Documentation Index
Fetch the complete documentation index at: https://docs.scanoss.com/llms.txt
Use this file to discover all available pages before exploring further.
What is SBOM Workbench?
SBOM Workbench is a graphical user interface (GUI) desktop application designed to scan and audit source code using the SCANOSS API. It provides an intuitive way to identify open source components in your projects, analyse license compliance, detect vulnerabilities, cryptography and generate comprehensive Software Bills of Materials (SBOMs).TL;DR: Complete Workflow
1. Scan Your Project- Open SBOM Workbench → New Project → select directory → configure settings → Continue
- Check metrics (matches, dependencies, vulnerabilities)
- Review components and match percentages
- Note Critical/High vulnerabilities or weak crypto
- Review component cards → review files
- Identify correct matches or Mark as Original
- Add notes and process dependencies (Accept/Dismiss)
- Confirm metrics and notes
- Verify identified components and decisions
- SPDX Lite – Legal compliance
- CycloneDX (with vulnerabilities) – Security teams
- CSV SBOM – Analysis/tracking
- HTML Summary – Reports
- scanoss.json – CI/CD automation
Installation
- Download the installer
- Select the appropriate installer for your platform:
- macOS:
.dmgfile - Windows:
.exeinstaller - Linux:
.AppImageor.debpackage
- macOS:
- Run the installer
Initial Configuration
- Open SBOM Workbench

- Go to File → Settings
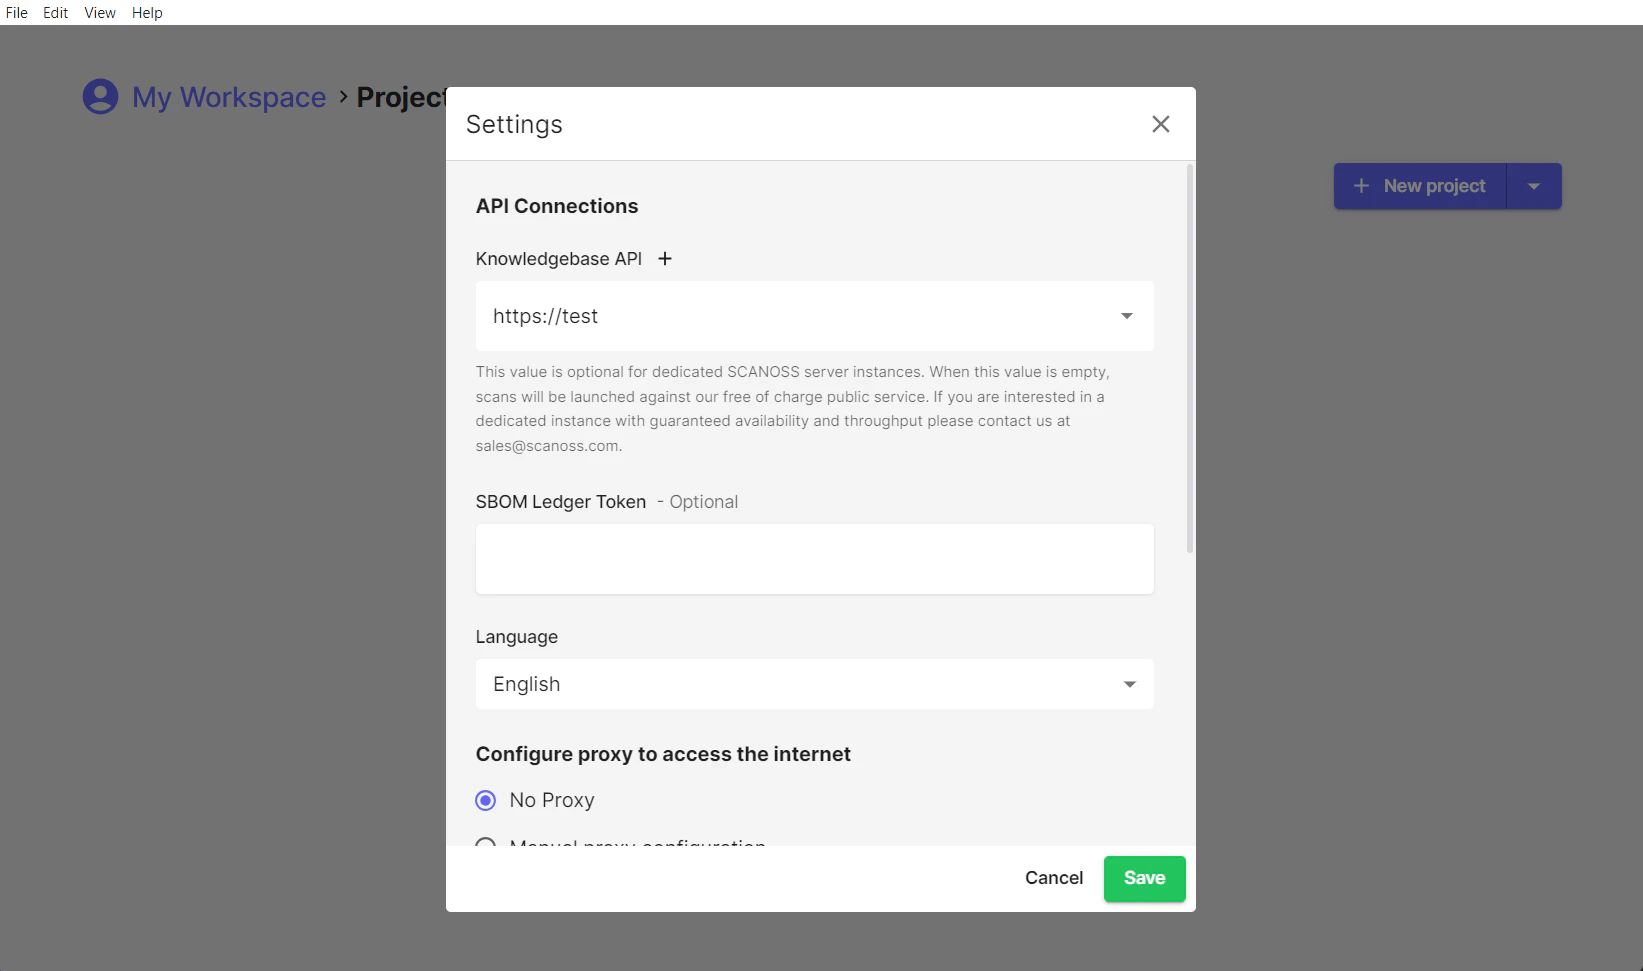
- Click the ”+” button after Knowledgebase API
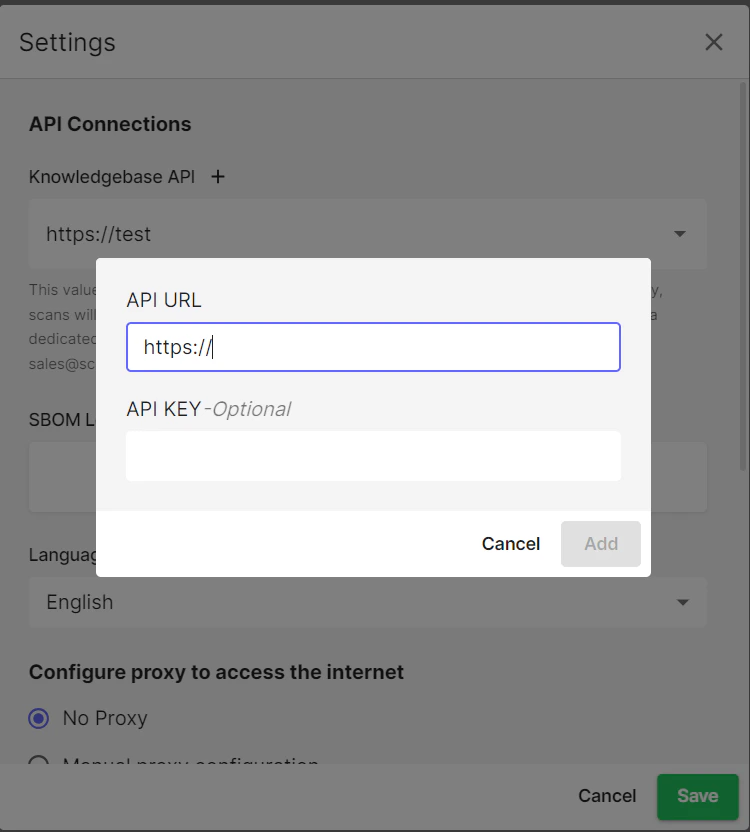
- Enter your API details (or keep defaults for free tier)
- Click Add → Save
Workspaces
Local Workspaces
By default, SBOM Workbench stores your projects in a local workspace on your machine. This is where your scan results, project configurations and identification decisions are saved.Shared Workspaces
SBOM Workbench supports shared workspaces, enabling teams to collaborate on projects from a common network location with centralised scan results and project configurations. Team members can work together with full read and write access, making identifications, adding notes and sharing decisions across the team.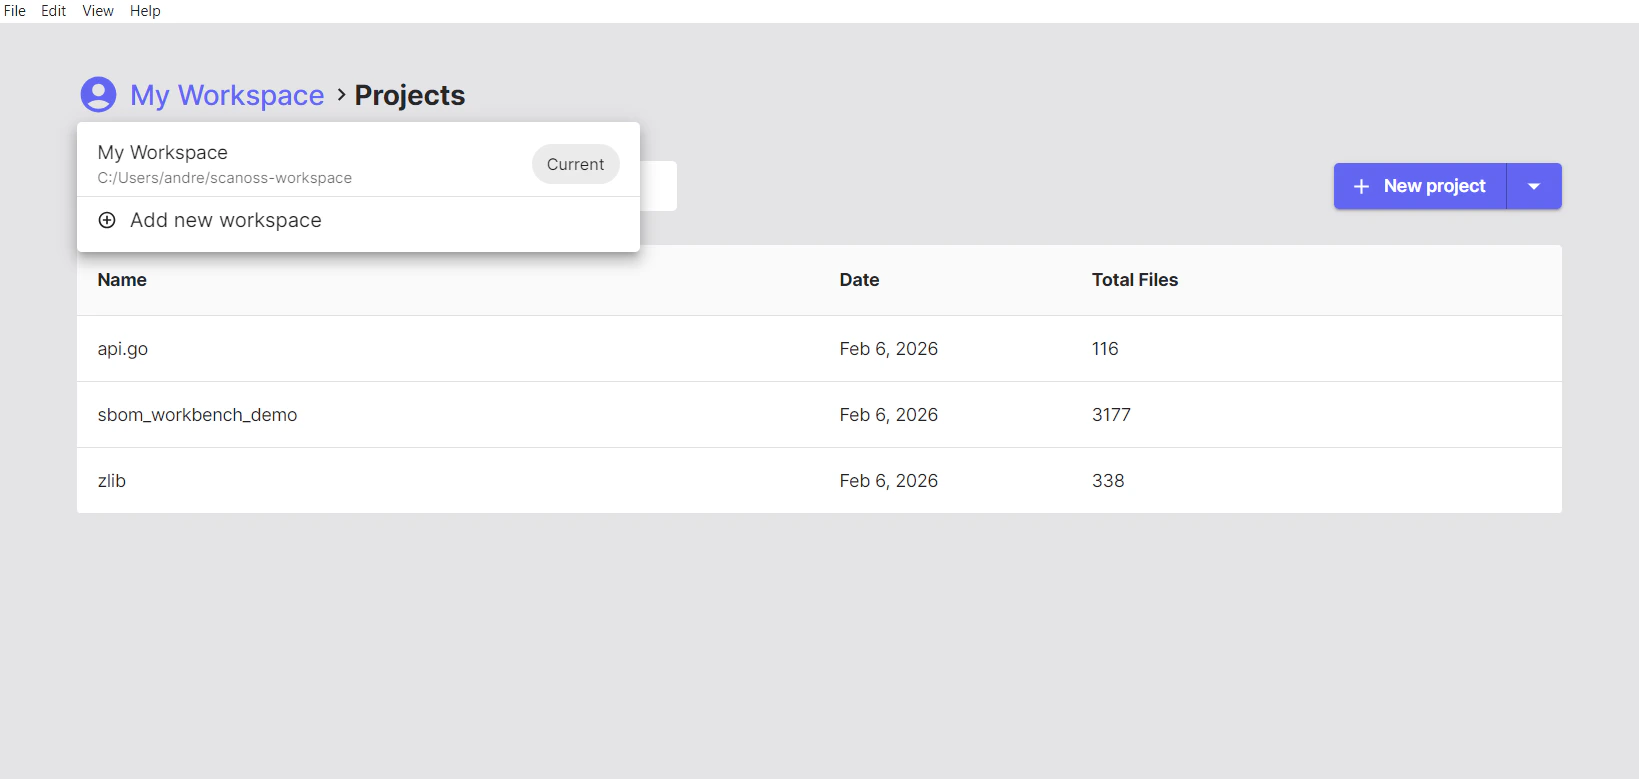
Setting Up Shared Workspaces
To set this up, create a shared folder using Samba on your system, configuring read/write permissions for team members. To access the shared workspace, mount the network share using your OS’s native file-sharing tools. Then, in SBOM Workbench, go to My Workspace → Add new workspace, browse to the shared folder, select the workspace directory, and click Add. The shared workspace will appear in your workspace list, letting you switch to it and access any projects stored there.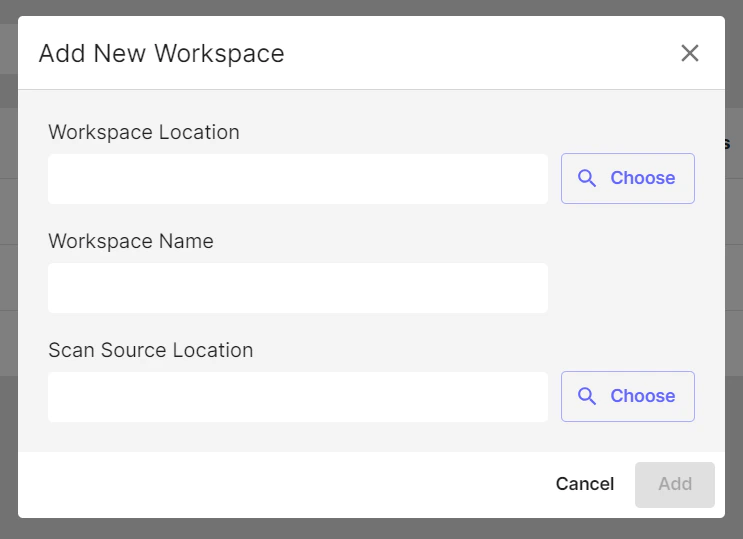
Multi-User Considerations and Access Control
Single-User Application Architecture
SBOM Workbench is a client-side desktop application. It is not designed for multiple users to access the same running instance simultaneously. Each user runs their own local installation of SBOM Workbench on their own machine. When using a shared workspace (e.g. over Samba), the recommended model is one user working on a given project at a time. Multiple users can share the same workspace and work on different projects concurrently, but two users should not open and modify the same project simultaneously, as this may lead to conflicts or data corruption.Project-Level Access Control
SBOM Workbench does not include built-in user authentication or project-level permission controls. Access management must be handled at the file system level. If you need to restrict which users can access specific projects, use your network file system’s permission settings. For example, on a Samba server you can configure directory-level ACLs so that a given user only has access to the project folders assigned to them:- User A is granted read/write access to
workspace/project-a/only - User B is granted read/write access to
workspace/project-b/only - Neither user can browse or open the other’s project directory
SBOM Workbench has no built-in login system, controlling access to sensitive project data is the responsibility of the administrator configuring the underlying file system or network share.
Scanning Your Project
Getting Started
Once you’ve configured SBOM Workbench, you’re ready to scan your first project. On the right-hand side, you’ll find the option to scan a New Project. You can either click it directly or use the dropdown arrow to choose from the following options: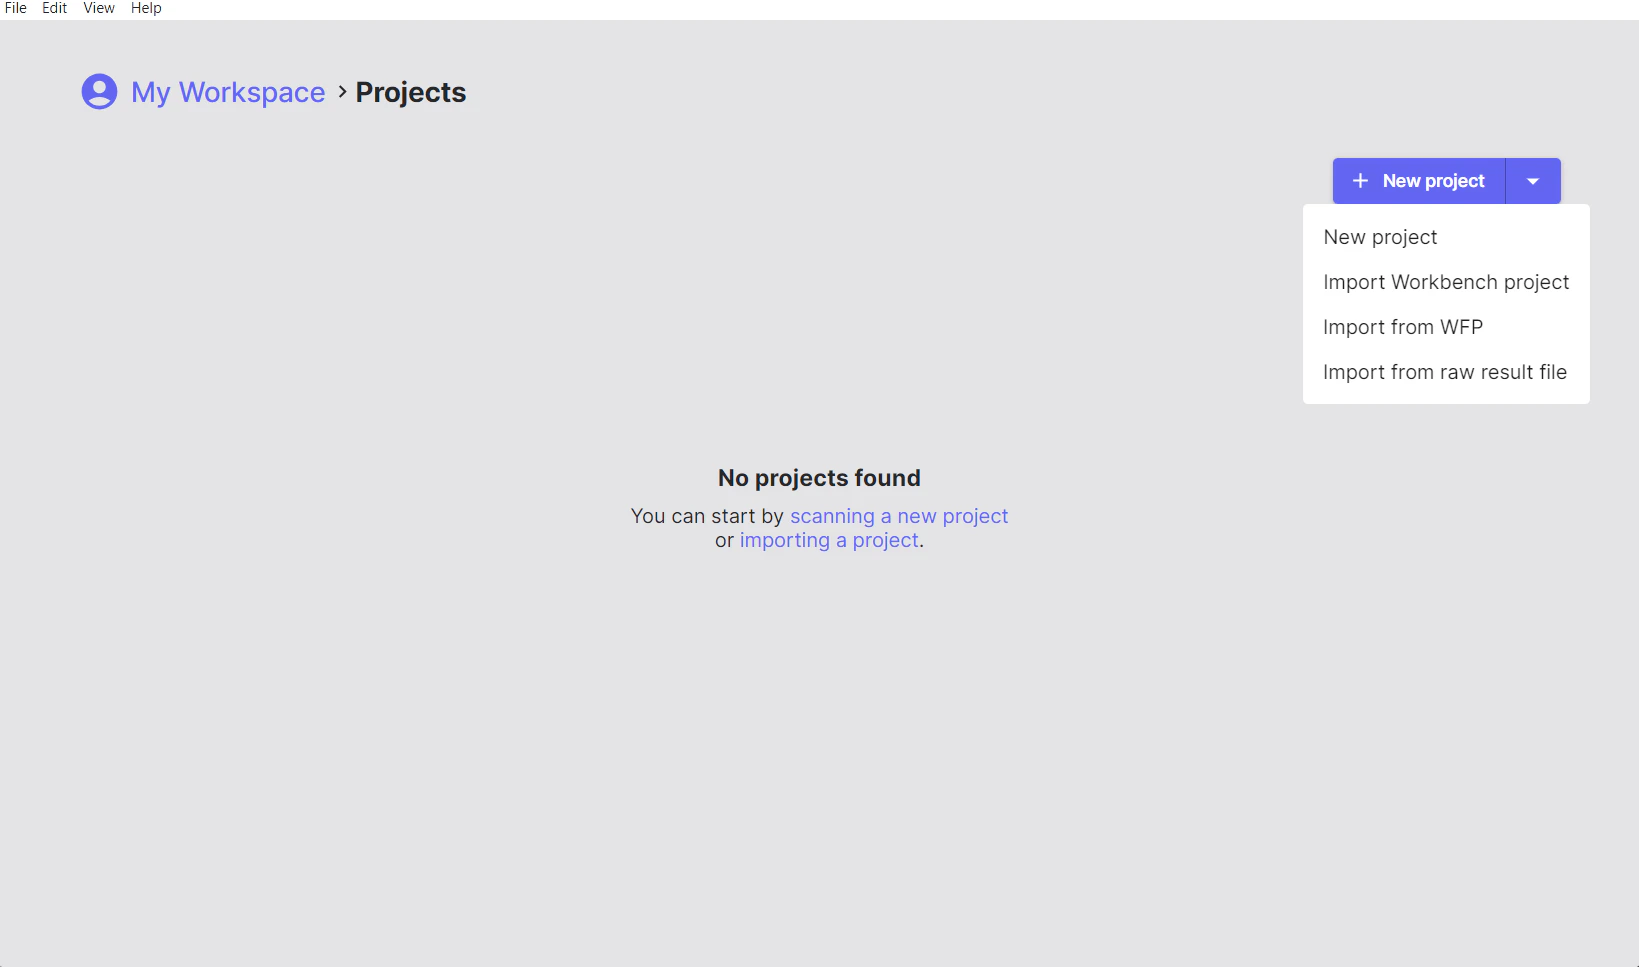
Project Options
- New Project: Select the directory of the project you want to scan.
- Import Workbench Project: Load a previously scanned project saved as a
.zipfile. - Import from WFP: Import a Winnowing FingerPrint
.wfpfile. - Import from raw result file: Load the output from a previous scan saved as a
.jsonfile.
Scanning Your First Project
- Click New Project and select the root folder of your source code project.
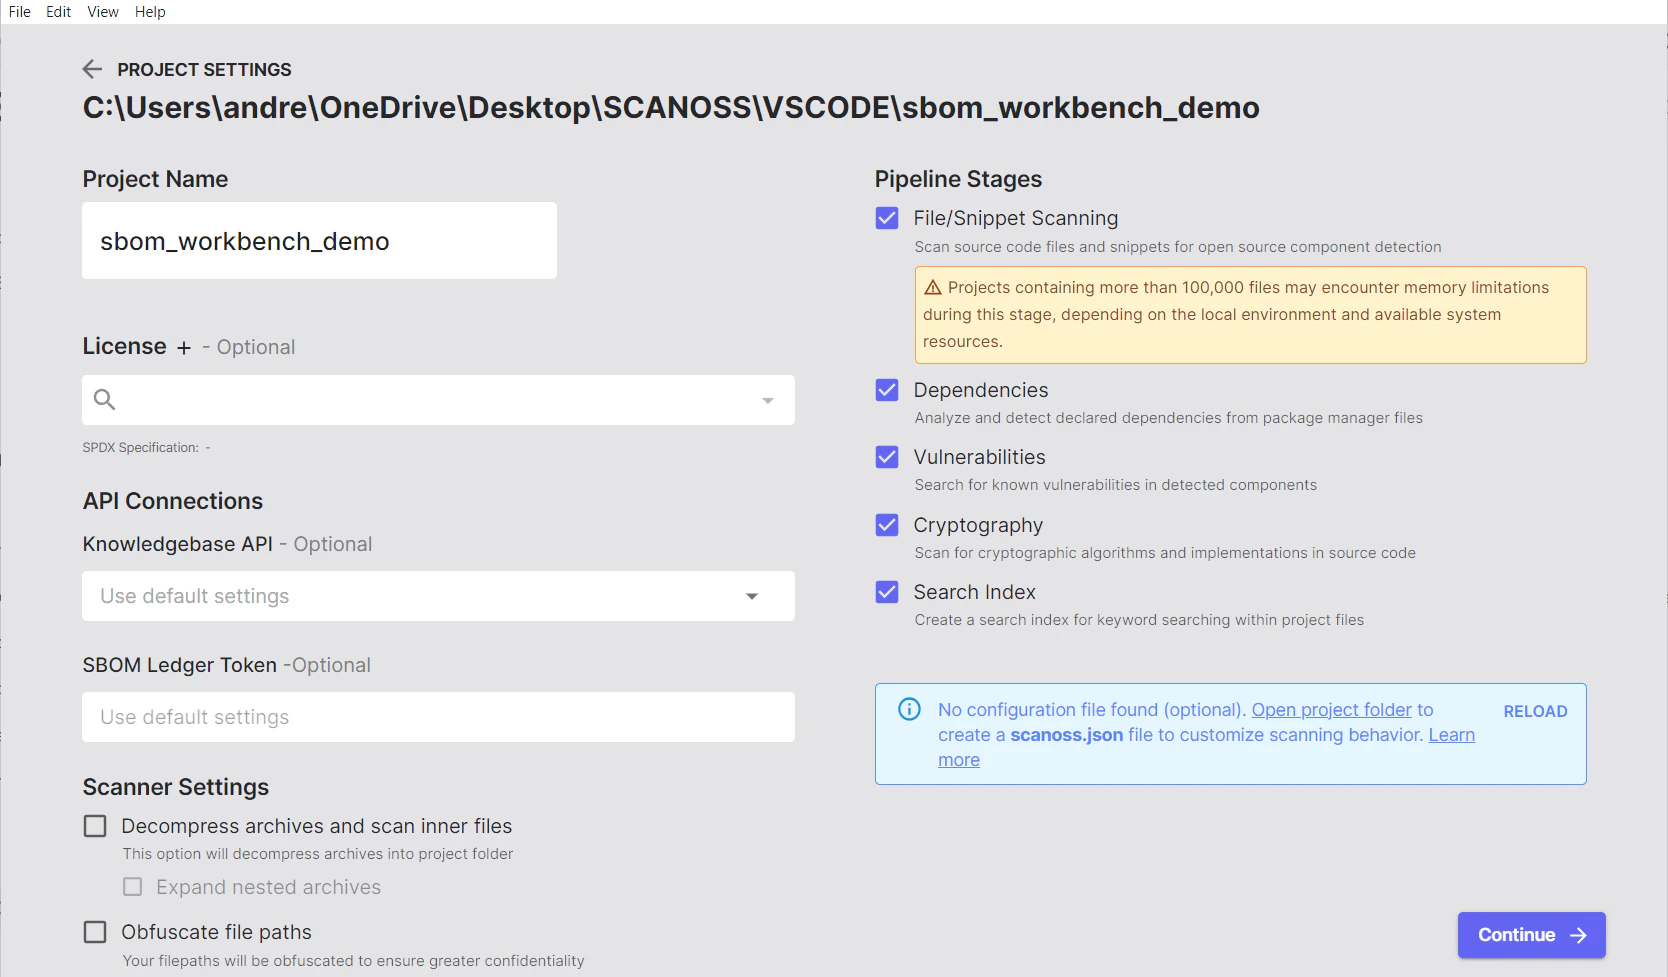
- After selecting your project, adjust the scan configuration as needed:
- Give your project a descriptive, meaningful name
- Set the default license for your project, if applicable
- Configure your SCANOSS API access
- Integrate with SBOM Ledger for advanced tracking, if required
- Decompress Archives and Scan Inner Files
- Unpack Nested Archives
- Obfuscate File Paths
- Enable HPSM (High Precision Snippet Matching)
- Include All File Types
Understanding the Scanning Process
When you select your project folder, SBOM Workbench automatically analyses your files through a few steps. It first filters out unnecessary items like build folders, binaries, empty files and common metadata, keeping only the files that matter. Enable Include All File Types in the scan settings to bypass this filter and scan every file regardless of extension.Fingerprinting
Next, it creates unique digital “fingerprints” of your source code using a proven technique called Winnowing. These fingerprints are securely compared against the SCANOSS database, which contains data from millions of open-source projects. This allows SBOM Workbench to recognise even small pieces of reused code.Analysis
In parallel, the tool checks for cryptography use, parses dependency manifest files and identifies any known vulnerabilities.Results
When the scan is complete, SBOM Workbench generates a detailed report that shows matched components, licenses, vulnerabilities, and dependencies. Everything is stored locally in your workspace and can be exported in multiple formats, including SPDX, CycloneDX, CSV, or HTML.Archive Format Support
SBOM Workbench supports scanning compressed and archived files, automatically decompressing them during the scan process.Understanding Your Scan Results
The Reports Tab Overview
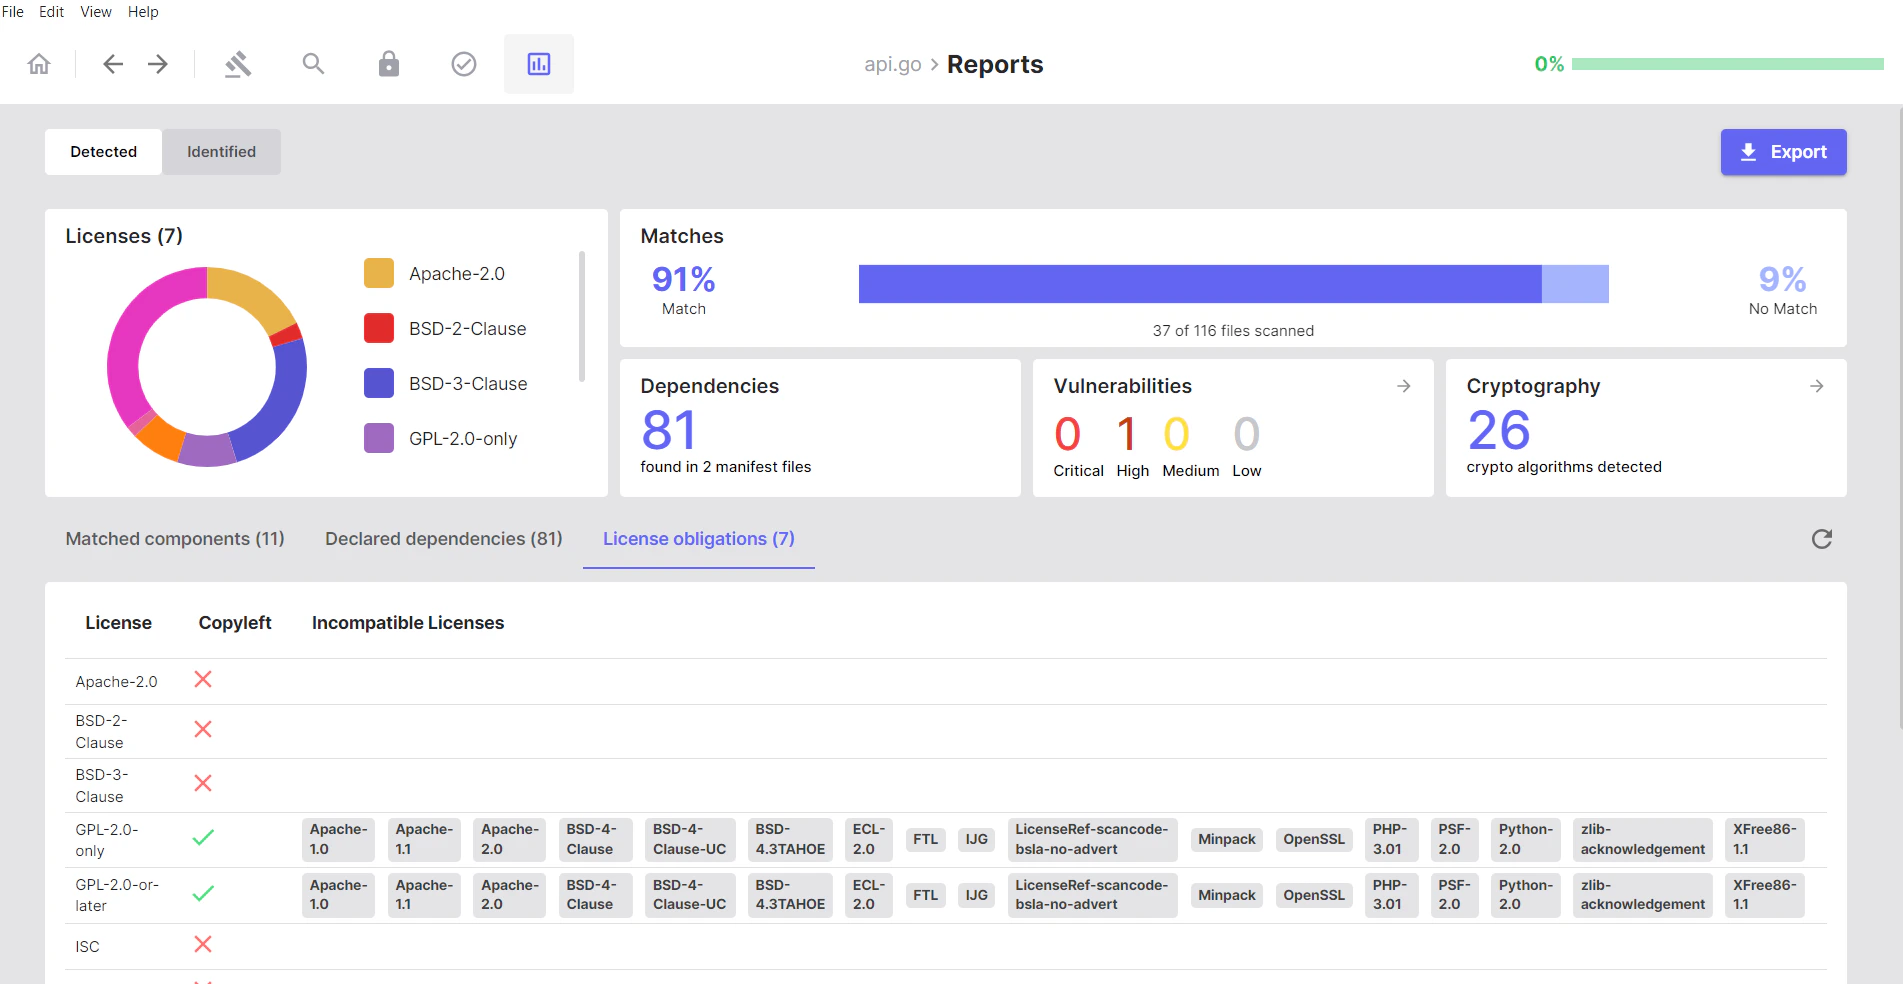
After scanning your project in SBOM Workbench, the Reports tab provides comprehensive analysis and insights into your scan results. The Reports section is divided into two main tabs: Detected and Identified, each offering different perspectives on your project’s composition.Detected Tab: Raw Scan Results
- What it shows: Raw, unmodified results from the SCANOSS API
- When to use: Initial review of scan results before any manual auditing
- Key characteristic: No user actions have been taken on these matches
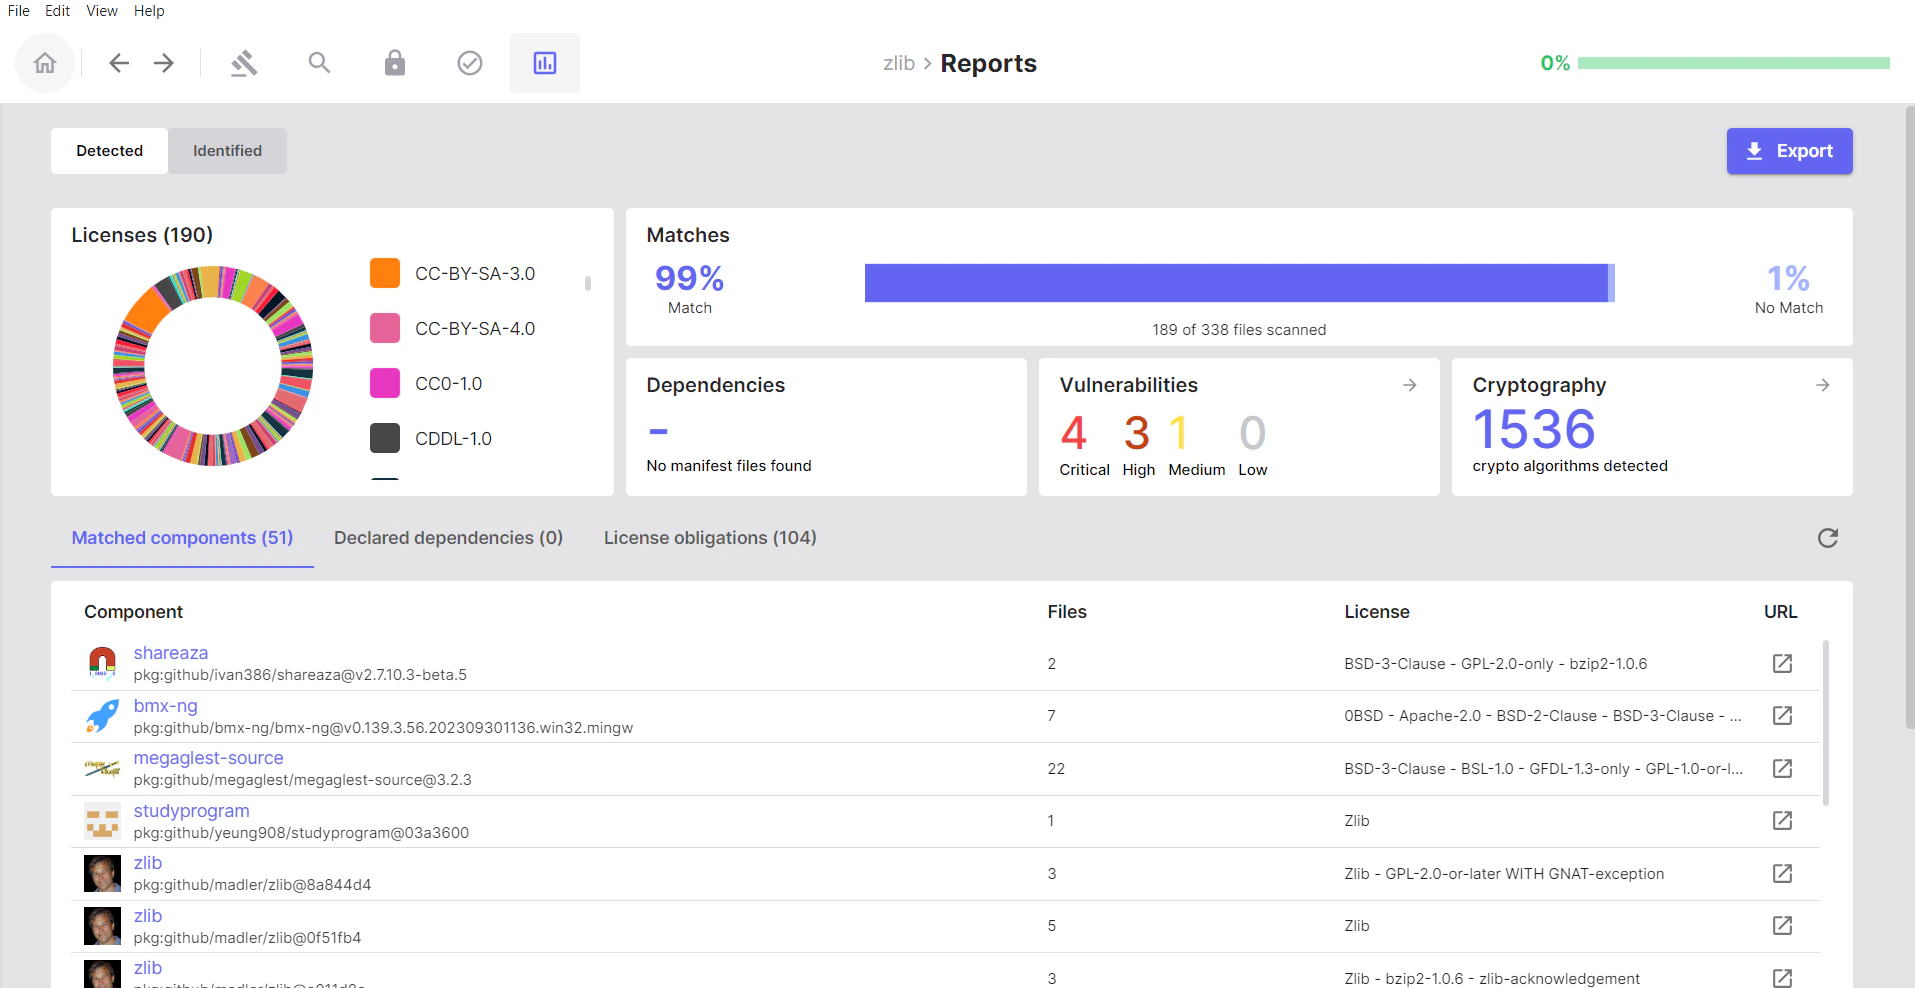
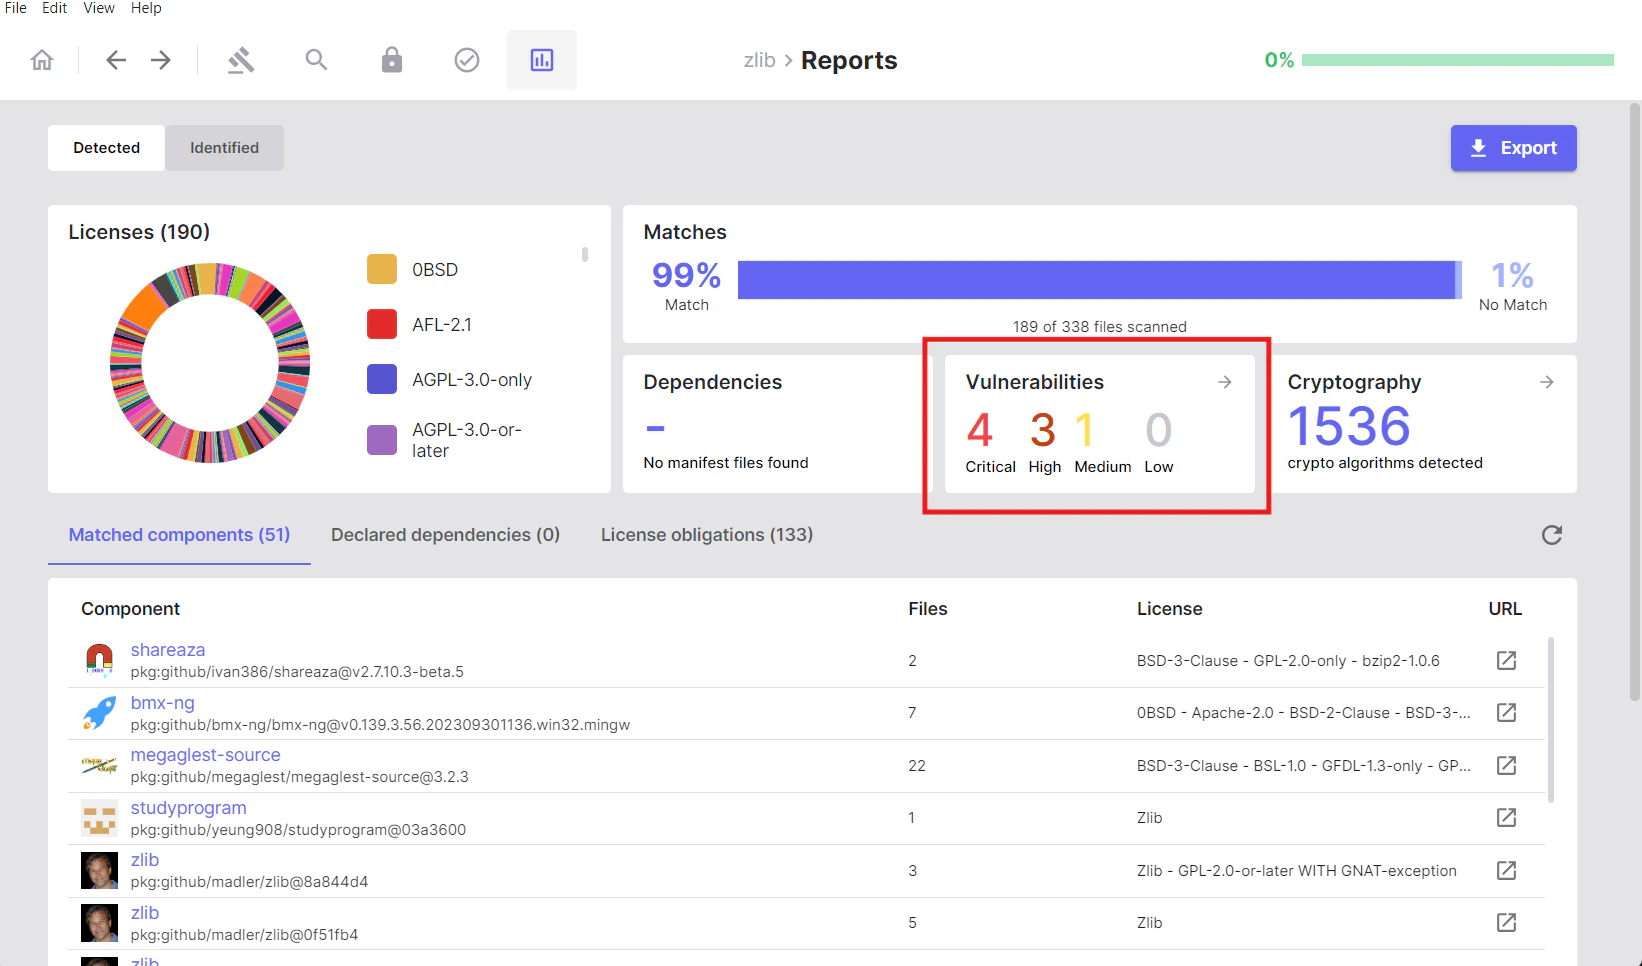
Summary Metrics
At the top of the Detected tab, you’ll see a summary bar with key metrics:- Matches: Number of your project files that matched components in the SCANOSS database
- Dependencies: Count of dependencies found in manifest files (
package.json,pom.xml, etc.) - Vulnerabilities: Total number of known security vulnerabilities detected across all matched components
- Cryptography: Cryptographic algorithms and patterns detected by analysing your source code
- Licenses: Summary of all licenses detected across your matched components
Matched Components
Open source components that the SCANOSS engine identified in your codebase.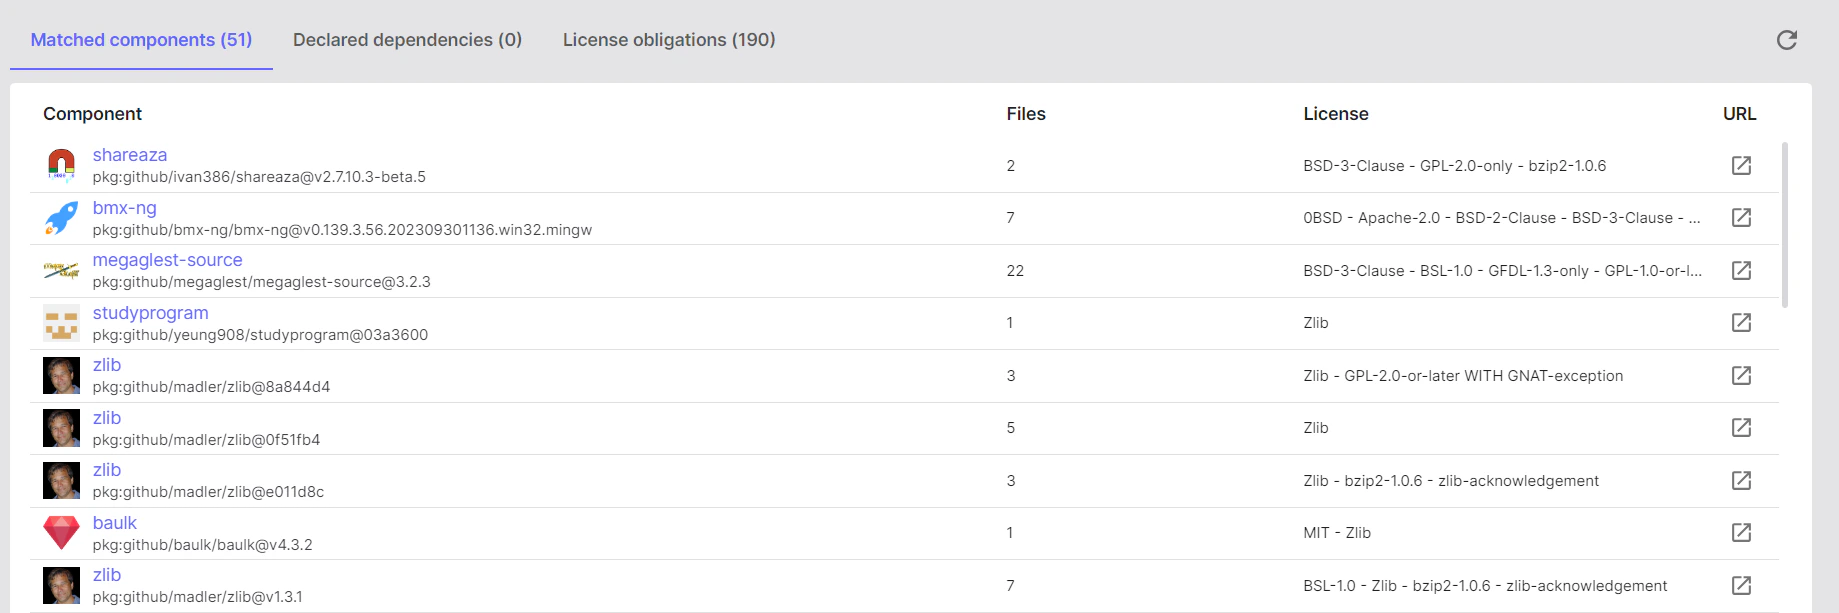
- Click on a component to see which files matched it
- Click on any of the files to review the match percentages in order to understand the extent of usage
- Decide on the match, choose to Identify the component or Mark as Original if it’s your own code

- If you click Identify, a dialog will appear prompting you to enter the component details
- After identifying or marking your first component as original, repeat the process for the remaining components
Declared Dependencies
All dependencies listed in your project’s manifest files.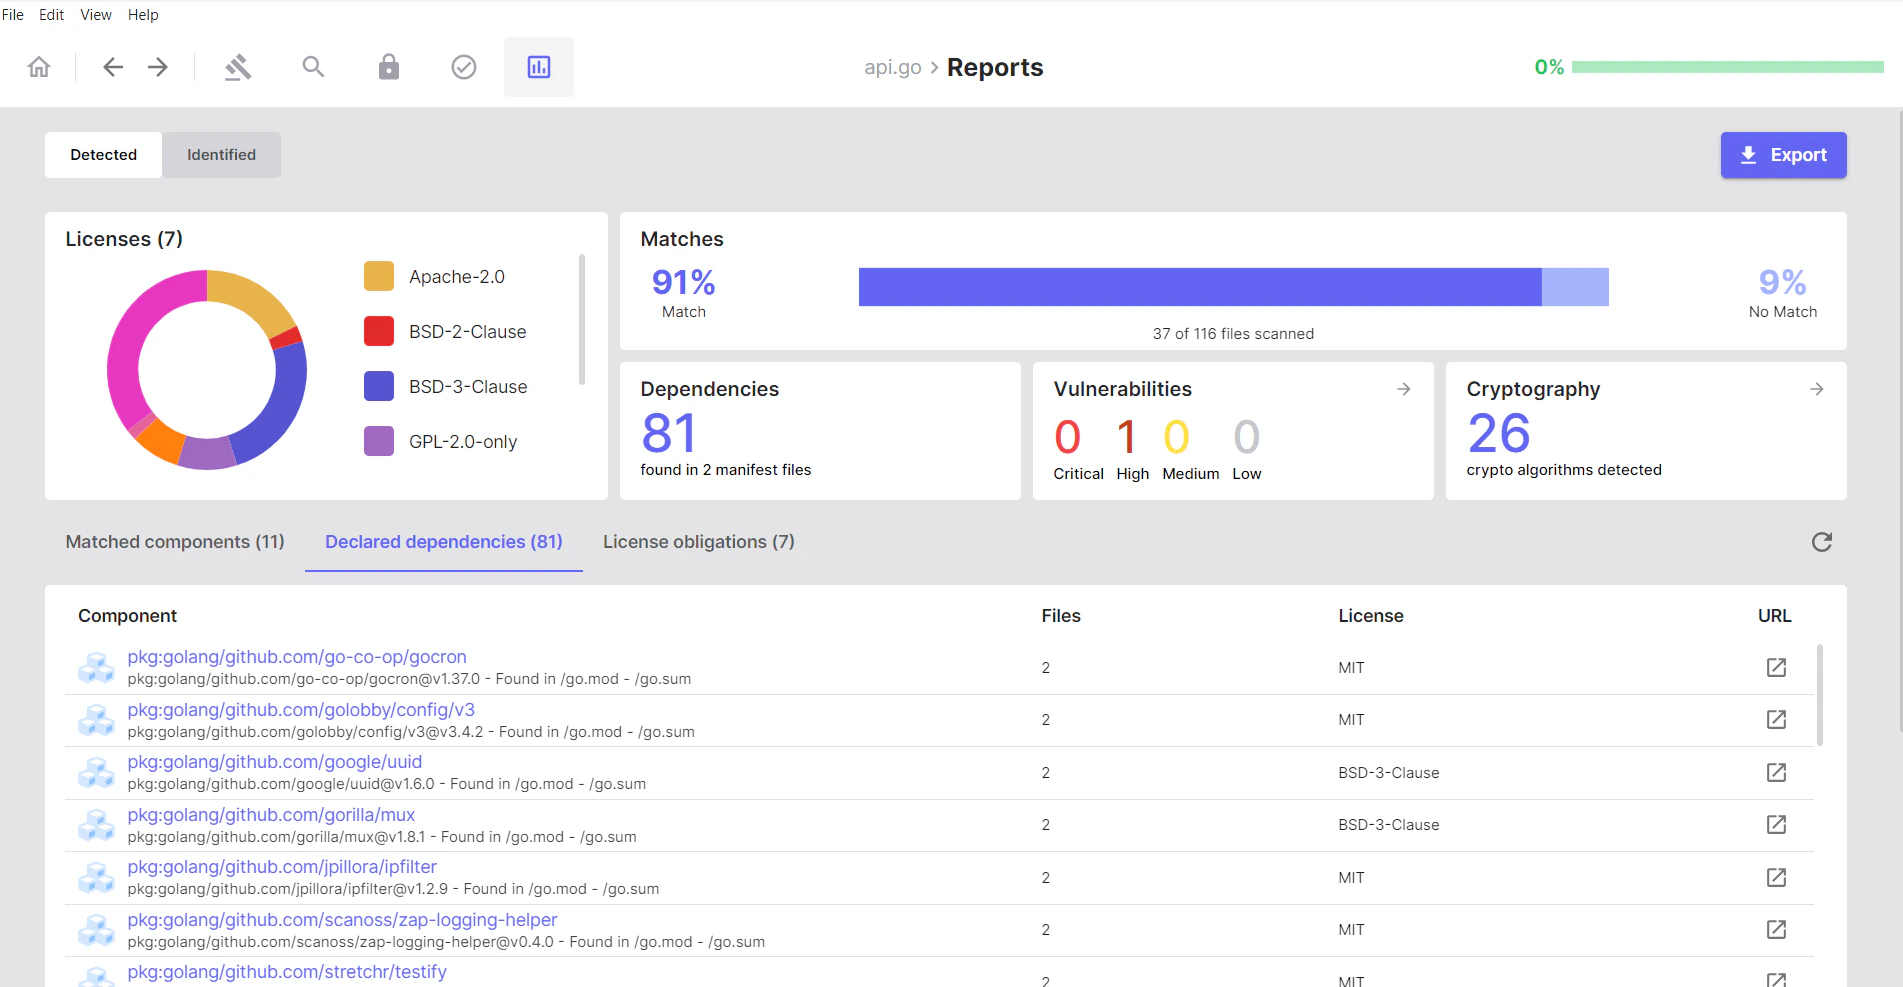
- Click a dependency to view its details and any related matches

- Open a dependency to see the associated package information
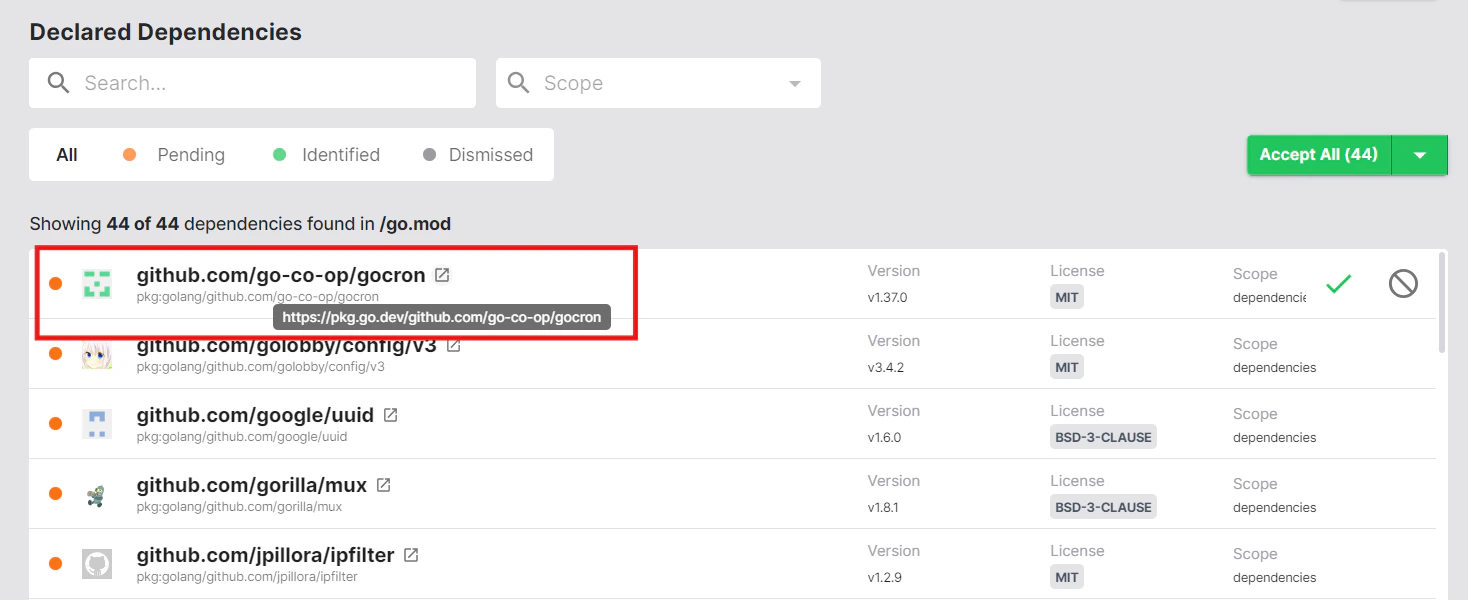
- Make a decision on each dependency by hovering over it on the right-hand side and choosing Accept or Dismiss

Vulnerabilities
The Vulnerabilities section provides a security-focused view of known vulnerabilities (CVEs) detected in your matched components and dependencies. This section helps you identify and prioritise security risks in your software supply chain. Vulnerabilities are categorised by severity:- Critical
- High
- Medium
- Low
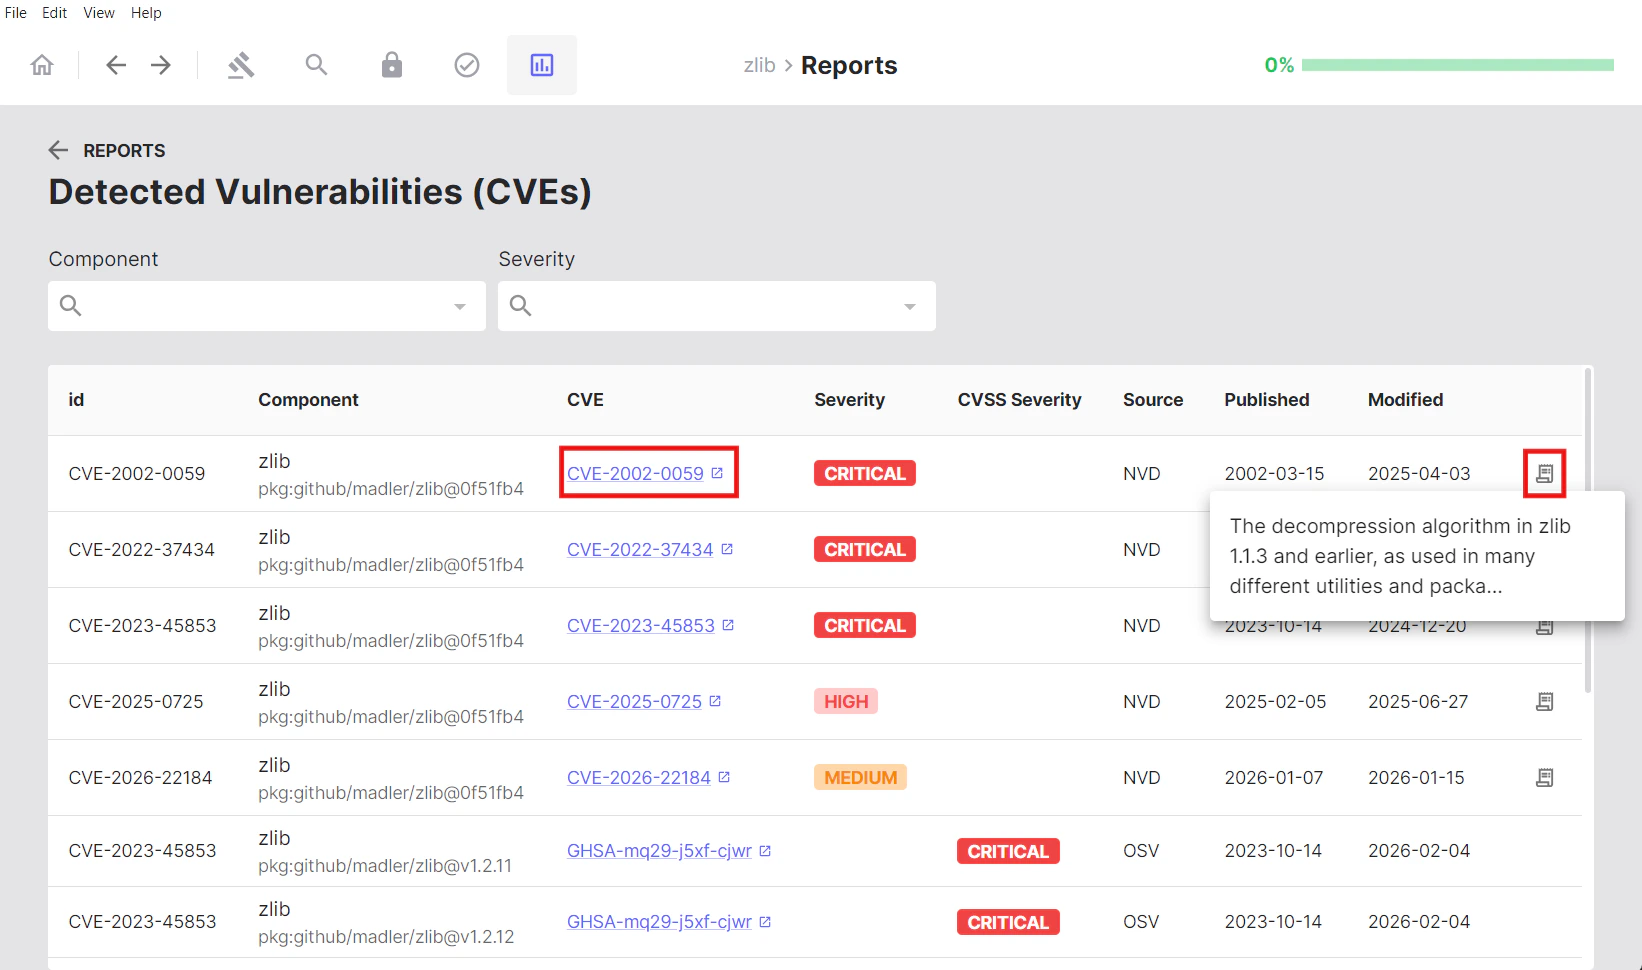
Viewing Vulnerability Details
Clicking into the Vulnerabilities tab reveals a comprehensive table with detailed information for each detected vulnerability:| Column | Description |
|---|---|
| ID | Package URL identifier |
| Component | The affected component name |
| CVE | Common Vulnerabilities and Exposures identifier |
| Severity | Risk level classification (Critical, High, Medium, Low) |
| CVSS | Common Vulnerability Scoring System score and severity rating |
| Source | Vulnerability database source (e.g., “NVD” - National Vulnerability Database) |
| Published | Date the vulnerability was first disclosed |
| Modified | Date the vulnerability information was last updated |
Cryptography
This section displays the total count of cryptographic algorithms detected across your entire project.
Local Cryptography
Shows cryptographic algorithms detected by analysing your source code files locally. This represents crypto usage in your own codebase.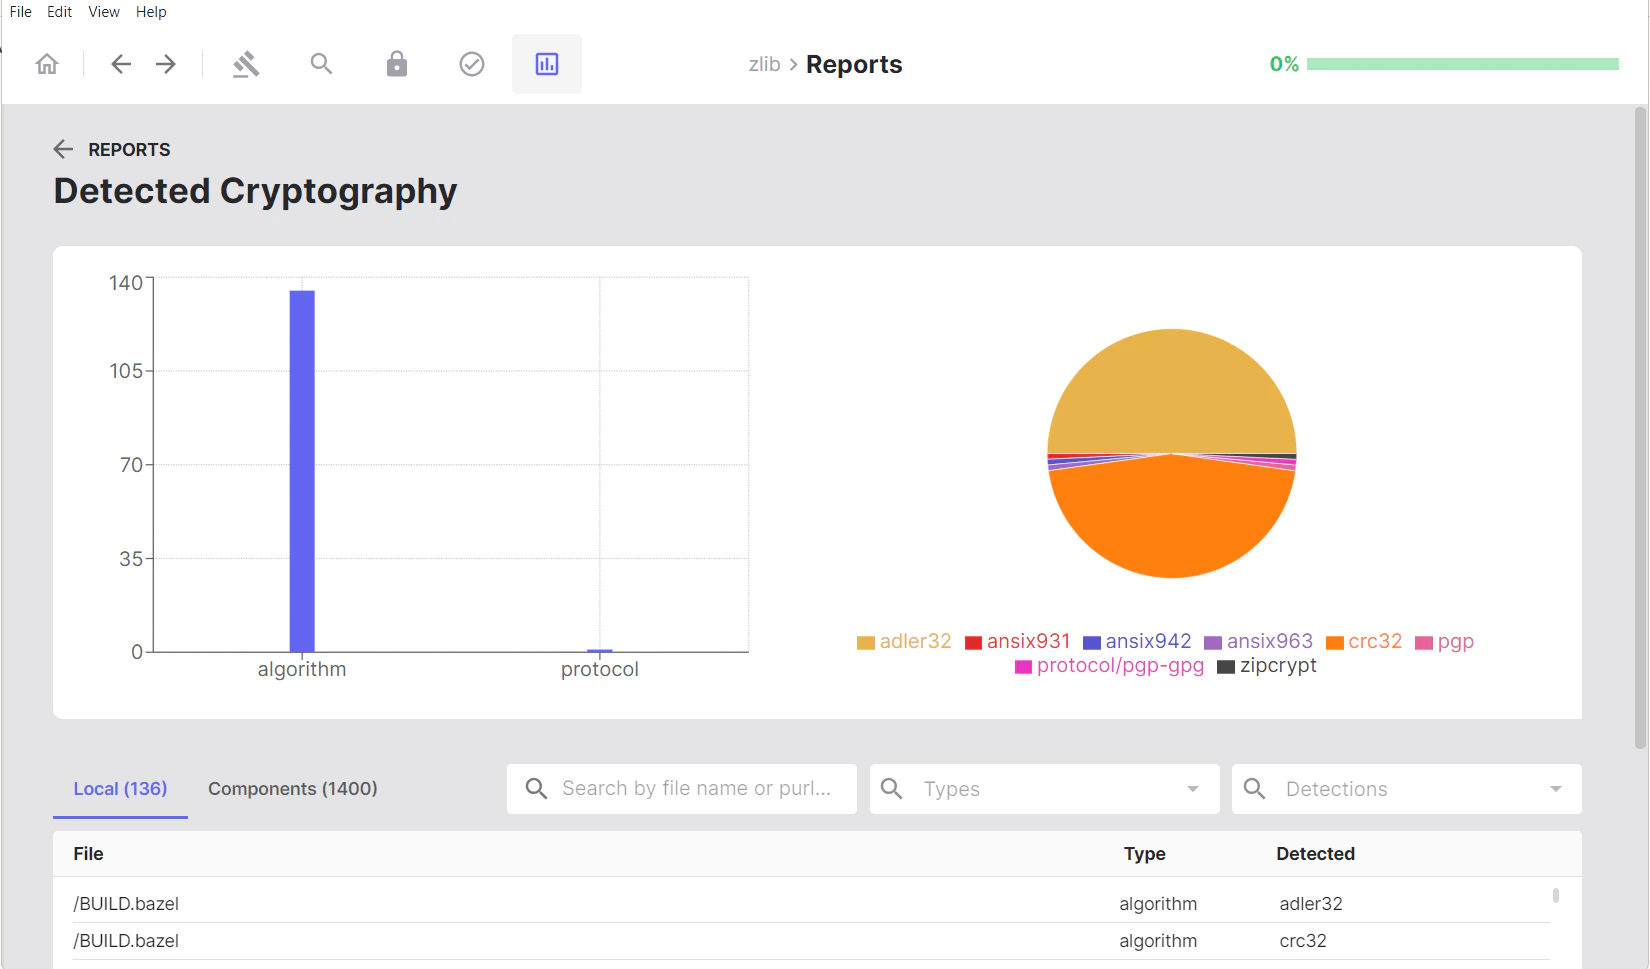
Components Cryptography
Shows cryptographic algorithms found in matched components and dependencies. This represents crypto capabilities provided by third-party libraries and components in your project.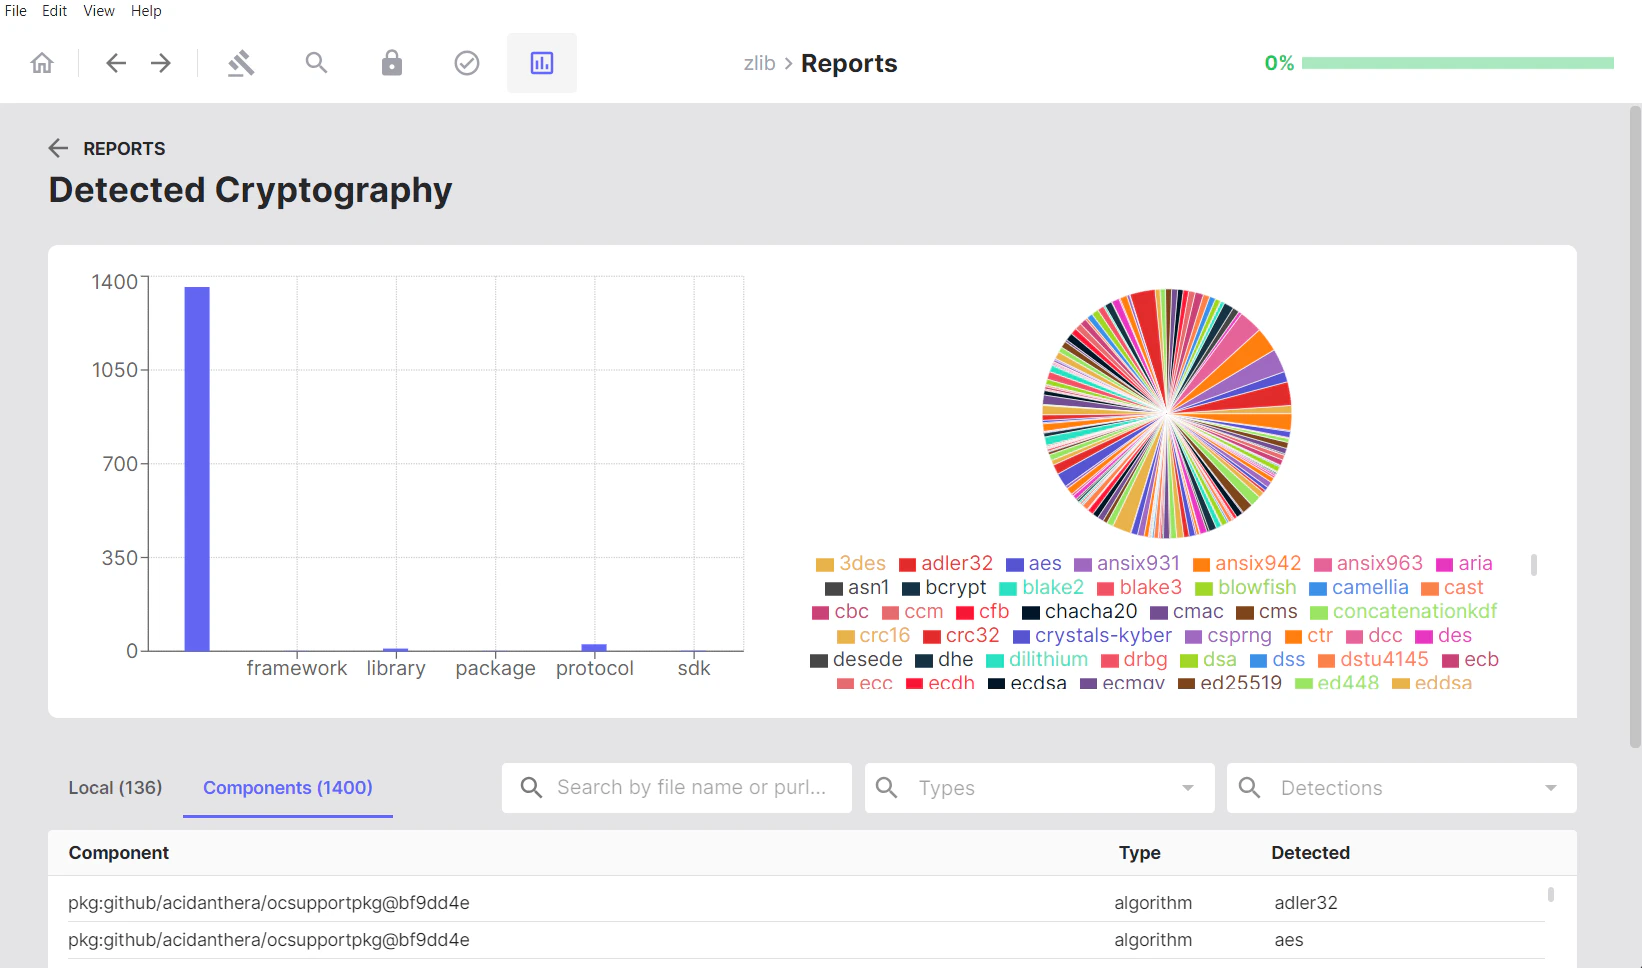
Visual Analytics
Visual analytics include:- Bar chart: Shows detections by type
- Pie chart: Illustrates the proportion of each detected algorithm, offering a view of cryptographic diversity
Viewing Crypto in Files
In the Local tab, clicking on either the file name or the detected algorithm opens the Cryptography Search page, where you can view the source code containing that cryptographic algorithm highlighted for easier review.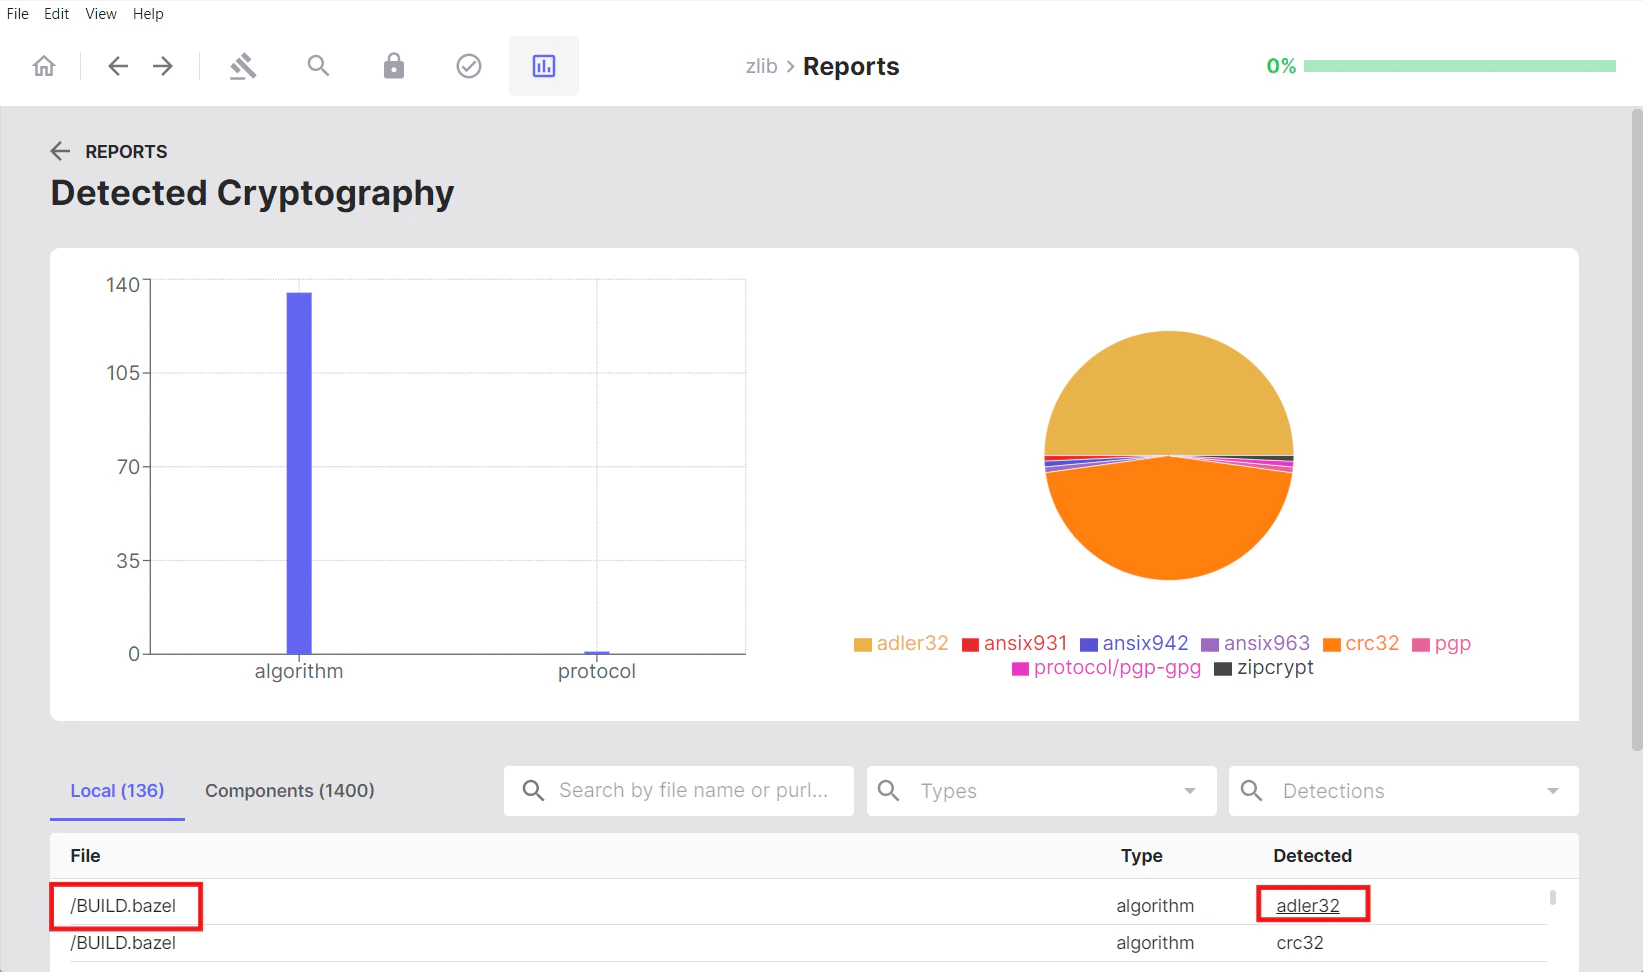
Licenses
When viewing the Licenses section in the Reports tab, clicking on a specific license filters the matched components list to show only components associated with that license, making it easy to review all components under a particular licensing term.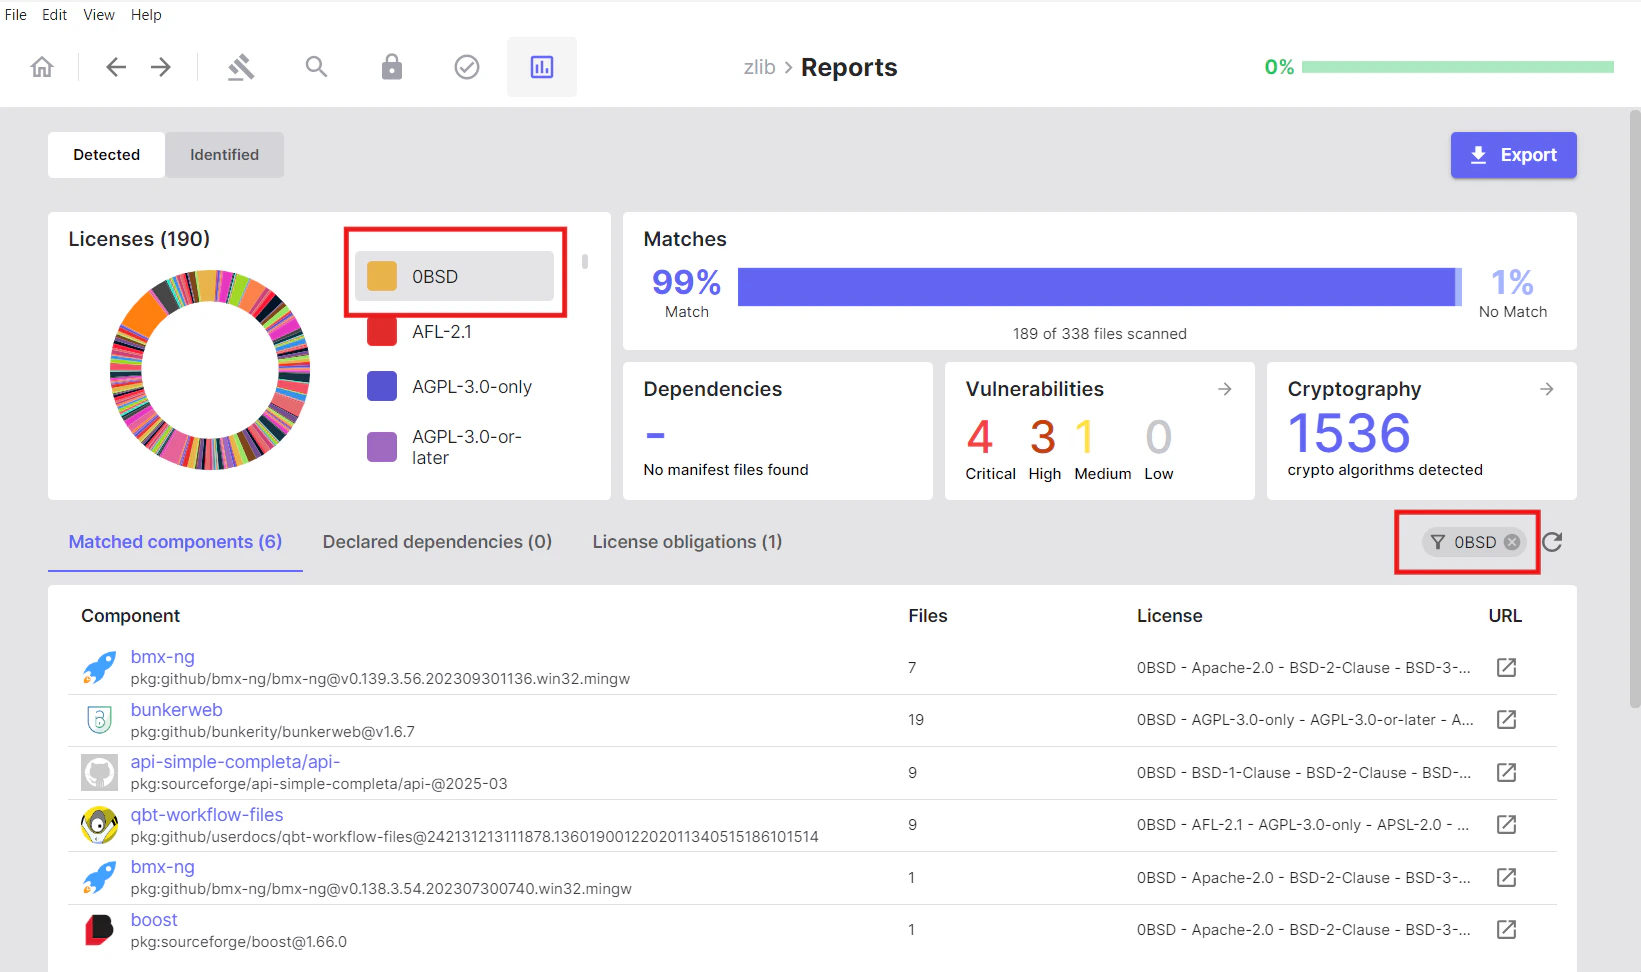
License Obligations
Use this section to view any licenses that may conflict with your project’s licensing strategy. SBOM Workbench analyses your project’s license landscape and identifies:- Incompatible license combinations
- License conflicts
- Copyleft implications
Identified Tab: Your Audited Results
- What it shows: Components you have explicitly reviewed and confirmed
- When to use: After auditing to see your curated, approved results
- Key characteristic: Only displays components where you’ve taken identification actions
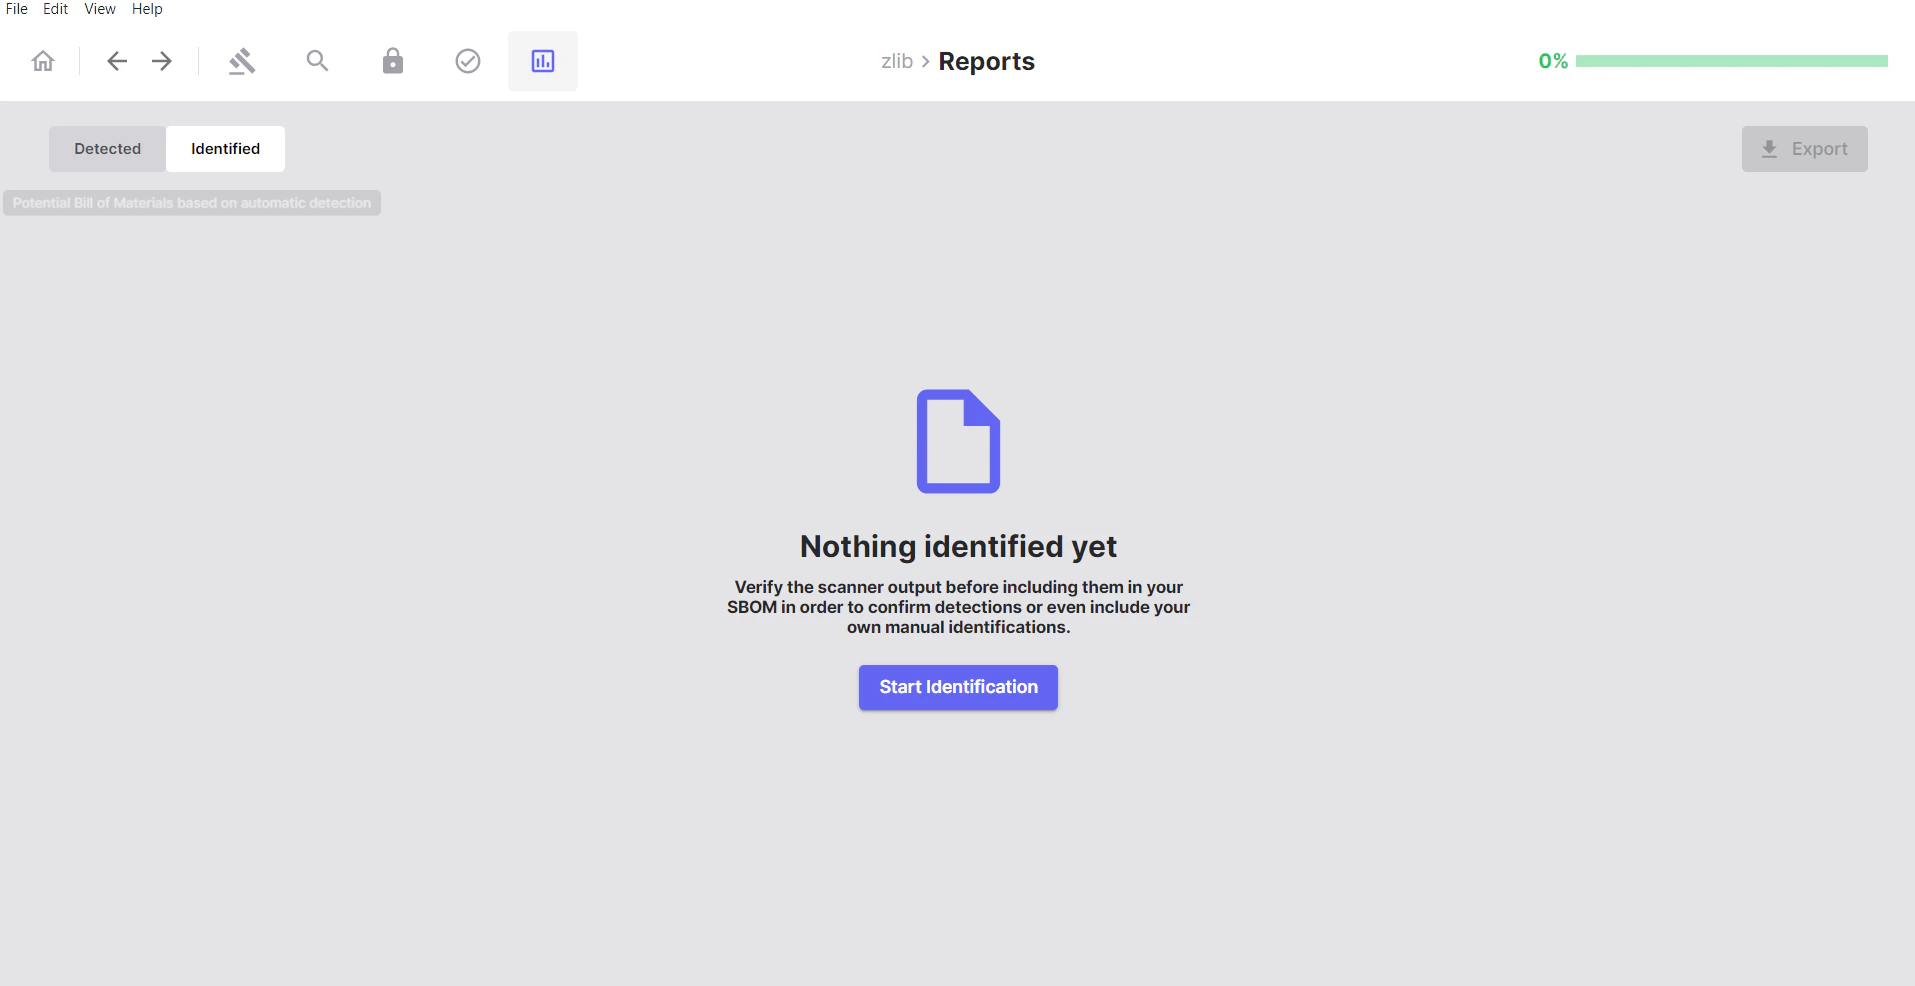
Note: Initially, the Identified tab will be empty until you start reviewing and accepting matches from the Detected tab.
What You’ll See After Identification
Once you have started identifying your components and dependencies, the Identified tab will populate with your verified results: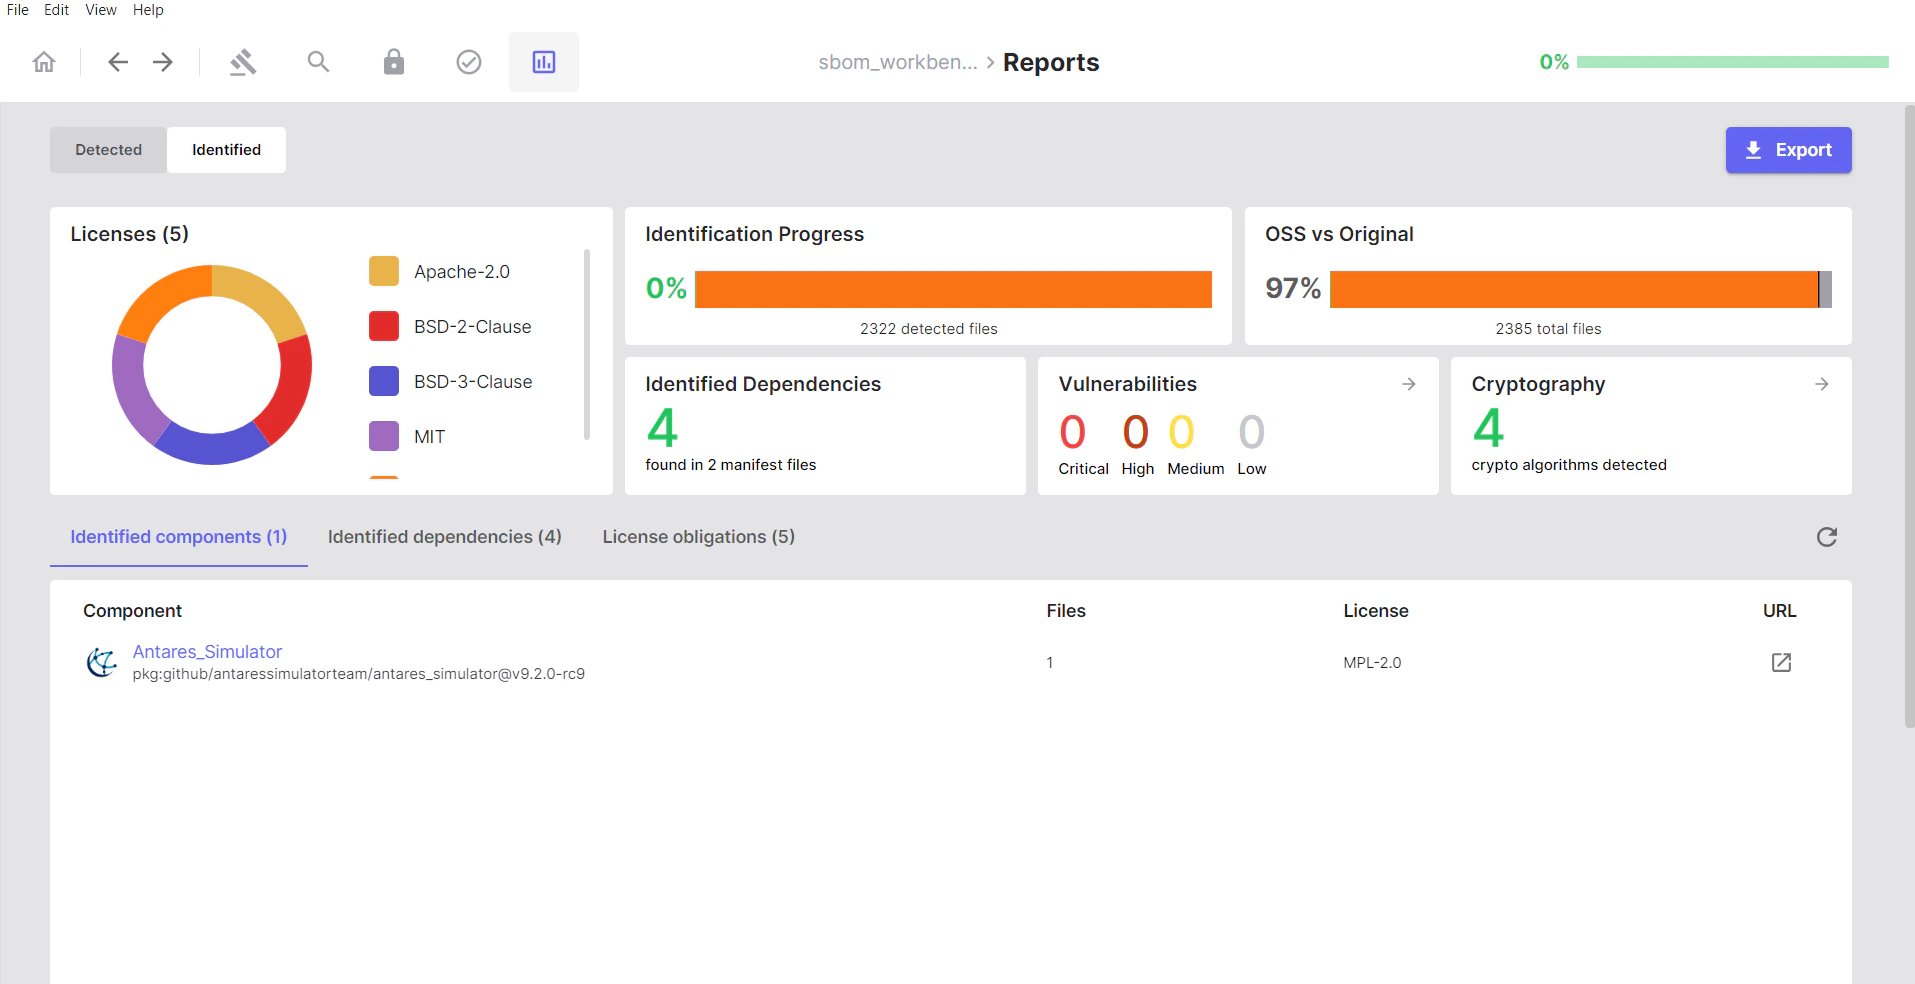
Auditing Your Project
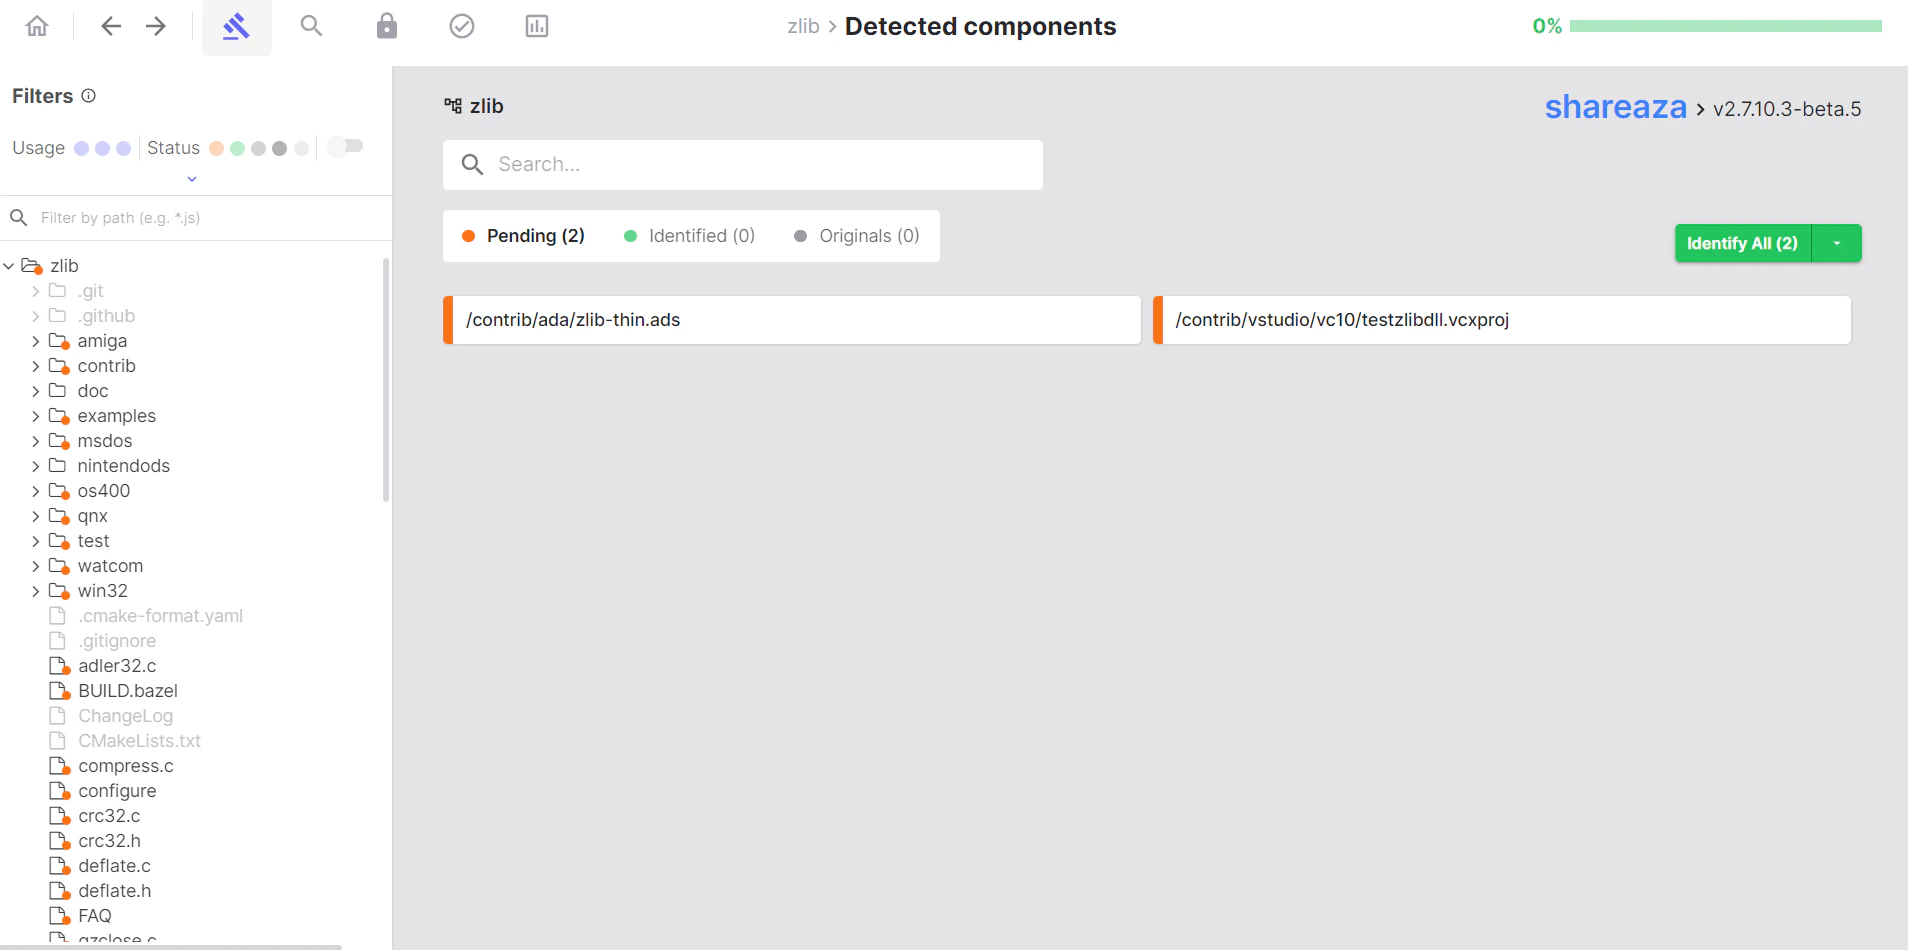
Working with Detected Components
The Detected Components tab is where you review and interact with the component matches found during your scan. This is the primary interface for auditing your scan results and making identification decisions.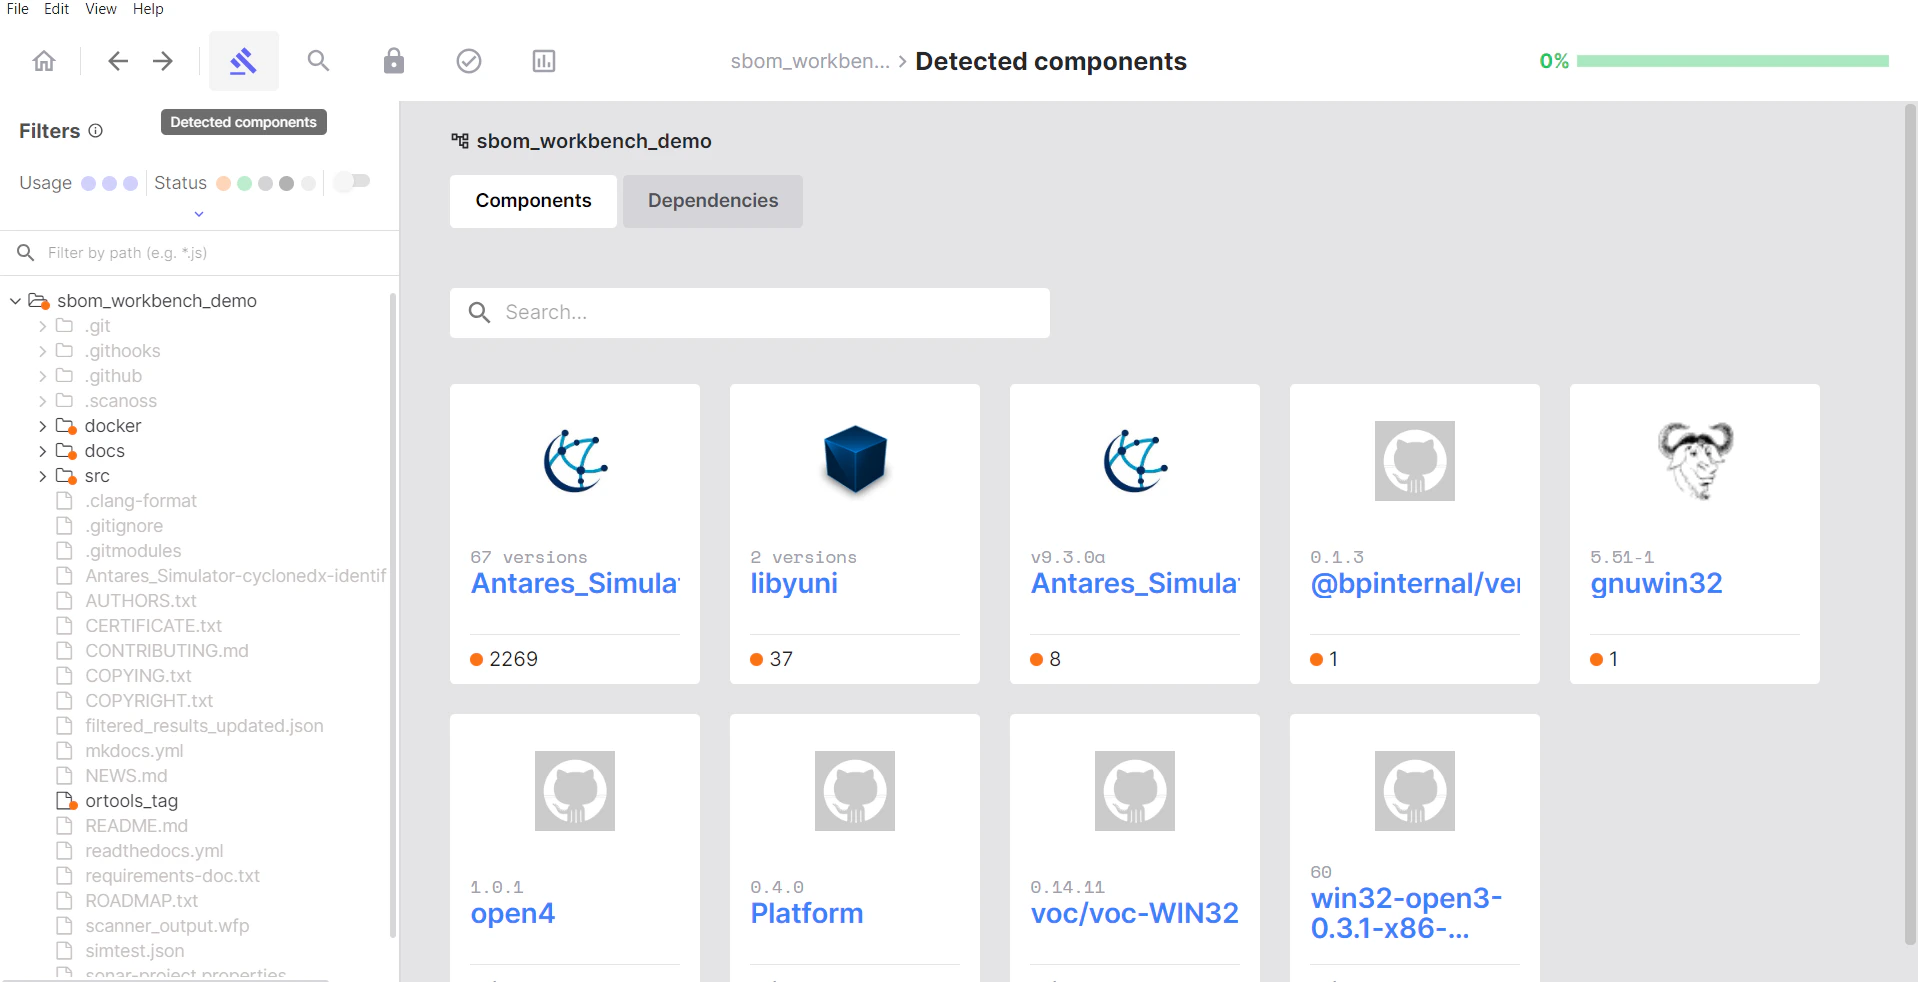
Understanding the Interface
File Status Indicators
The files in your project tree are displayed on the left with visual indicators to help you navigate and filter the results: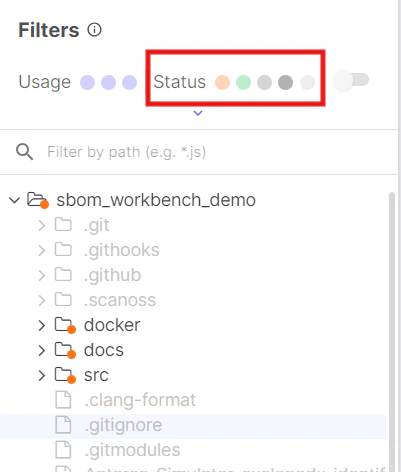
- Pending: Files match the SCANOSS database (pending review)
- Identified: Identified files (you’ve accepted these)
- Original: Original files (you’ve marked these as your own code)
- No Match: Scanned files but no match was found
- Ignored: Filtered files and NOT scanned
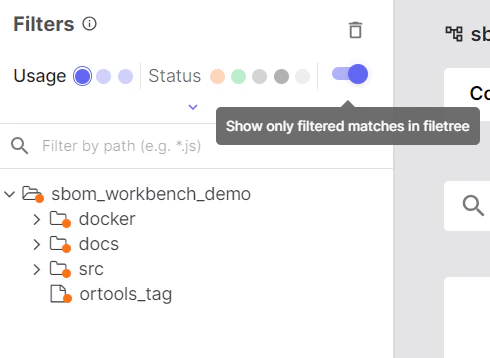
Filters
Use filters to focus your audit workflow: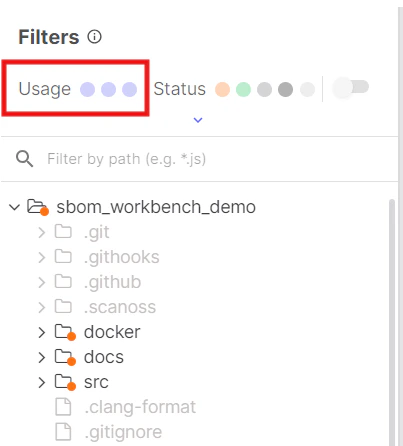
- File: Show results based on full file matches (100% matches)
- Snippet: Show results based on snippet matches (<100% matches)
- Dependency: Show results based on project dependencies
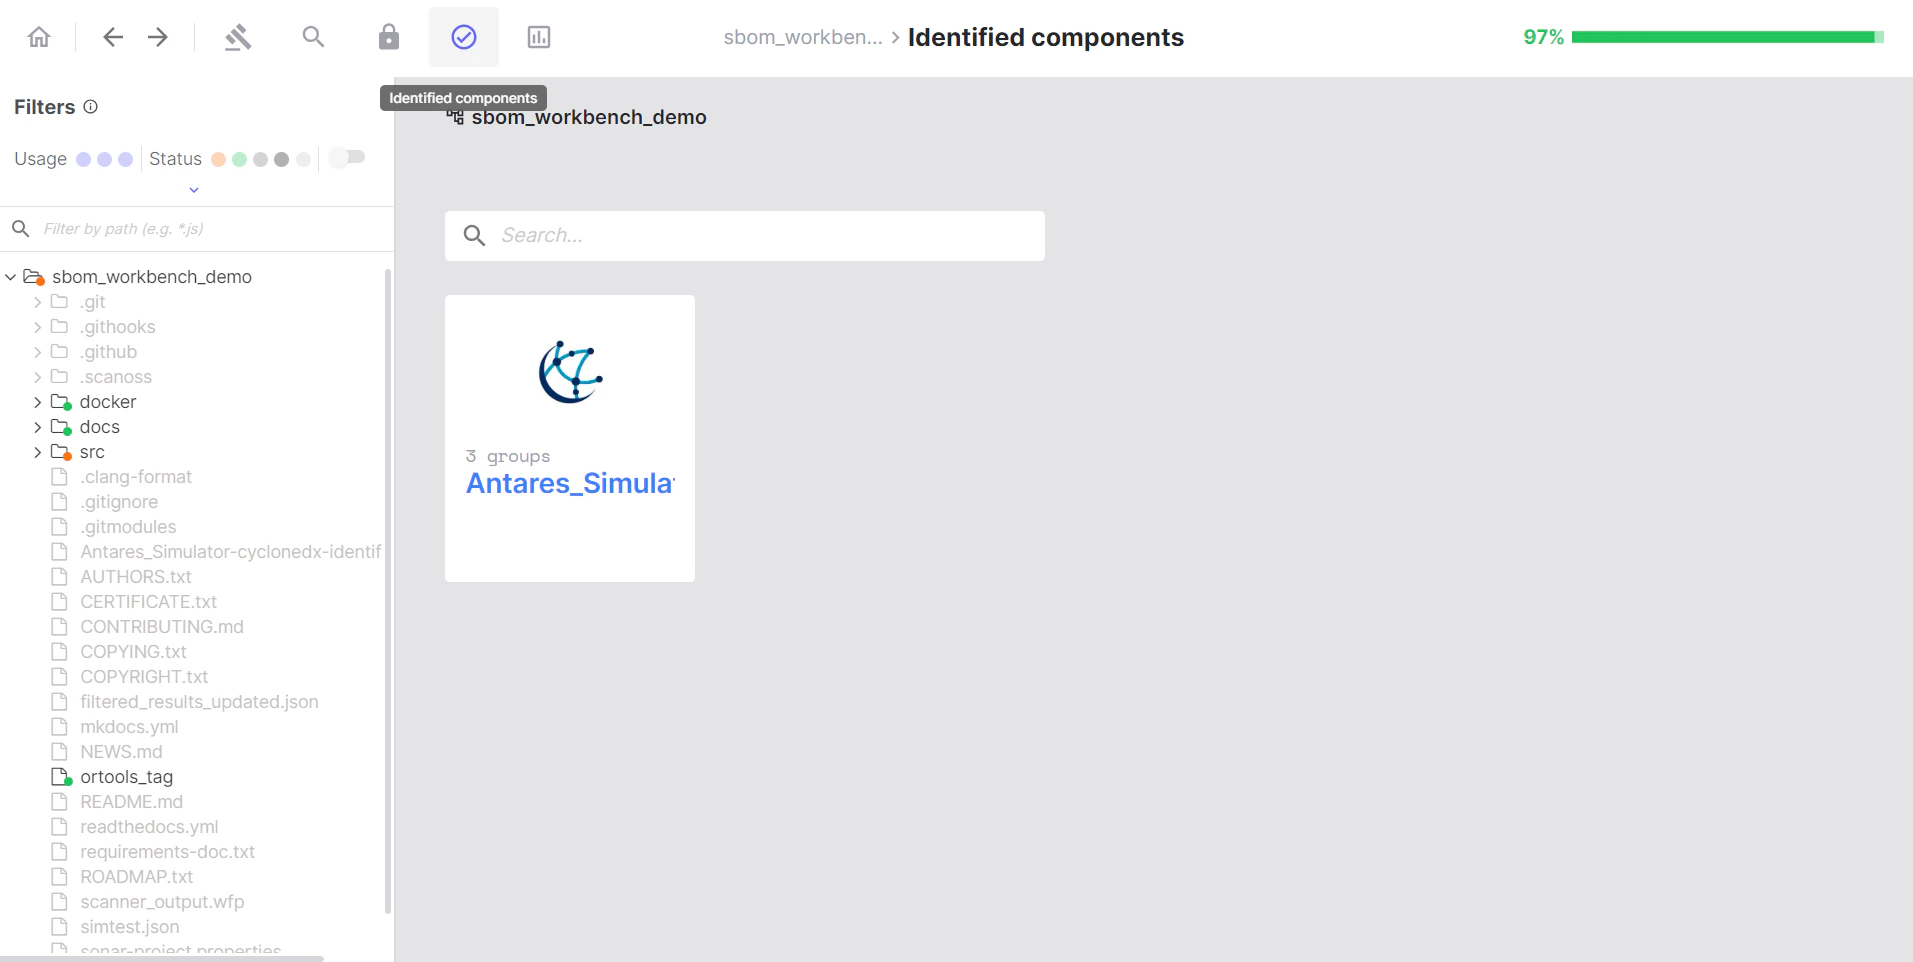
Component Cards
Component cards are the grouped visual containers in the file tree that organise files by their matched component.
- A single open source component that was detected
- All files in your project that matched that component
- A way to review and take action on multiple files at once
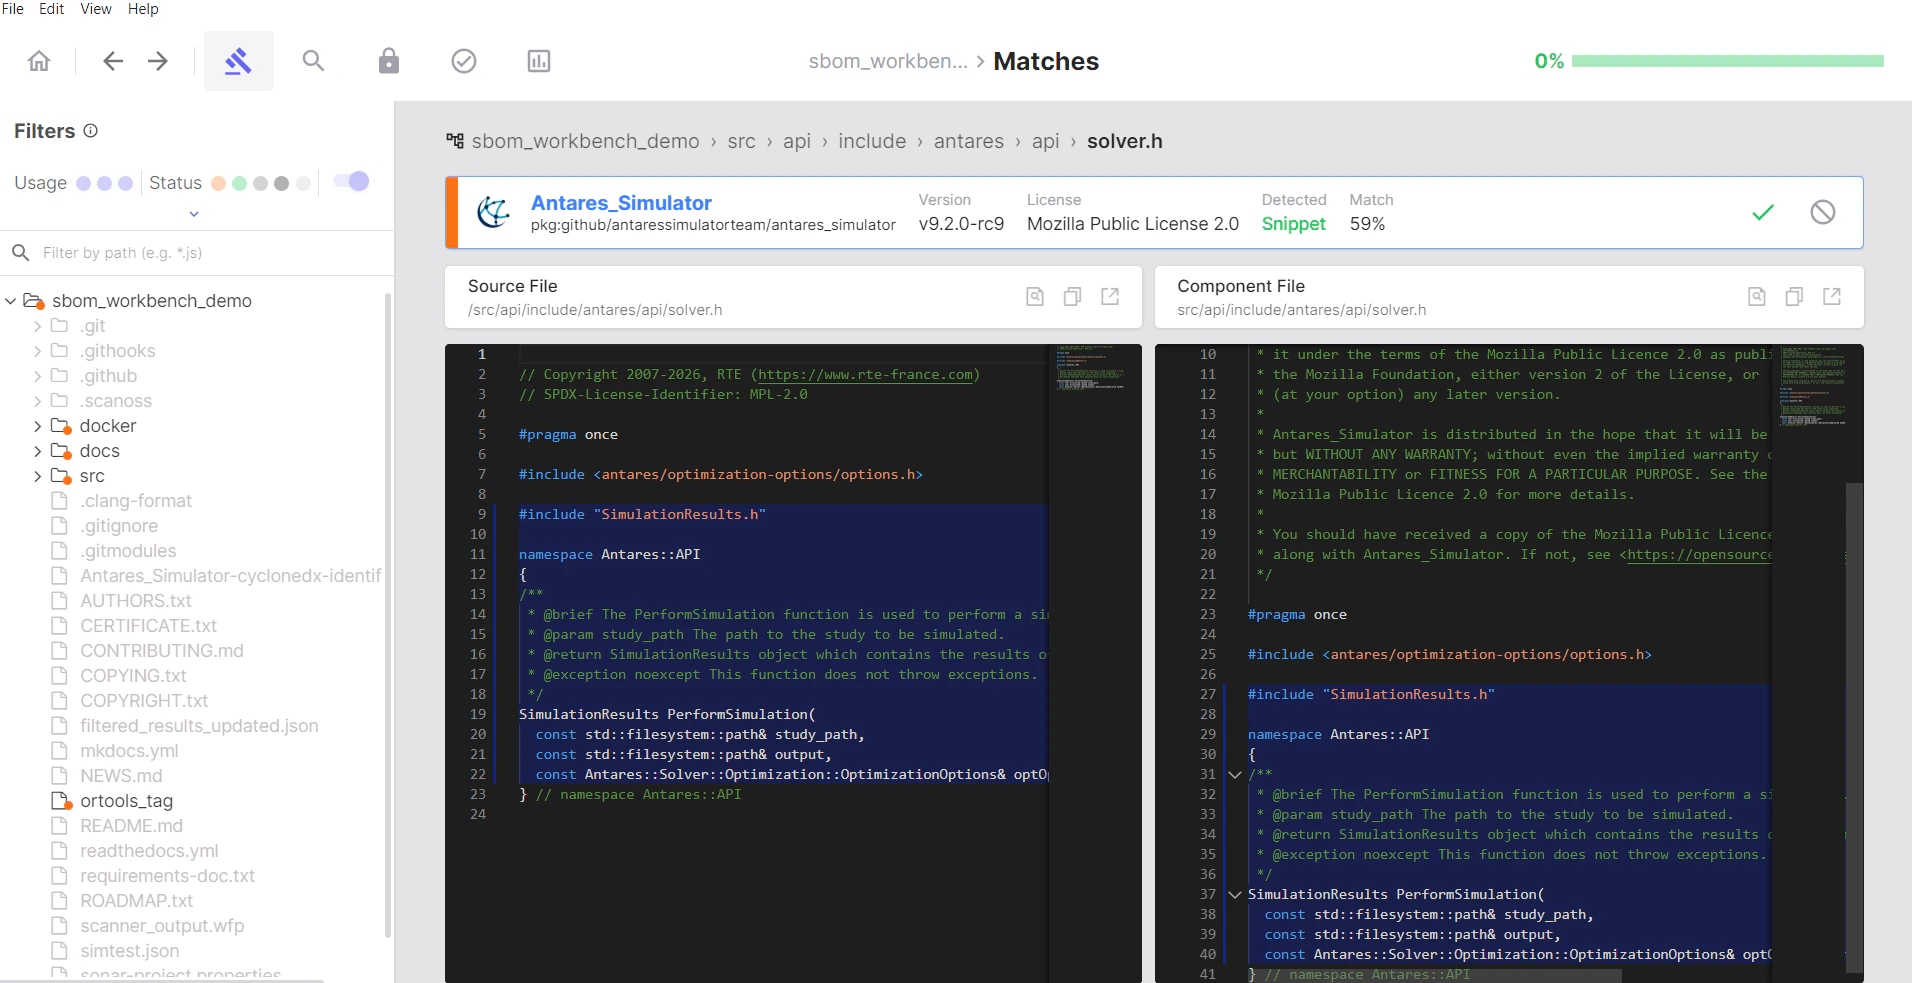
Identifying Components
The identification process is the core of auditing your project. For each component match, you need to decide whether to accept it, modify it, or mark it as your original code.The Identify Process
To review and act on individual files within a component card:- Expand the component card to see all files that matched
- Click on a file to view match details in the code viewer
- Review the match percentage and source code comparison
- Make your decision:
- Click Identify to accept the match
- Click Mark as Original if it’s your own code or a false positive
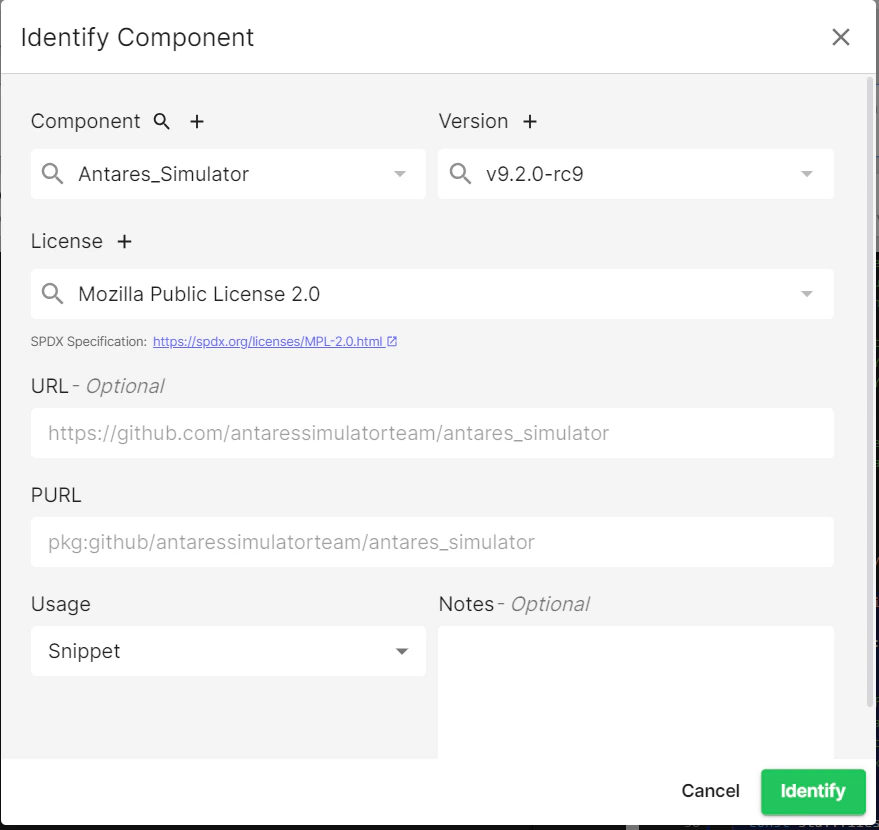
Using the Identify Dialog
When you click Identify, a dialog will appear:- Component name: Pre-populated from the match
- Version: Detected version (you can modify if incorrect)
- License: Associated license
- PURL: Package URL that identifies the component
- URL: Repository link
- Usage: File / Snippet / PreRequisite
- Notes field: Add your reasoning and context
Marking as Original
Use Mark as Original when:- The match is incorrect or a false positive
- The code is actually your own
- Code similarity is coincidental
Re-scanning and Identification Persistence
When you re-scan a project that already has confirmed identifications, SBOM Workbench preserves your previous identification decisions by design. This ensures that your audit work is not lost between scans.How Re-scan Behaviour Works
- Previously confirmed components remain in their confirmed state after a re-scan, even if the underlying source code has been modified (e.g. adding debug code to an OSS-derived file). This is expected and intentional behaviour.
- If the scan detects a new or larger snippet that provides a more accurate match than a previously confirmed identification, the updated result may require re-validation to confirm the new identification.
- If the existing identification is still valid (i.e. no new or improved match was found), no further action is needed, the confirmed state is retained automatically.
Modifying a Previously Confirmed Identification
If you need to update or change a confirmed identification after a re-scan, there are two ways to do this depending on how the original confirmation was applied:- File-level identification: If the confirmation was applied at the file level, navigate to the file in the file tree, open the file identification view, and use the Remove identification button to clear the existing decision. You can then re-identify the file as needed.

- Component-level identification: If the confirmation was applied at the component level, navigate to the component view, where you can use the Restore All option or manage individual file statuses directly.

Tip: Use the Snippet filter in the Detected Components view to quickly locate files matched via snippet detection, making it easier to review modified files after a re-scan.
Managing Dependencies
When your project contains dependency manifest files, they appear in the Dependencies section.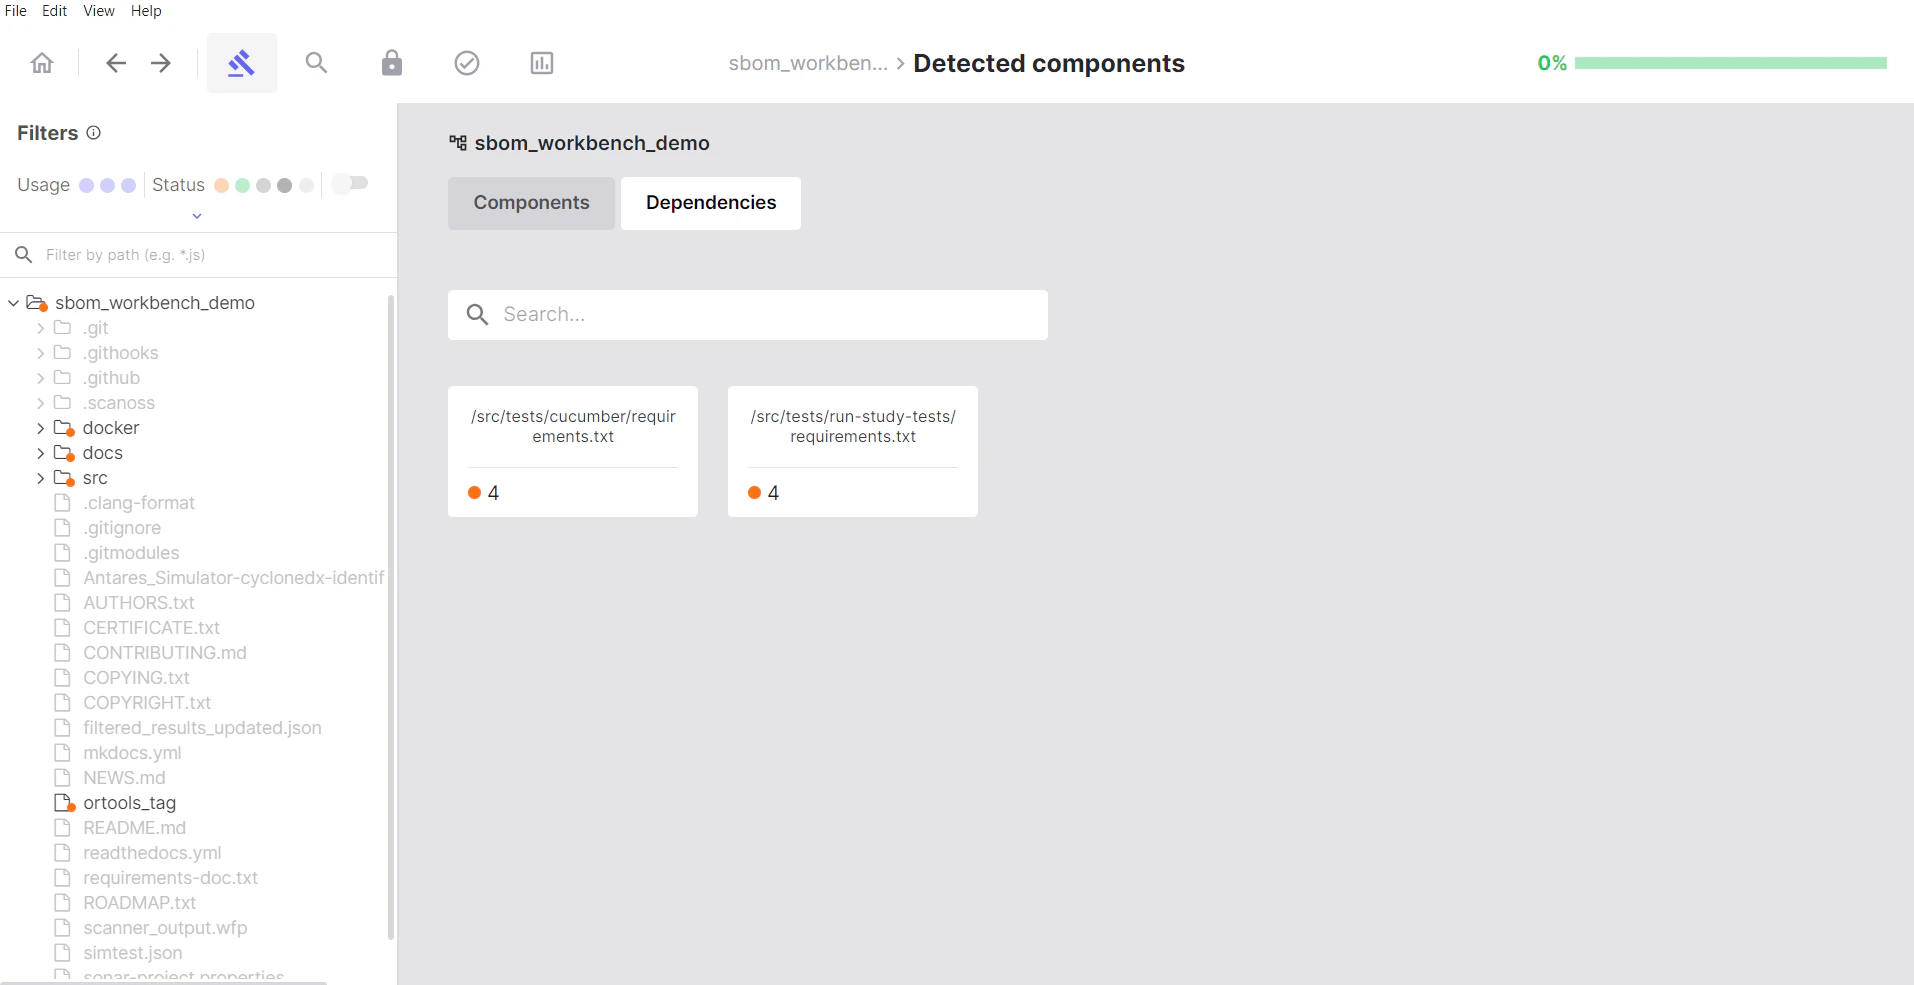
Accepting Dependencies
- Click on a dependency manifest file
- Review the list of declared dependencies
- Hover over each dependency
- Click Accept to confirm it’s intentionally used
Dismissing Dependencies
Click Dismiss for:- Development dependencies not included in production
- Transitive dependencies you want to exclude
- False positives in dependency detection
Dependency Status
- Pending: No action taken yet
- Identified: You’ve confirmed this dependency
- Dismissed: Excluded from your SBOM
Advanced Features
Search Keywords
Search Keywords is particularly useful for:- Finding license declarations: Search for “license”, “copyright”, “GPL”, etc.
- Locating specific components: Search for library names or imports
- Compliance auditing: Find files with specific legal terms
- Code pattern detection: Search for technical keywords
- Custom searches: Any text pattern you need to locate
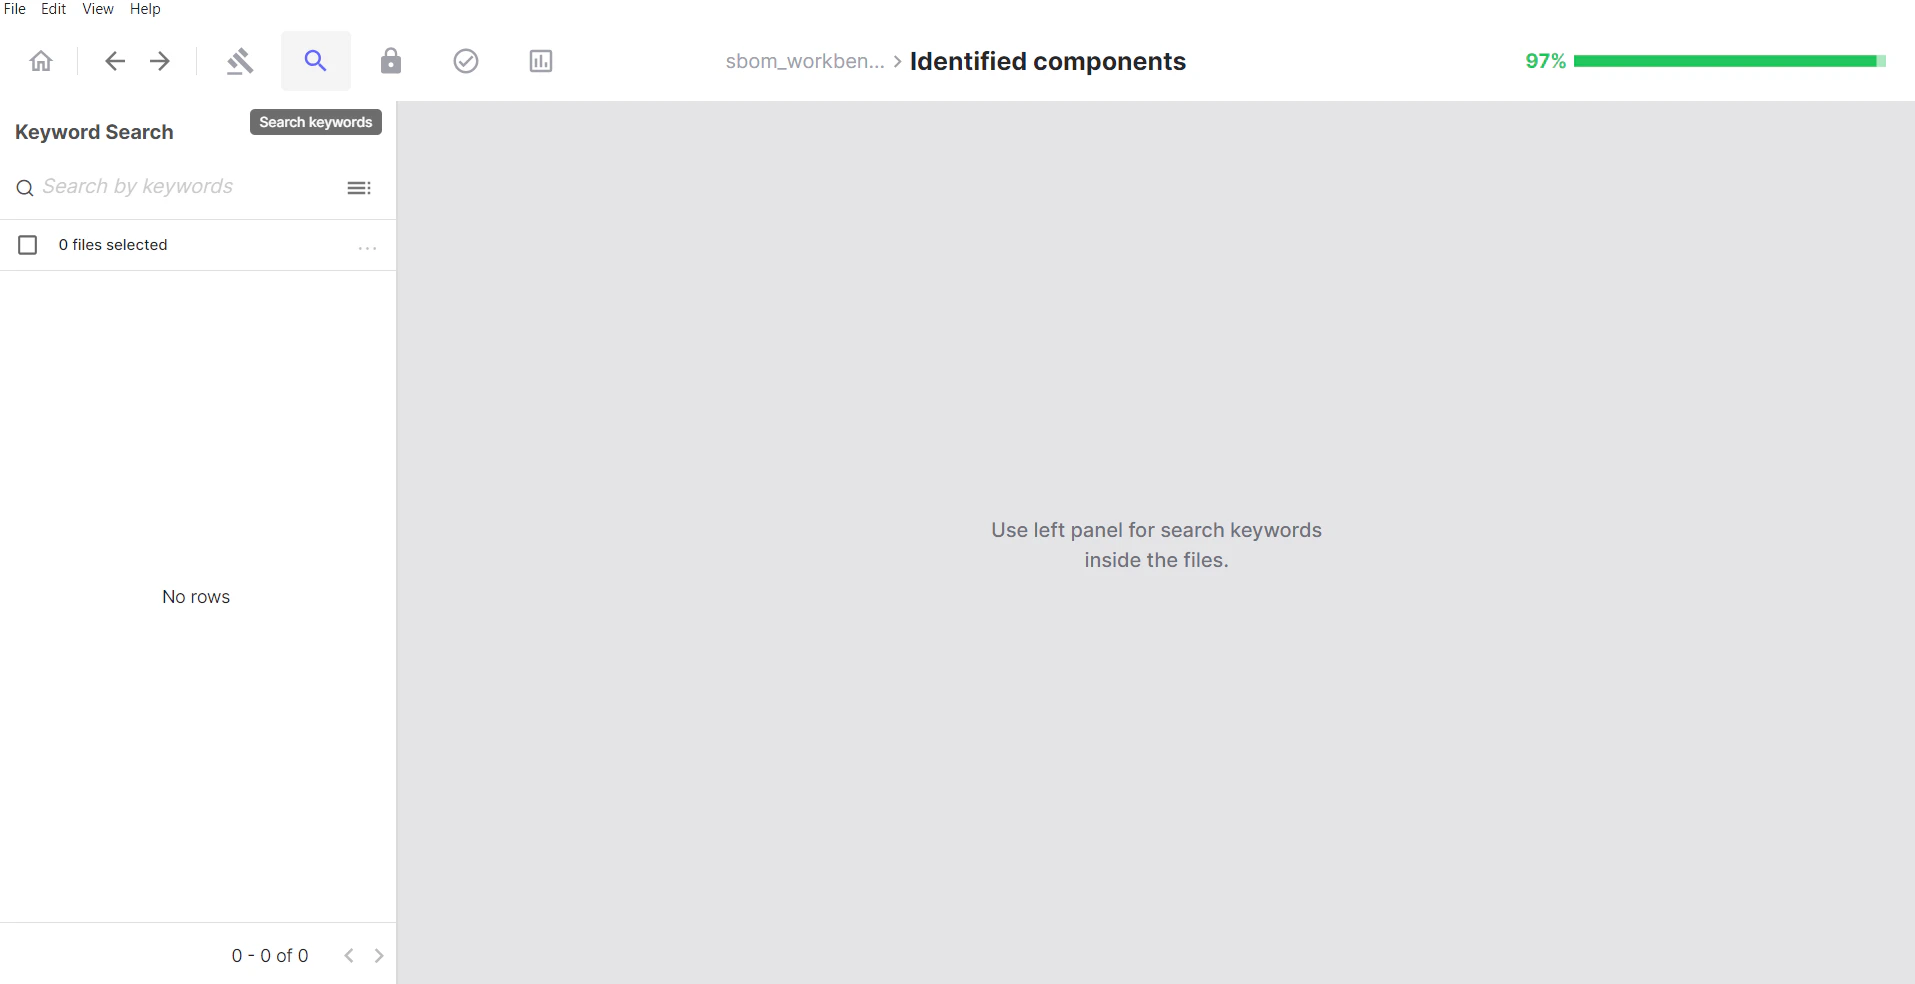
How to Use Search Keywords
- Type your search term in the search box
- Press Enter
- Review the list of files containing your keyword
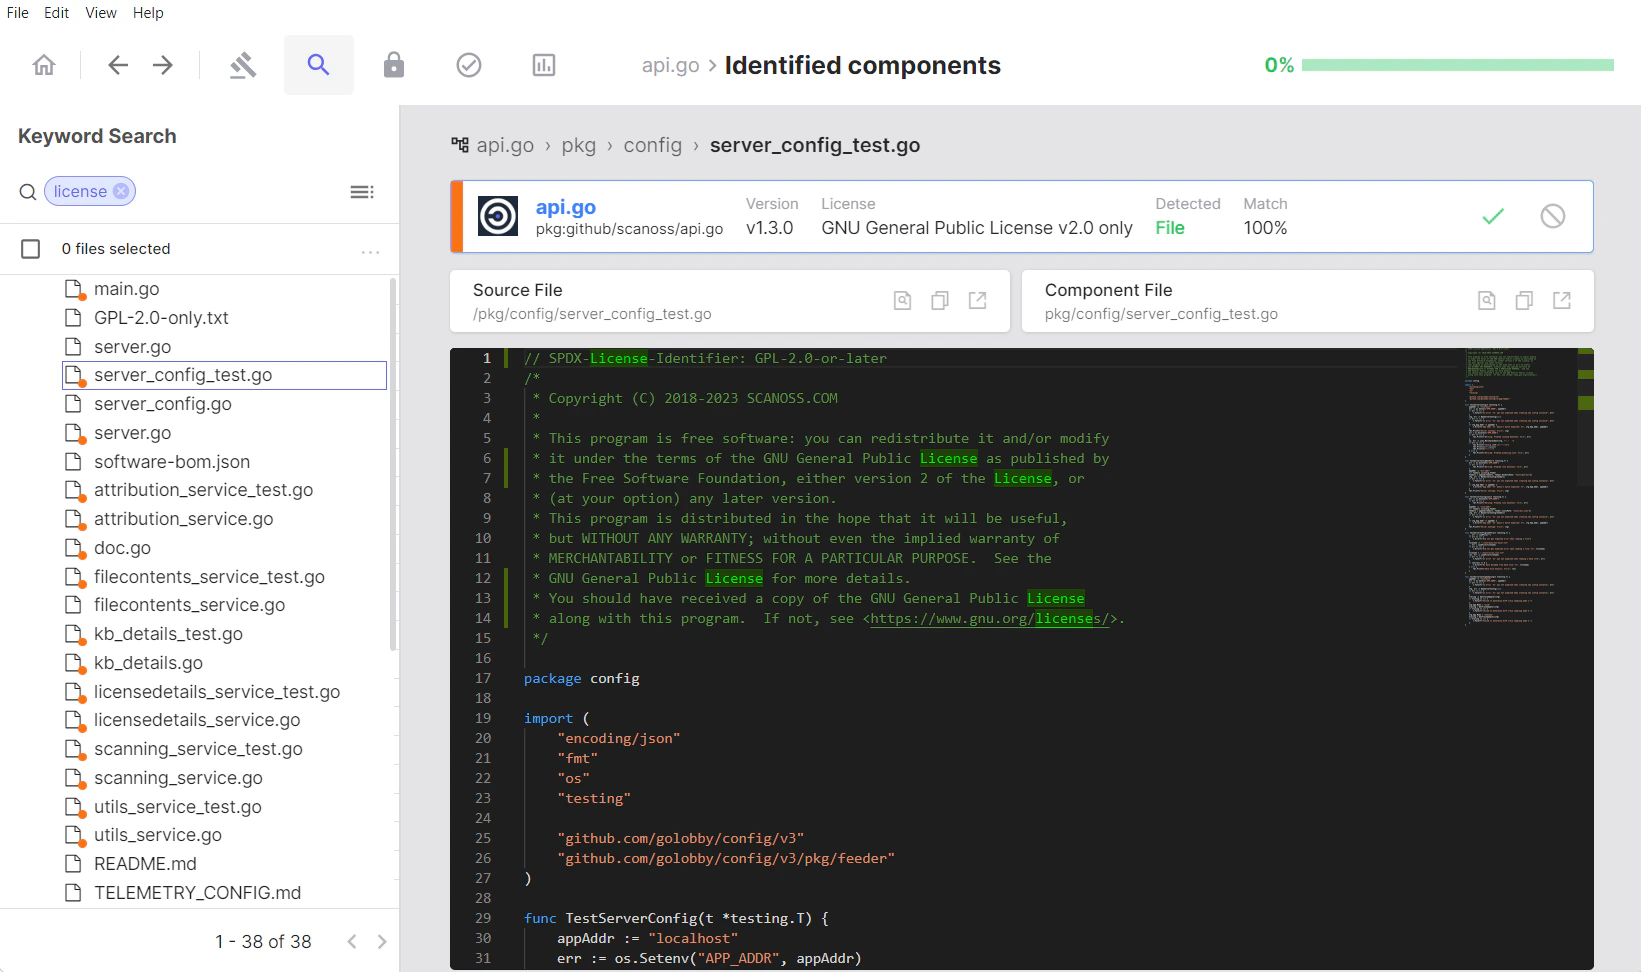
- Select files from the results
- Click Identify and manually choose which component they belong to
- Or click Mark as Original if they’re your own code
Creating Keyword Groups
Click the icon to the right of the search bar to create and save custom keyword groups for repeated use: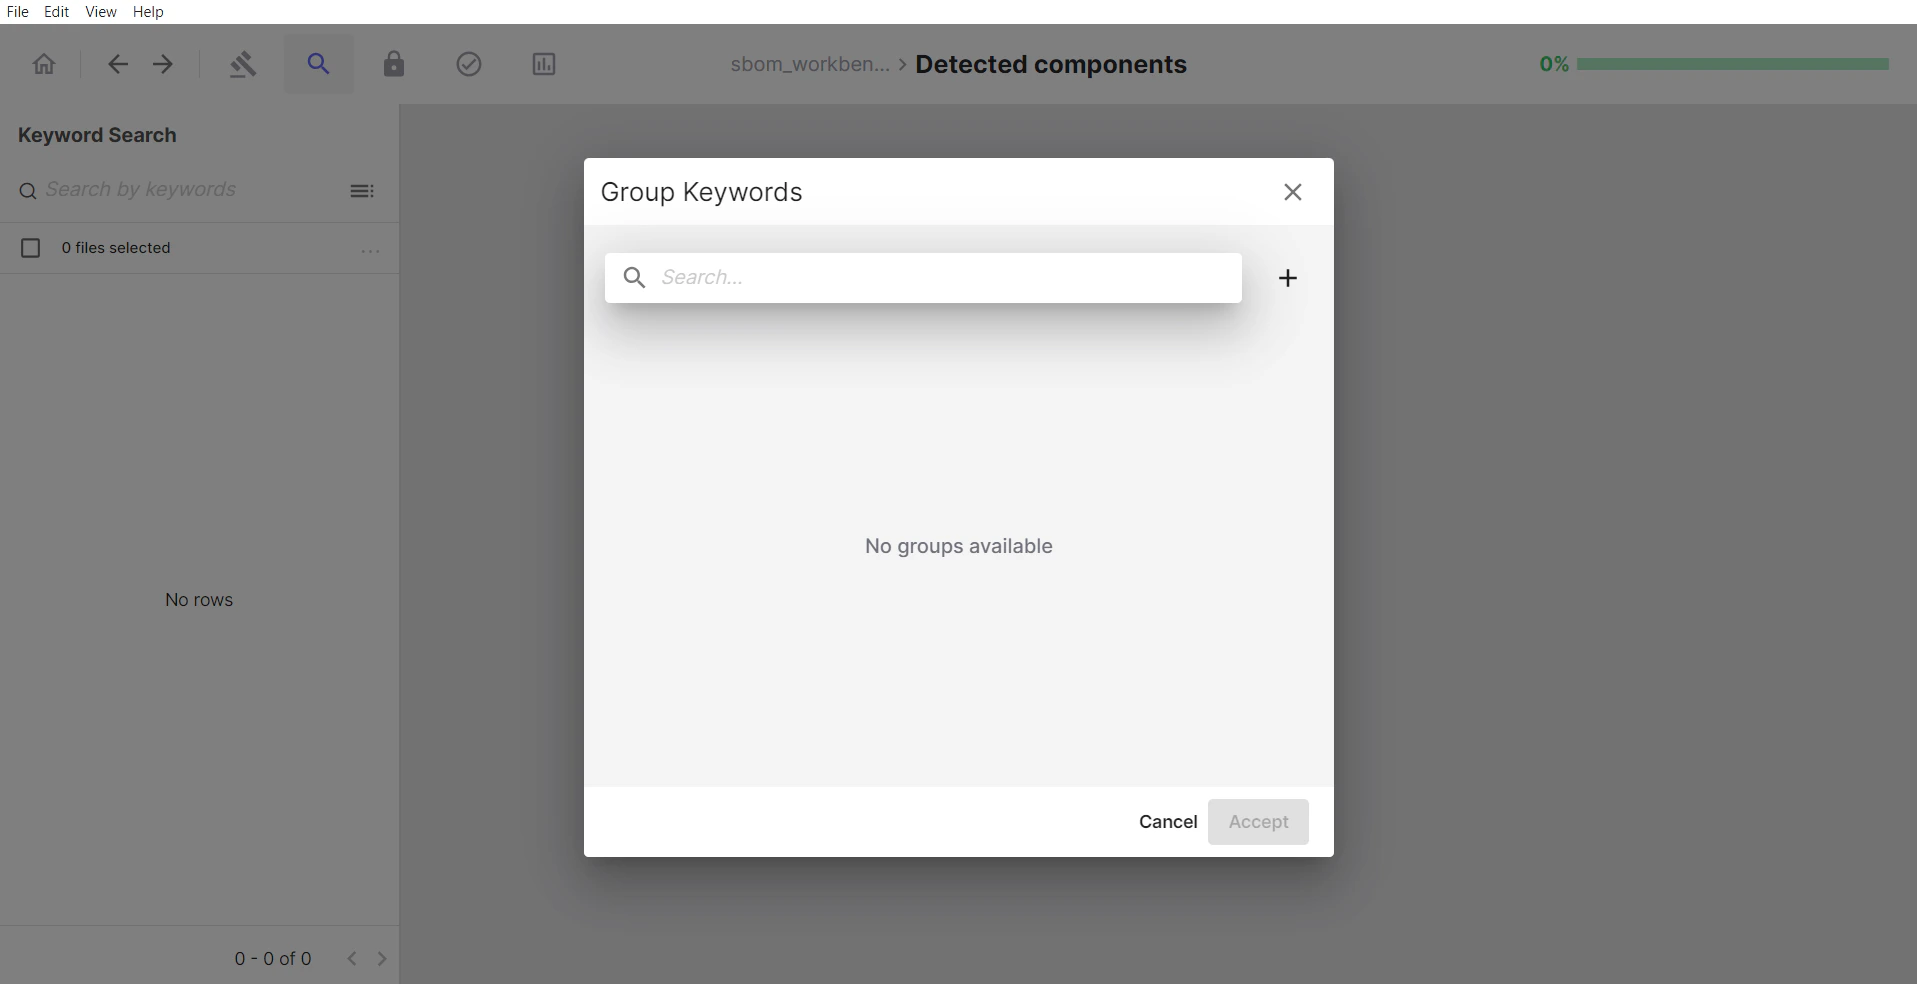
- Saved collections of related keywords
- Reusable search templates
- Named sets for specific purposes (e.g., “License Keywords”, “Security Terms”)
- Click the + button
- Name your group
- Enter keywords
- Click Create
- In the Group Keywords dialog, select the group you want to use.
- Click Accept
- The search automatically executes with all keywords in that group
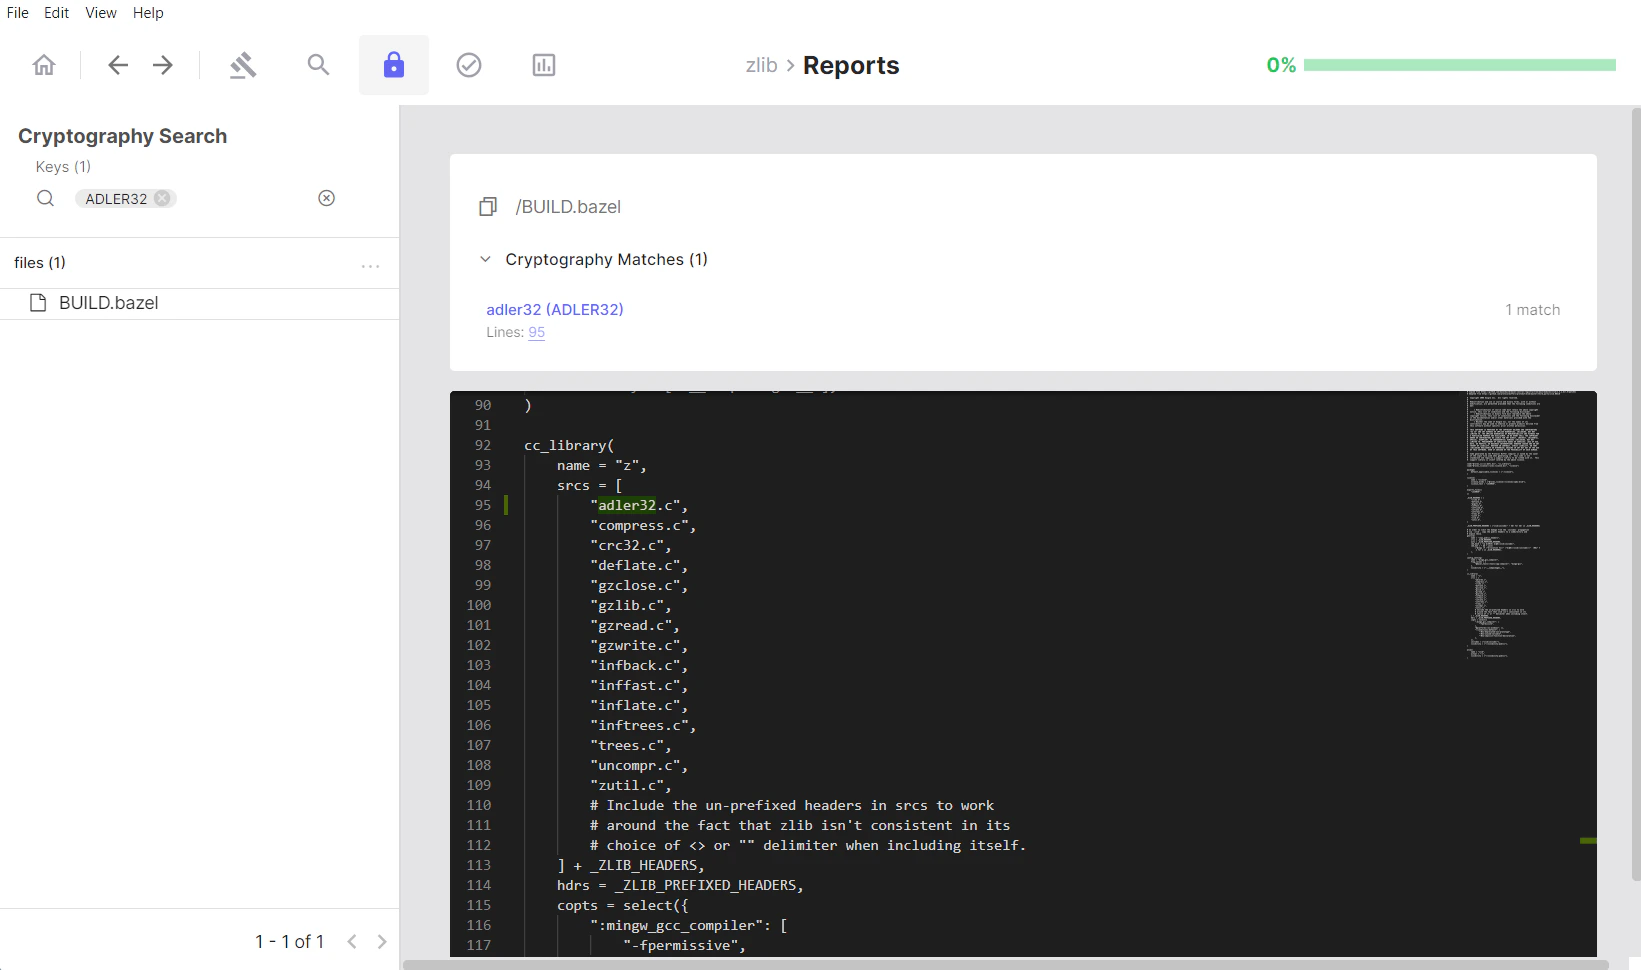
Cryptography Search
The Cryptography Search section allows you to filter and find files containing specific cryptographic algorithms.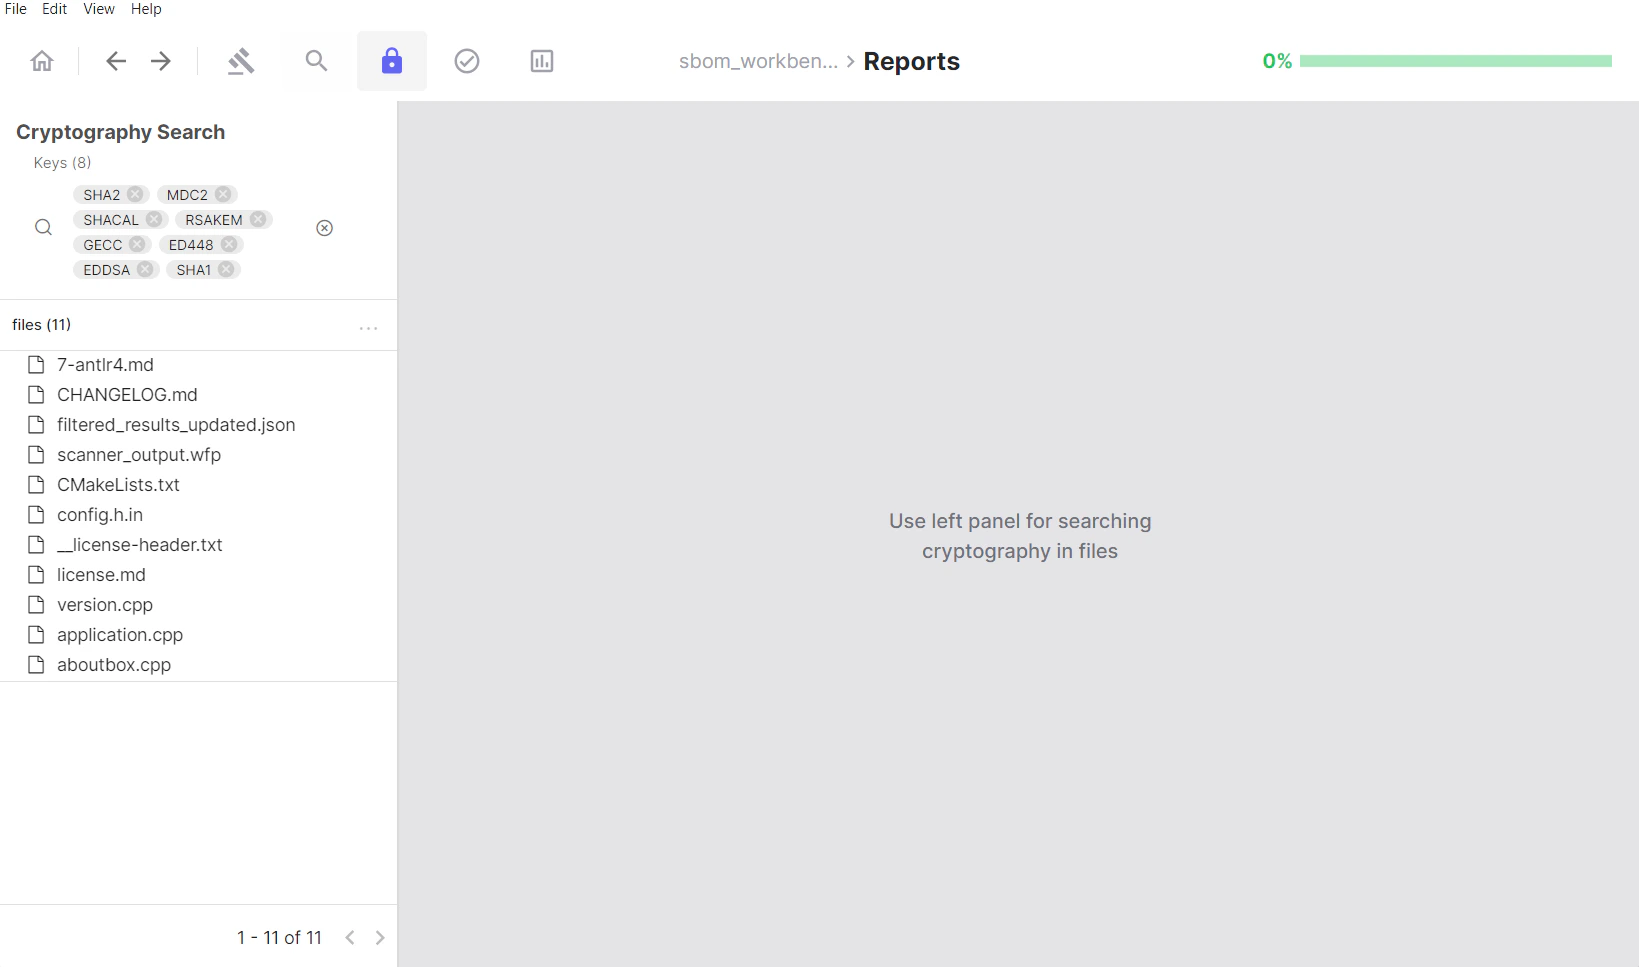
Using the Keys Filter
The Keys section serves as a filtering panel for algorithm detection: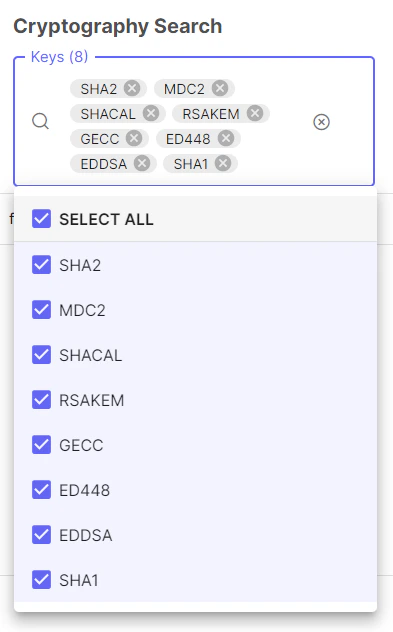
- Lists all cryptographic algorithms identified in your project
- Click on algorithm tags to filter results
- Shows count of unique algorithms detected
- Select multiple algorithms to find files using any of them
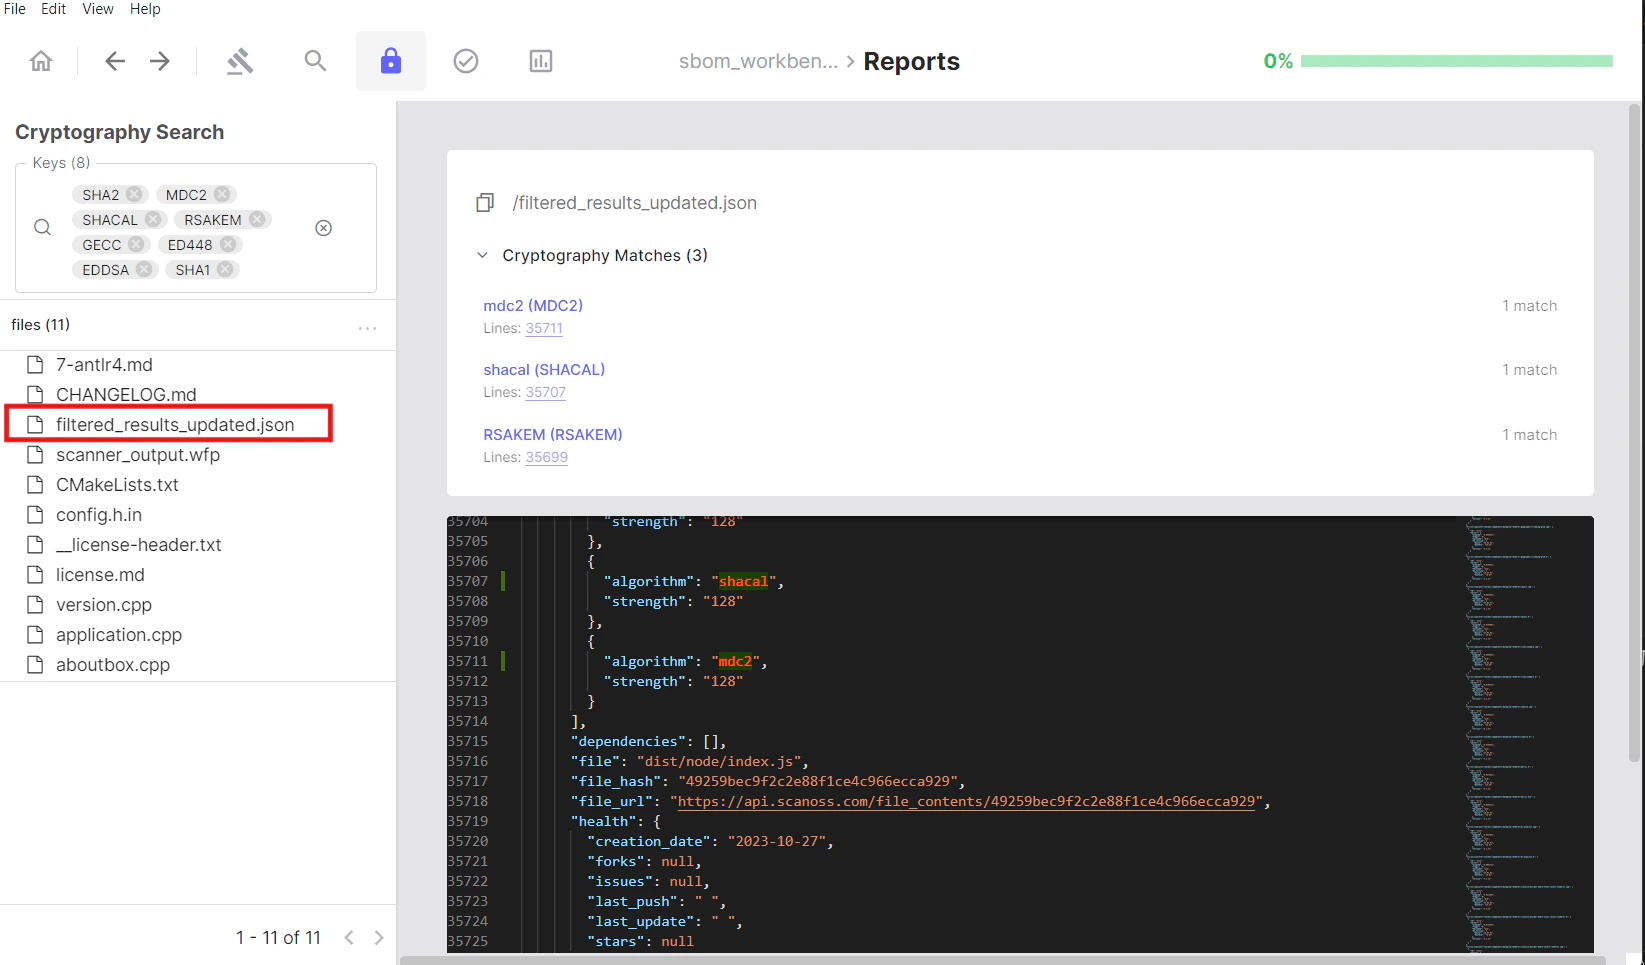
Reviewing Files with Crypto
The files section displays all files where cryptographic algorithms have been detected:- Click on a file from the filtered list
- The file opens in the code viewer on the right
- All detected cryptographic algorithms are highlighted
- An algorithm panel lists which algorithms appear in that file
- Click an algorithm in the panel to jump directly to its occurrence in the code
Reviewing Your Work
The Identified Tab
After completing your audit, navigate to Reports → Identified to review your final results.What You’ll See
The Identified tab mirrors the structure of the Detected tab but shows only components and files you’ve explicitly reviewed.Verifying Your Audit
Check for completeness:- Review the summary metrics
- Ensure all critical components have been identified
- Verify dependencies are properly addressed
- Check that vulnerability and cryptography counts match your expectations
Checking Identified vs Detected
Compare the two tabs to ensure:- All important matches have been addressed
- Nothing critical remains in Detected only
- Your audit is complete enough for your needs
Exporting Your SBOM
Export Overview
SBOM Workbench provides export capabilities from both the Detected and Identified tabs, each serving different purposes in your software audit and compliance workflow.Difference Between Exporting an SBOM File and Exporting a Project
These are two distinct operations and it is important to understand the difference: Exporting an SBOM file generates a standards-compliant bill of materials document (e.g. CycloneDX, SPDX Lite, or CSV) containing your component inventory, licence information and vulnerability data. This is the output you share with stakeholders, submit for compliance, or feed into downstream tools. It reflects only the component data, not your audit workspace. Exporting a project saves a complete snapshot of your entire audit workspace. This includes all scan results, identification decisions, notes, annotations, component statuses and the full audit history. Use this when you need to archive your work, share it with a colleague for continued review, or resume auditing on another machine.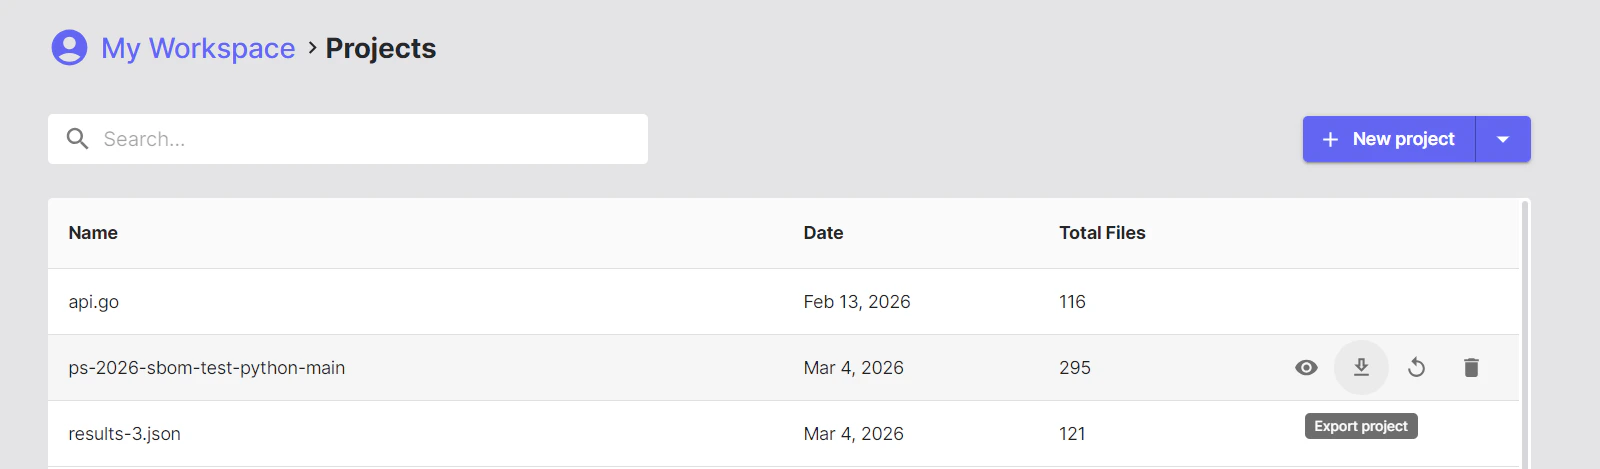
Exporting from Detected
Exports from the Detected tab provide raw, unreviewed scan data directly from the analysis engine.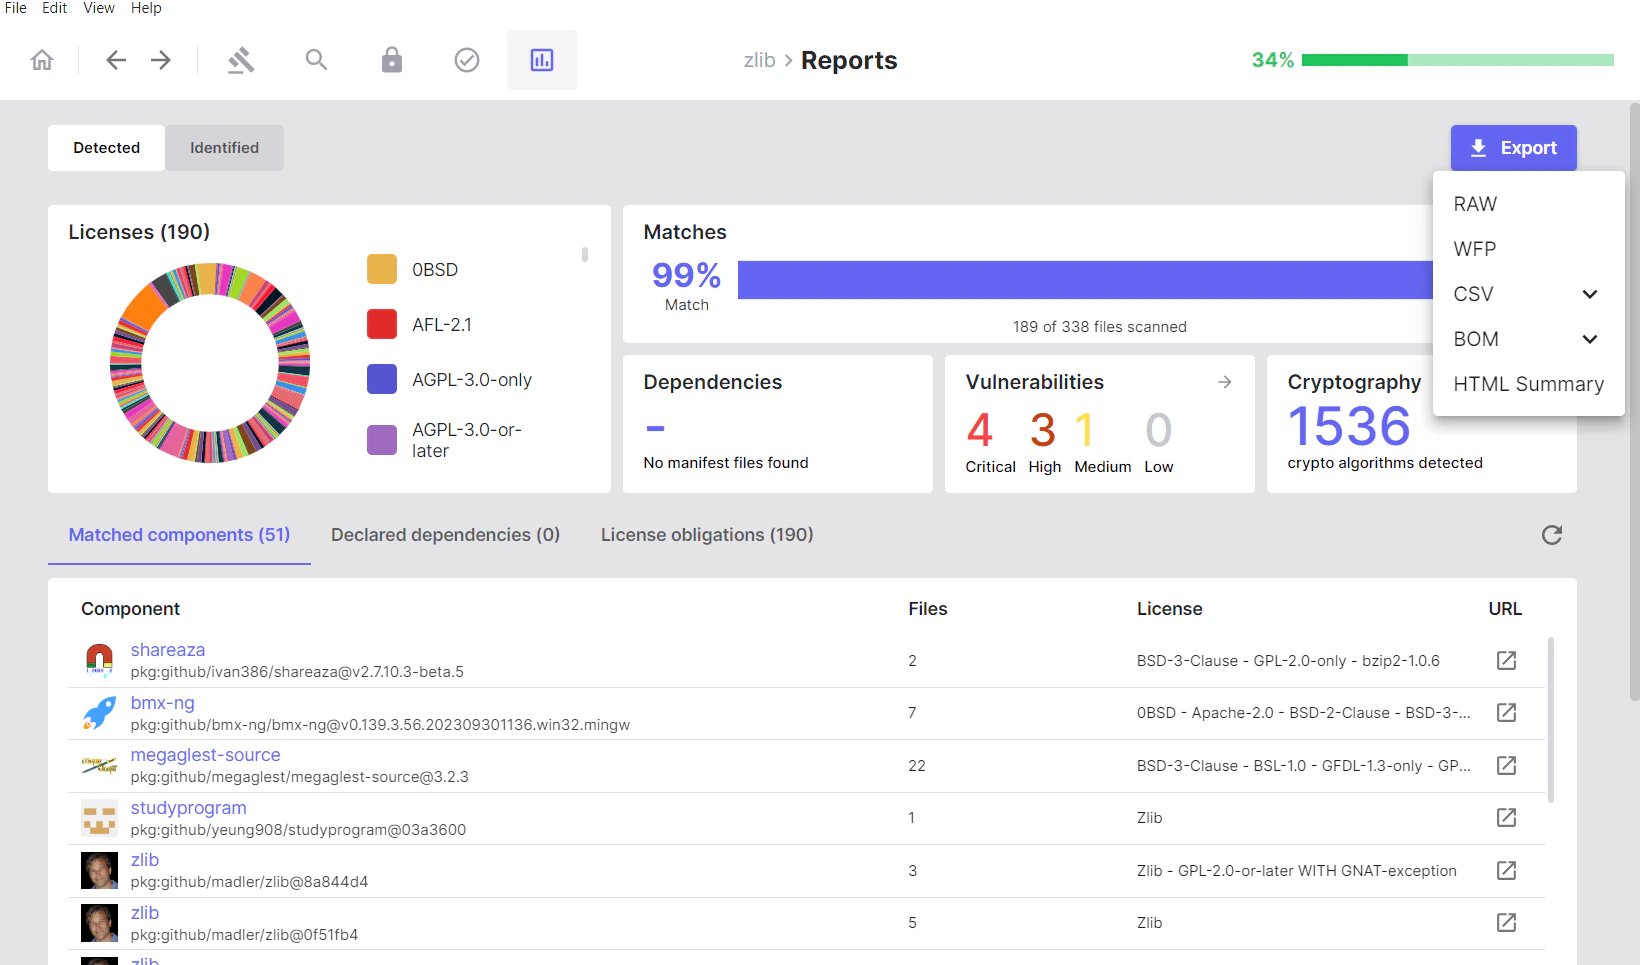
Available Formats (Detected)
- Raw
- WFP (Winnowing FingerPrint)
-
CSV
- SBOM
- Cryptography
- Vulnerabilities
-
BOM Formats
- CycloneDX
- CycloneDX with Vulnerabilities
- SPDX Lite
- HTML Summary
Exporting from Identified
Exports from the Identified tab include only components and vulnerabilities that have been manually reviewed and confirmed.
Available Formats (Identified)
- CSV
- SBOM
- Cryptography
- Vulnerabilities
-
BOM Formats
- CycloneDX
- CycloneDX with Vulnerabilities
- SPDX Lite
- HTML Summary
-
Settings (
scanoss.json)