
Prerequisites

Before you begin, ensure you have completed:
  • Local Testing to ensure you already have SCANOSS-PY installed and a scanned project
  • Project scan results from the previous steps
  • SCANOSS API key for enterprise features
If you haven’t completed the Local Testing guide yet, start there first. This guide builds on the scan results you generated in that step.

Overview

This guide demonstrates different ways to perform advanced analysis with SCANOSS:
  • SCANOSS API with Postman Interactive API testing for cryptography and vulnerability queries
  • SCANOSS-PY Command-line tool for automated scanning and analysis
  • SBOM Workbench Visual desktop application for comprehensive analysis
Choose the method that best fits your workflow, or use a combination of all three.

SCANOSS with Postman

Postman provides an interactive way to explore the SCANOSS API and understand how advanced analysis works.

Prerequisites

Setup Postman Environment

Create Environment Variables:
  1. In Postman, click Environments (left sidebar)
  2. Click Create Environment or +
  3. Name it “SCANOSS
  4. Add these variables:
VariableValue
base_urlhttps://api.scanoss.com
api_keyyour-api-key-here
  1. Activate the environment by clicking the checkmark next to SCANOSS in the left panel, or select SCANOSS from the environment dropdown in the top right corner

Query Cryptographic Algorithms

You can query PURLs from your scan results (obtained from Local Testing) or use the sample PURLs shown below to learn how the API works. Single Component Query:
  1. Create a new request by clicking the + icon in the tab bar
  2. Set request type to GET
  3. Enter URL:
    {{base_url}}/v2/cryptography/algorithms/component
    
  4. Click Params tab and add query parameters:
    • Key: purl Value: pkg:github/scanoss/scanoss.py (or use a PURL from your scan results)
    • Key: requirement Value: >1.3.5 (or use a version from your scan results)
  5. Click Authorization tab and configure:
    • Auth Type: Select API Key
    • Key: X-Api-Key
    • Value: {{api_key}}
    • Add to: Ensure it’s set to Header
  6. Click Send
Multiple Components Query:
  1. Create a new request
  2. Set request type to POST
  3. Enter URL:
    {{base_url}}/v2/cryptography/algorithms/components
    
  4. Click Authorization tab and configure:
    • Auth Type: Select API Key
    • Key: X-Api-Key
    • Value: {{api_key}}
    • Add to: Ensure it’s set to Header
  5. Click Headers tab and add:
    • Key: Content-Type Value: application/json
  6. Click Body tab, select raw and JSON
  7. Enter request body:
    {
      "components": [
        {
          "purl": "pkg:github/scanoss/engine@>=5.0.0"
        },
        {
          "purl": "pkg:github/scanoss/scanoss.py@~1.30.0"
        }
      ]
    }
    
  8. Click Send

Query Cryptographic Hints

Hints reveal the encryption libraries, protocols and SDKs used by components.
  1. Create a new request
  2. Set request type to GET
  3. Enter URL:
    {{base_url}}/v2/cryptography/hints/component
    
  4. Add query parameters:
    • Key: purl Value: pkg:github/scanoss/scanoss.py
    • Key: requirement Value: v1.19.5
  5. Click Authorization tab and configure:
    • Auth Type: Select API Key
    • Key: X-Api-Key
    • Value: {{api_key}}
    • Add to: Ensure it’s set to Header
  6. Click Send
Expected Response:
{
  "component": {
    "purl": "pkg:github/scanoss/scanoss.py",
    "version": "v1.19.5",
    "requirement": "v1.19.5",
    "hints": [
      {
        "id": "library/openssl",
        "name": "OpenSSL",
        "description": "A robust, full-featured open-source toolkit implementing the Secure Sockets Layer (SSL) and Transport Layer Security (TLS) protocols.",
        "category": "library",
        "url": "https://www.openssl.org/docs/",
        "purl": "pkg:github/openssl/openssl"
      },
      {
        "id": "protocol/https",
        "name": "HTTPS",
        "description": "HTTPS (Hypertext Transfer Protocol Secure) is a protocol for secure communication over a computer network",
        "category": "library",
        "url": "",
        "purl": ""
      },
      {
        "id": "protocol/OAuth",
        "name": "Open Authorization",
        "description": "N/A",
        "category": "protocol",
        "url": "",
        "purl": ""
      }
    ]
  },
  "status": {
    "status": "SUCCESS",
    "message": "Encryption's hints retrieved successfully."
  }
}

Query Vulnerabilities

Single Component Vulnerability Query:
  1. Create a new request
  2. Set request type to GET
  3. Enter URL:
    {{base_url}}/v2/vulnerabilities/component
    
  4. Add query parameters:
    • Key: purl Value: pkg:npm/lodash
    • Key: requirement Value: 4.17.20
  5. Click Authorization tab and configure:
    • Auth Type: Select API Key
    • Key: X-Api-Key
    • Value: {{api_key}}
    • Add to: Ensure it’s set to Header
  6. Click Send
Expected Response:
{
  "component": {
    "purl": "pkg:npm/lodash",
    "version": "4.17.20",
    "requirement": "4.17.20",
    "vulnerabilities": [
      {
        "id": "CVE-2020-28500",
        "cve": "CVE-2020-28500",
        "url": "https://nvd.nist.gov/vuln/detail/CVE-2020-28500",
        "summary": "Lodash versions prior to 4.17.21 are vulnerable to Regular Expression Denial of Service (ReDoS) via ...",
        "severity": "MEDIUM",
        "published": "2021-02-15",
        "modified": "2024-11-21",
        "source": "NVD",
        "cvss": []
      },
      {
        "id": "CVE-2021-23337",
        "cve": "CVE-2021-23337",
        "url": "https://nvd.nist.gov/vuln/detail/CVE-2021-23337",
        "summary": "Lodash versions prior to 4.17.21 are vulnerable to Command Injection via the template function.",
        "severity": "HIGH",
        "published": "2021-02-15",
        "modified": "2024-11-21",
        "source": "NVD",
        "cvss": []
      },
      {
        "id": "GHSA-29mw-wpgm-hmr9",
        "cve": "CVE-2020-28500",
        "url": "https://osv.dev/vulnerability/CVE-2020-28500",
        "summary": "Regular Expression Denial of Service (ReDoS) in lodash",
        "severity": "MODERATE",
        "published": "2022-01-06",
        "modified": "2025-09-29",
        "source": "OSV",
        "cvss": [
          {
            "cvss": "CVSS:3.1/AV:N/AC:L/PR:N/UI:N/S:U/C:N/I:N/A:L",
            "cvss_score": 5.3,
            "cvss_severity": "MEDIUM"
          }
        ]
      },
      {
        "id": "GHSA-35jh-r3h4-6jhm",
        "cve": "CVE-2021-23337",
        "url": "https://osv.dev/vulnerability/CVE-2021-23337",
        "summary": "Command Injection in lodash",
        "severity": "HIGH",
        "published": "2021-05-06",
        "modified": "2025-08-12",
        "source": "OSV",
        "cvss": [
          {
            "cvss": "CVSS:3.1/AV:N/AC:L/PR:H/UI:N/S:U/C:H/I:H/A:H",
            "cvss_score": 7.2,
            "cvss_severity": "HIGH"
          }
        ]
      }
    ]
  },
  "status": {
    "status": "SUCCESS",
    "message": "Success"
  }
}
Multiple Components Vulnerability Query:
  1. Create a new request
  2. Set request type to POST
  3. Enter URL:
    {{base_url}}/v2/vulnerabilities/components
    
  4. Click Authorization tab and configure:
    • Auth Type: Select API Key
    • Key: X-Api-Key
    • Value: {{api_key}}
    • Add to: Ensure it’s set to Header
  5. Click Headers tab and add:
    • Key: Content-Type Value: application/json
  6. Click Body tab, select raw and JSON, then add body:
    {
      "components": [
        {
          "purl": "pkg:npm/lodash",
          "requirement": "4.17.20"
        },
        {
          "purl": "pkg:pypi/requests",
          "requirement": "2.25.0"
        }
      ]
    }
    
  7. Click Send

Save Postman Collection

To reuse these requests:
  1. Click Collections (left sidebar)
  2. Click Create Collection or +
  3. Name it “SCANOSS Advanced Analysis
  4. Click into each of your requests, then click save request o nthe right hand side, select the collection and click save
  5. Click next to collection name > More > Export > Continue with Export > Export JSON
  6. Share the exported JSON with your team
For additional details, refer to the following documentation:

SCANOSS-PY (Command Line)

SCANOSS-PY provides powerful command-line capabilities for automated scanning and analysis.

Detect Cryptographic Algorithms

You have two options for analysing cryptography, using the existing scan results or performing a new scan with focus on cryptographic detection. Analyze Existing Scan Results If you already have scan results from Local Testing, examine them for cryptography information:
# View cryptography information for all components
cat results.json | jq '.[].[] | select(.cryptography != null) | {file: .file, component: .component, crypto: .cryptography}'
Run a Fresh Scan Navigate to your project directory and run a new scan:
cd /path/to/your/project

scanoss-py scan . \
  --dependencies \
  --output results.json \
  --key $SCANOSS_API_KEY
This scan generates a results.json file containing component metadata including PURLs, versions and detected cryptography information.

Query Cryptographic Algorithms

After identifying components with cryptography, you can query detailed algorithm information. Extract Component PURLs:
# Extract all PURLs with versions from your scan results
jq -r '.[].[] | select(.purl != null) | .purl[] as $purl | "\($purl)@\(.version)"' results.json

# Save PURLs to file for batch processing
jq -r '.[].[] | select(.purl != null) | .purl[] as $purl | "\($purl)@\(.version)"' results.json > purls.txt
Query Single Component: Get specific algorithm details for a component you’re interested in (use a PURL from your scan results or try the sample below):
scanoss-py crypto algorithms \
  --purl "pkg:github/scanoss/engine@5.0.0" \
  --key $SCANOSS_API_KEY
Query Multiple Components: For analysing multiple components at once, create a PURL input file:
# Create PURL input file
cat > purl-list.json << 'EOF'
{
  "purls": [
    {
      "purl": "pkg:github/scanoss/engine@>=5.0.0"
    },
    {
      "purl": "pkg:github/scanoss/scanoss.py@~1.30.0"
    }
  ]
}
EOF
# Query all components
scanoss-py crypto algorithms \
  --input purl-list.json \
  --key $SCANOSS_API_KEY

Query Cryptographic Hints

Cryptographic hints reveal the encryption libraries, protocols and SDKs used by your components:
scanoss-py crypto hints \
  --purl "pkg:github/scanoss/scanoss.py@v1.19.5" \
  --key $SCANOSS_API_KEY
For additional command-line options and examples, refer to Cryptography Detection - SCANOSS-PY.

Query Vulnerabilities

Vulnerability analysis identifies known security issues (CVEs) in your open source components, helping you prioritise security fixes. Query Single Component:
scanoss-py comp vulns \
  --purl "pkg:npm/lodash@4.17.20" \
  --key $SCANOSS_API_KEY
Query Multiple Components: For comprehensive vulnerability analysis across all your components:
# Create PURL input file
cat > purl-list.json << 'EOF'
{
  "components": [
    {
      "purl": "pkg:npm/lodash@4.17.20"
    },
    {
      "purl": "pkg:pypi/requests@2.25.0"
    }
  ]
}
EOF
# Query all components
scanoss-py comp vulns \
  -i purl-list.json \
  --key $SCANOSS_API_KEY
For detailed command-line options and additional examples, refer to Security & Vulnerabilities - SCANOSS-PY.

SBOM Workbench (Desktop GUI)

For a more comprehensive visual analysis experience, use SBOM Workbench to explore cryptography and vulnerabilities interactively.

Install SBOM Workbench

  1. Visit SBOM Workbench releases
  2. Download the installer for your platform
  3. Run the installer

Add Your Project

  1. Open SBOM Workbench
  2. Go to FileSettings
  3. Click on + after Knowledgebase API
  4. Enter your API details:
    • API URL: Default is https://api.osskb.org (free tier)
    • API Key: Optional for free tier, required for premium features
  5. Save then click New project
  6. Select your project directory
  7. Configure project settings:
    • Set your project name
    • (Optional) Add your license information
    • Configure API connection with your SCANOSS API key
SBOM Workbench will automatically scan your project and perform comprehensive analysis including license detection, dependency analysis, cryptography detection and vulnerability scanning.

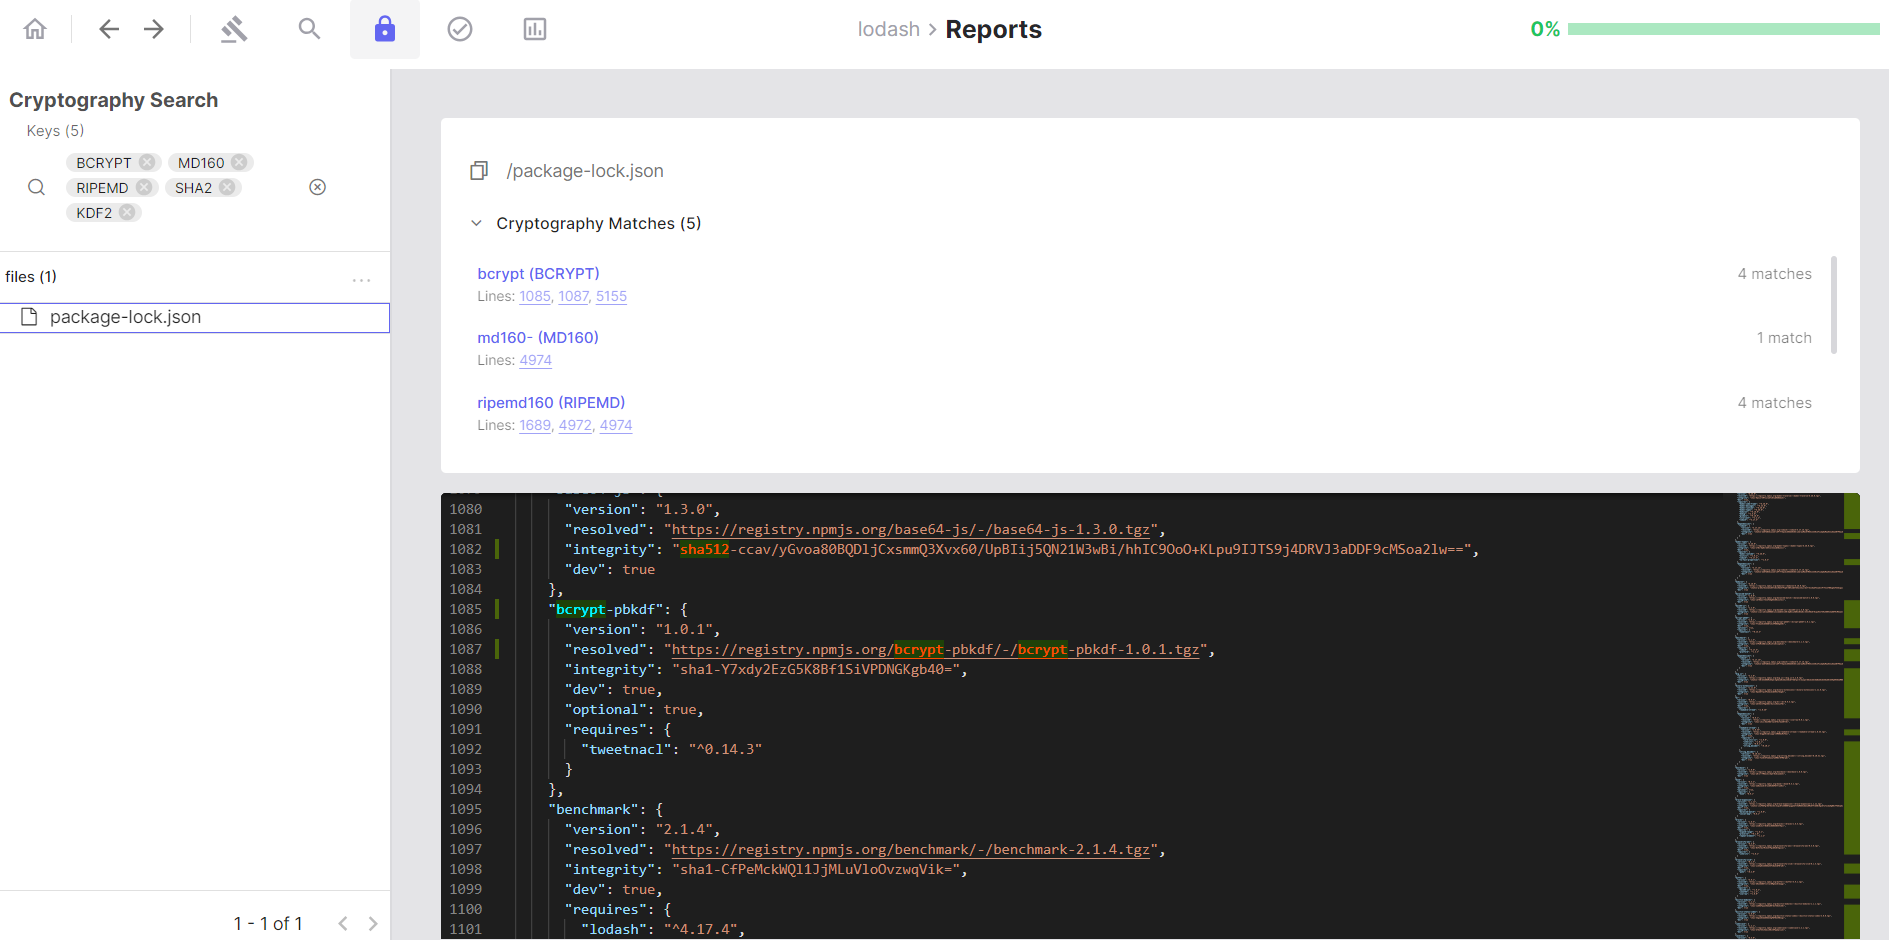
Analyse Cryptography

Click the Crypto Search lock symbol to view all local source code files where cryptographic keywords have been detected. Navigate Results:
  • The left panel shows a hierarchical tree of your source code files
  • Select a file to view its source code with detected cryptographic keywords highlighted
  • Click line numbers to jump directly to cryptographic implementations
  • Use filters to focus on specific algorithms
sbom-crypto View Crypto Report:
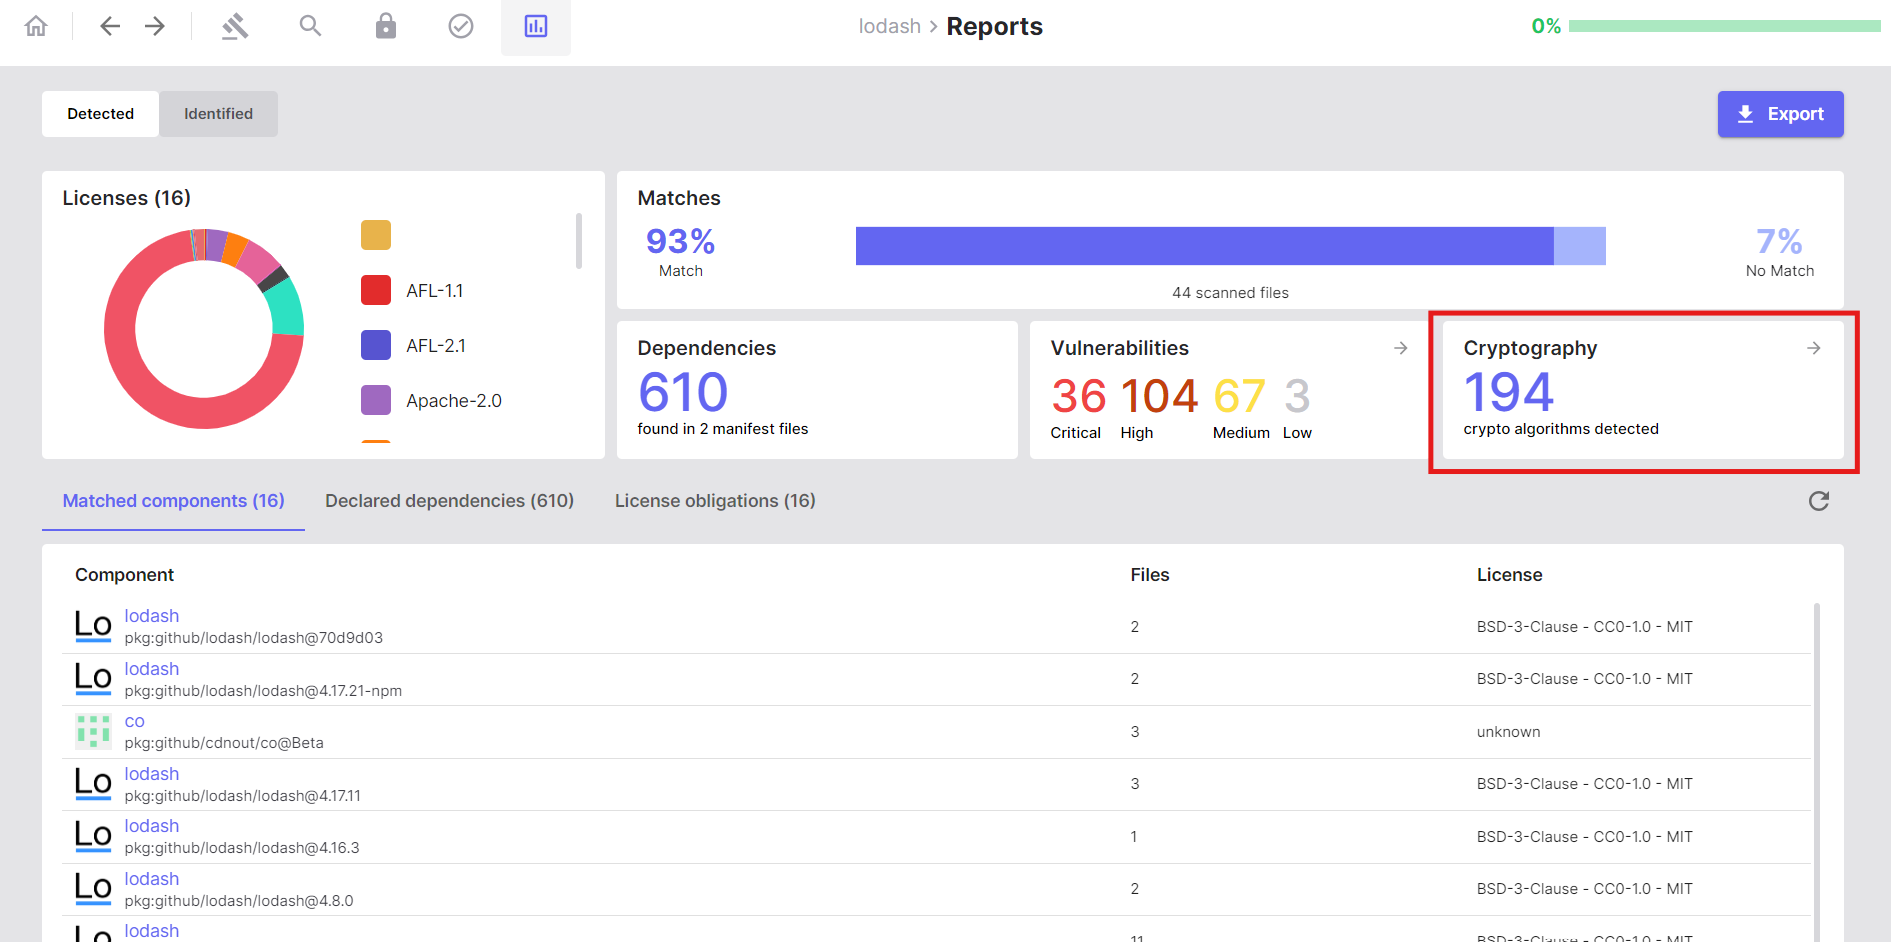
  1. Click the Reports button
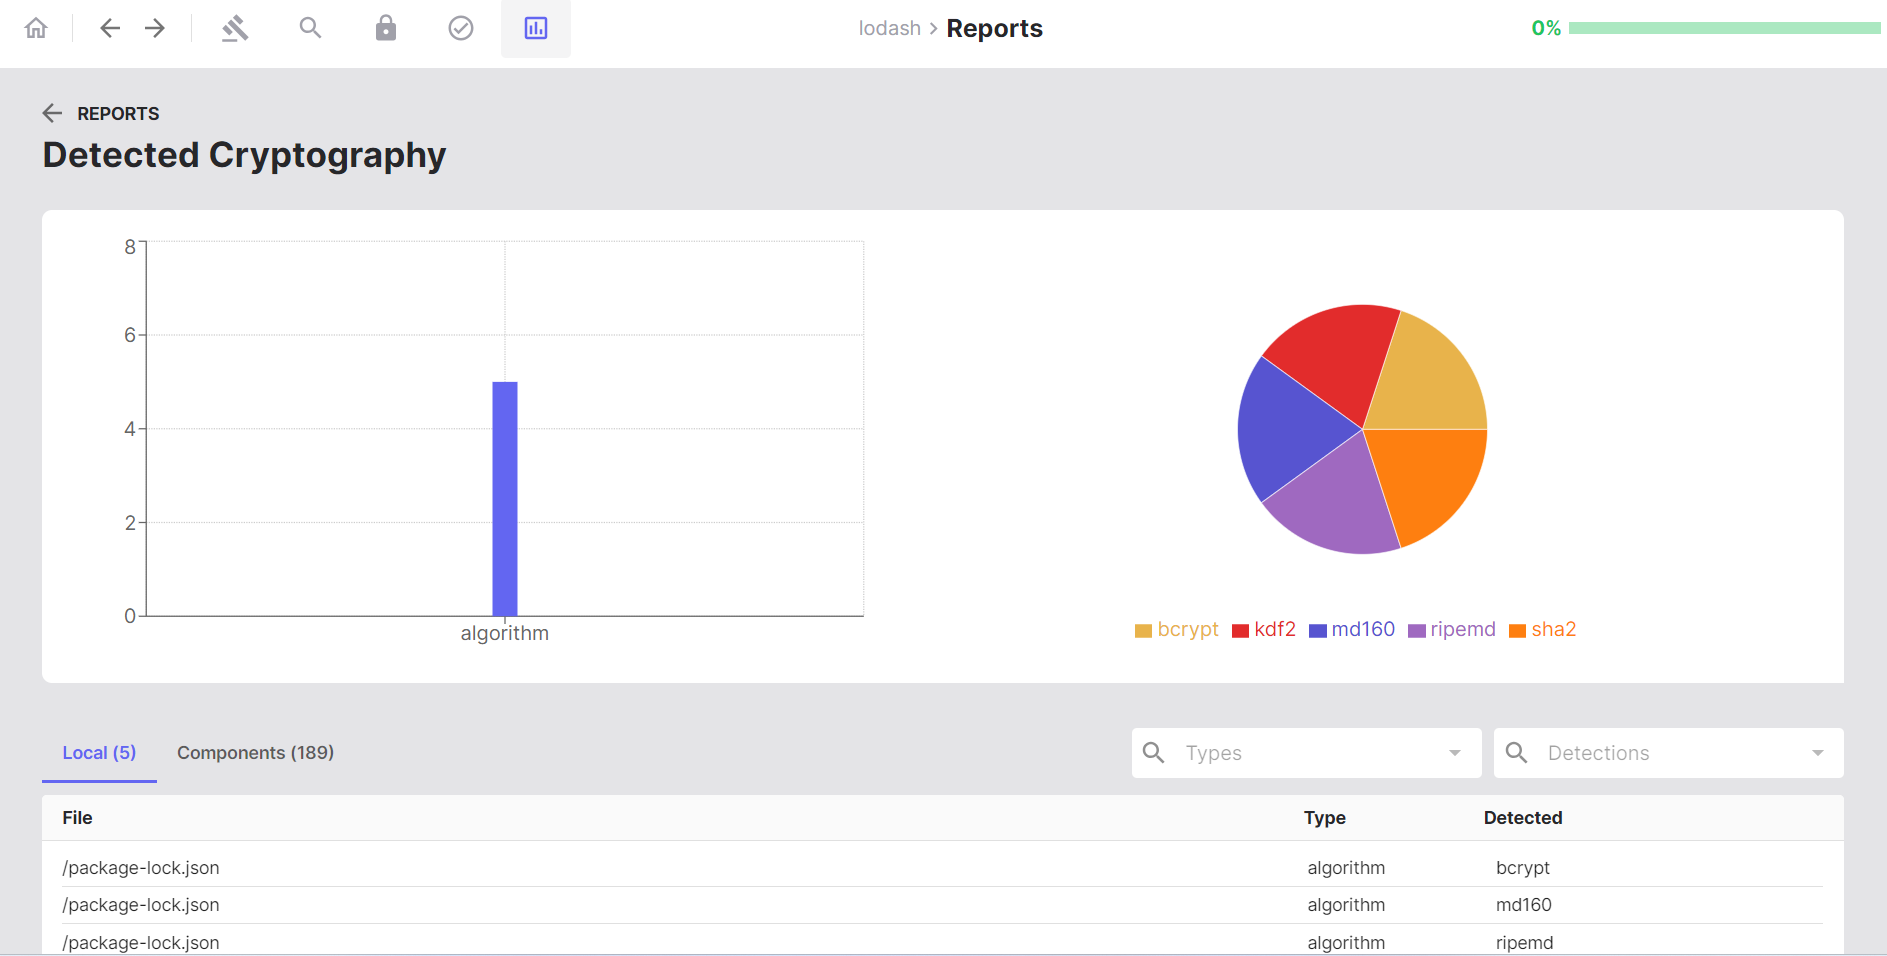
  2. Navigate to the Cryptography section
  3. Review statistical charts showing:
    • Distribution of cryptographic algorithms
    • Overall cryptographic keyword usage
  4. Explore the detection list showing cryptographic material per file
  5. Click on file paths or algorithm names to navigate back to detailed code views
sbom-reports-crypto sbom-detected-crypto

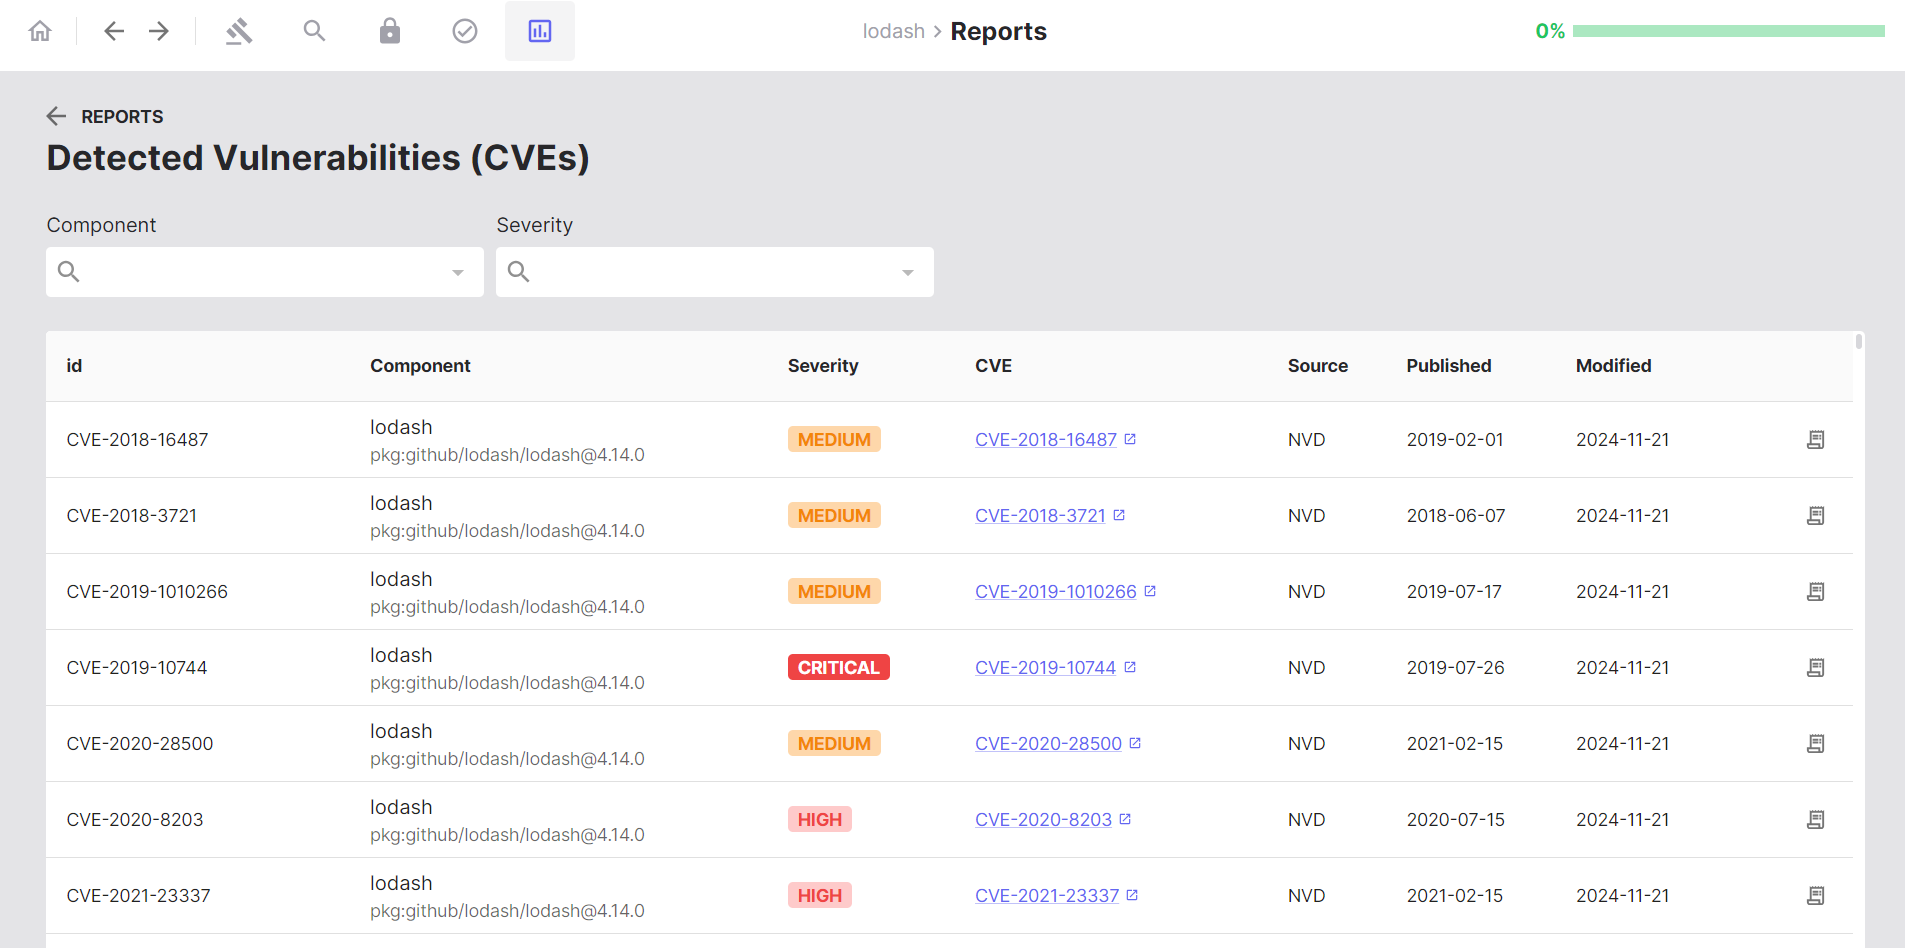
Analyse Vulnerabilities

  1. Navigate to the Reports tab
  2. Click on Vulnerabilities
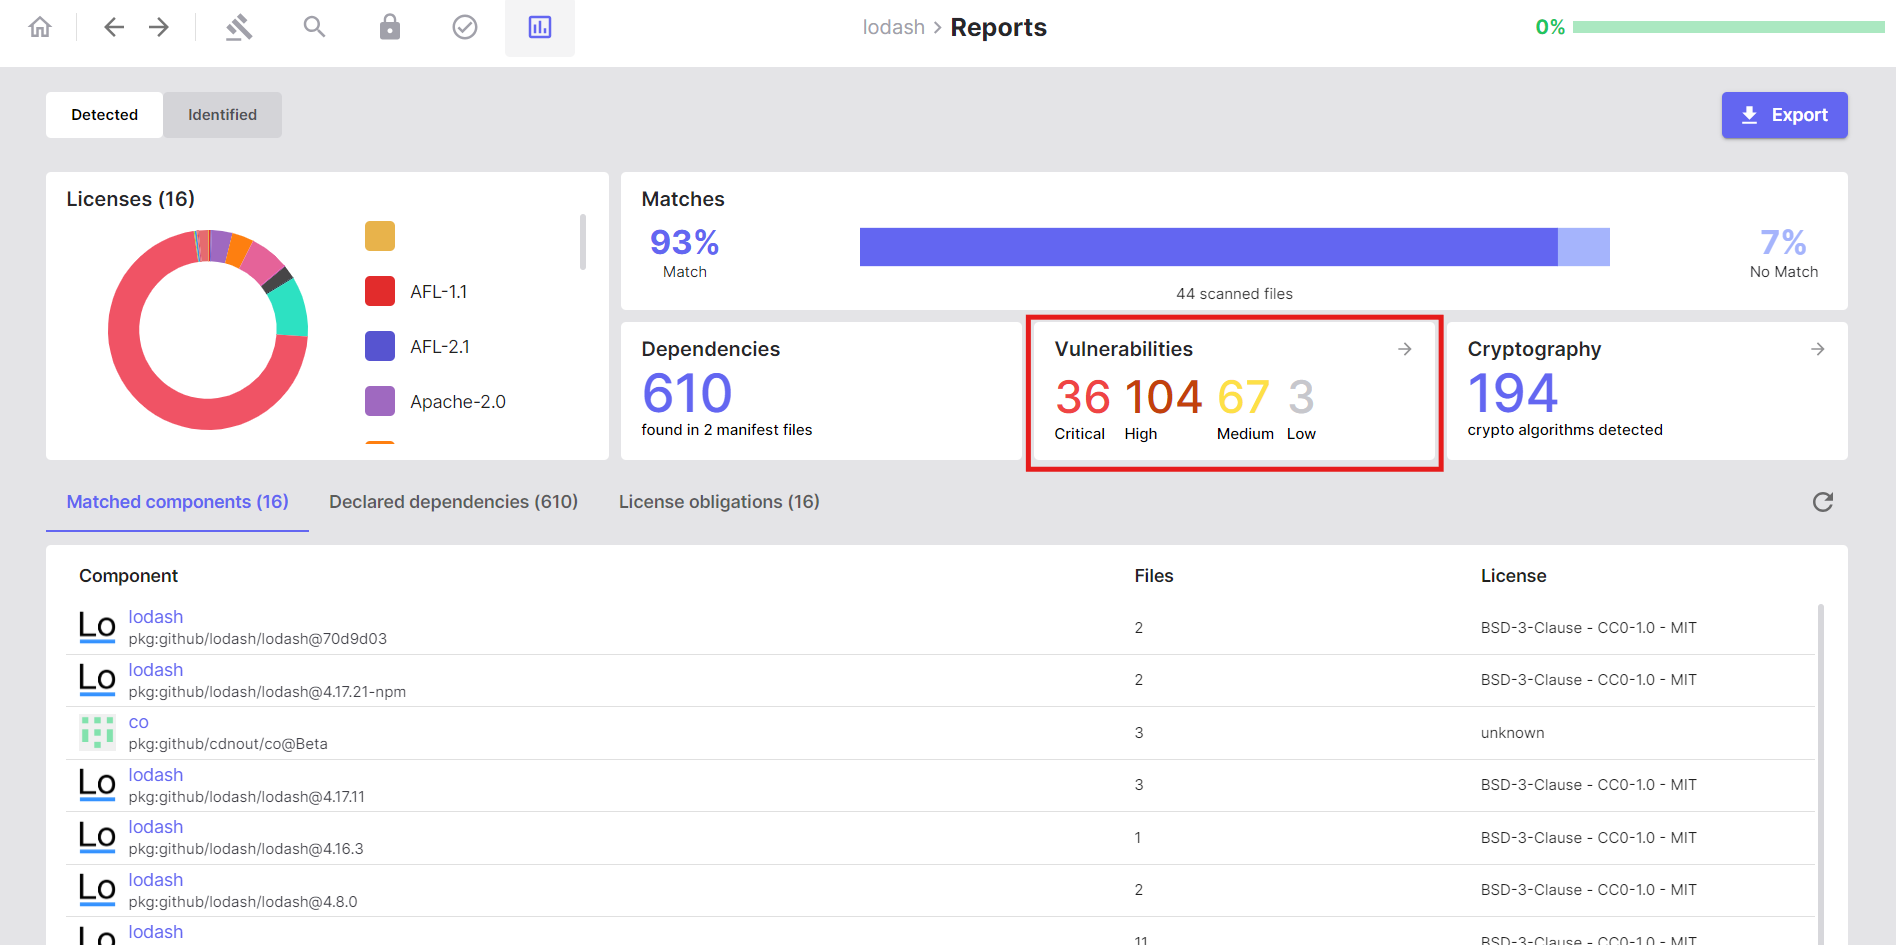
sbom-vulnerabilities The dashboard displays all detected CVEs for your components with:
  • Severity ratings
  • Affected components and versions
  • CVE descriptions and links
sbom-detected-vulnerabilities

Export Comprehensive Reports

After completing your analysis, you can export your scan results by navigating to the Reports tab, clicking Export, and selecting your desired format. For additional details, refer to the following documentation: Need help? Contact our AI assistant