Prerequisites
Before you begin, ensure you have:- GitHub repository with Actions enabled and workflow permissions configured
- SCANOSS API key for enterprise features
If you haven’t completed the Desktop Integration guide yet, we recommend starting there to understand how SCANOSS scanning works before automating it in CI/CD.
Setup GitHub Actions Workflow
GitHub Actions provides automated workflows that run on specific events like pushes and pull requests. We’ll create a workflow that scans your code with SCANOSS on every change.Create a Feature Branch
Open your project in your IDE (for example, VS Code), then open the terminal in your project folder. Make sure your project is initialised with Git. Run this command to create a new branch for the workflow:Create Workflow Directory
GitHub Actions expects workflow files to be stored in a specific location within your project. In the root of your project, create a folder named.github, and inside it, create another folder called workflows.
Create the Workflow File
Create a file namedscanoss.yml in the .github/workflows directory with the following configuration:
- Runs on pull requests to the
mainbranch - Performs a full scan of your repository
- Enforces undeclared and copyleft policies
- Requires a SCANOSS API key (stored as a secret)
Understanding Workflow Triggers
The workflow file above useson: pull_request: branches: [main] to determine when SCANOSS runs. GitHub Actions workflows can be triggered by various events.
Understanding Compliance Policies
The workflow file usespolicies: undeclared,copyleft to enforce compliance rules. SCANOSS can enforce these policies to fail your workflow when issues are detected:
undeclared- Fails if open source components aren’t declared inscanoss.jsoncopyleft- Fails if copyleft-licensed components are detected
scanoss.json file that declares your components.
Configure API Secrets
Your SCANOSS API key should never be hardcoded in your workflow files. Instead, store it securely as a GitHub secret.Add SCANOSS API Key
- Go to your GitHub repository
- Click Settings → Secrets and variables → Actions
- Click New repository secret
- Set the following:
- Name:
SCANOSS_API_KEY - Secret: Your SCANOSS API key
- Name:
- Click Add secret
If you don’t have a SCANOSS API key, you can remove the api.key parameter from the workflow. The action will use the public API.
Trigger Your First Workflow Run
Now that you’ve created your workflow file, let’s commit it and trigger the first scan.Commit and Push Your Changes
Open your terminal and execute the following commands in order:-
Stage your workflow file:
-
Commit the workflow:
-
Update your branch with latest main:
-
Push your branch to GitHub:
Create a Pull Request
- Go to your GitHub repository
- You should see a prompt to “Compare & pull request” for your branch
- Click “Compare & pull request”
- Review the changes and click “Create pull request”
Monitor the Workflow Execution
Once you create the pull request, GitHub Actions will automatically trigger your workflow:- In your pull request, click the “Checks” tab
- You should see your “SCANOSS Scan” workflow running
- Click on the workflow to see real-time progress
- Wait for the workflow to complete
Review Scan Results
After the workflow completes its run, navigate to the Summary page to view detailed scan results.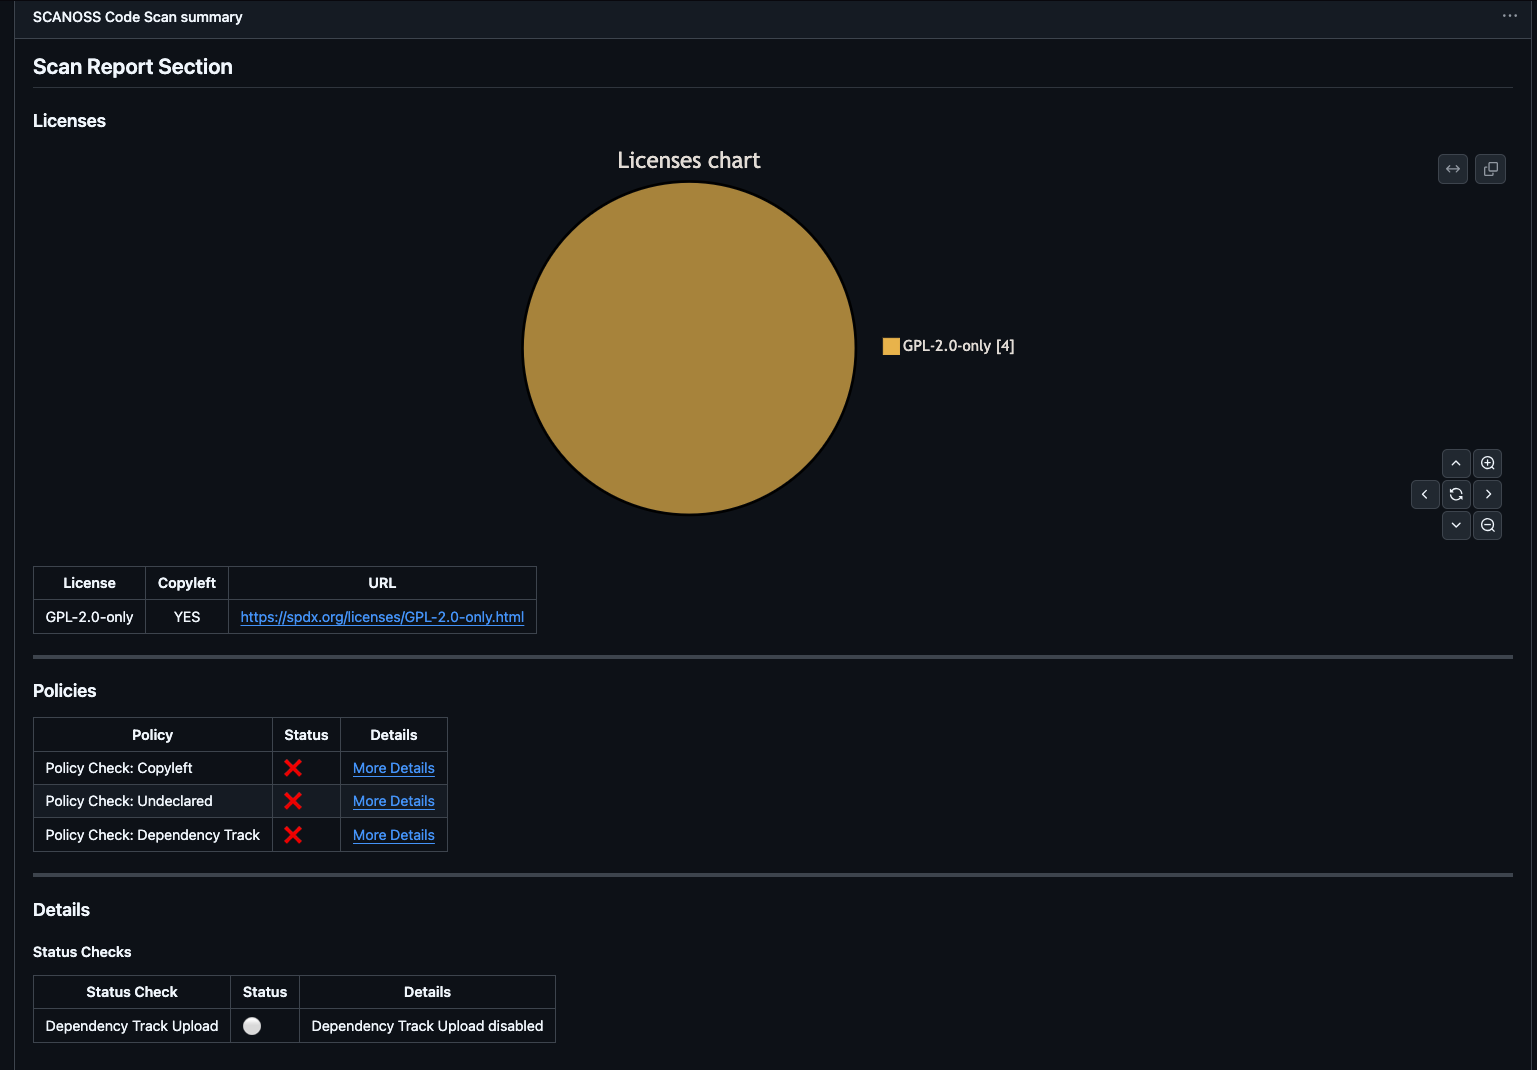
License Distribution
At the top of the Summary page, you’ll find a license pie chart showing the distribution of licenses detected in your project. Below the chart, a detailed table lists each license along with the components associated with it.Policy Compliance
The Policies section shows the outcome of each configured policy check. In this example:- Undeclared Policy: Failed (some components are not declared).
- Copyleft Policy: Failed (copyleft-licensed components detected).
- Dependency Track: Failed
Status Checks
The Details section provides the status of optional integrations, such as Dependency Track, giving additional insight into the scan run.Artifacts
At the bottom of the Summary page, you’ll find the Artifacts section showing all files produced during the workflow run: