Documentation Index
Fetch the complete documentation index at: https://docs.scanoss.com/llms.txt
Use this file to discover all available pages before exploring further.
Overview
Continuous monitoring ensures your applications remain secure and compliant as new vulnerabilities are discovered and dependencies evolve. This guide demonstrates two approaches:
Dependency Track Integration
Dependency Track provides continuous monitoring of your Software Bill of Materials (SBOM) for vulnerabilities, license risks and policy violations.
Prerequisites
Before you begin, ensure you have:
- Completed CI/CD Integration to understand GitHub Actions workflows
- A running Dependency Track instance
- GitHub repository with Actions enabled
- SCANOSS API key
- Dependency Track API key (from Administration → Access Management → Teams → API Keys)
Navigate to your GitHub repository and add the required secrets:
Settings → Secrets and variables → Actions
Click New repository secret and add each of the following:
| Secret Name | Description | Example |
|---|
DT_API_KEY | Dependency Track API key | abc123… |
DT_SERVER_URL | Dependency Track base URL | https://your-dependencytrack-url.com |
SCANOSS_API_KEY | SCANOSS API key | xyz789… |
Create Monitoring Workflow
Open your project in your IDE (for example, VS Code), then open the terminal in your project folder.
If you haven’t already created the .github/workflows directory from the CI/CD Integration guide, create it now:
your-project/
└── .github/
    └── workflows/
.github/workflows/scanoss-monitoring.yml:
name: SCANOSS with Dependency Track

on:
  push:
    branches:
      - "main"
  pull_request:
    branches:
      - "*"

permissions:
  contents: read
  pull-requests: write
  checks: write
  actions: read

jobs:
  scanoss-code-scan:
    name: SCANOSS Code Scan
    runs-on: ubuntu-latest

    steps:
      - name: Checkout code
        uses: actions/checkout@v6

      - name: Run SCANOSS Code Scan
        id: scanoss-code-scan-step
        uses: scanoss/gha-code-scan@v1
        with:
          policies: copyleft, undeclared, dt
          scanMode: "full"
          dependencies.enabled: true
          deptrack.upload: true
          deptrack.url: ${{ secrets.DT_SERVER_URL }}
          deptrack.apikey: ${{ secrets.DT_API_KEY }}
          deptrack.projectname: "my-project"
          deptrack.projectversion: "1.0.0"
          api.key: ${{ secrets.SCANOSS_API_KEY }}

      - name: Print stdout scan command
        run: echo "${{ steps.scanoss-code-scan-step.outputs.stdout-scan-command }}"

      - name: Print Results
        run: cat "${{ steps.scanoss-code-scan-step.outputs.result-filepath }}"
- Event Triggers: Executes on pushes and pull requests for continuous validation
- Automatic Upload: Sends SBOM to Dependency Track for ongoing monitoring
- Policy Enforcement: Validates copyleft, undeclared components, and Dependency Track policies
Commit and Push Workflow
Open your terminal and execute these commands:
# Stage the workflow file
git add .github/workflows/scanoss-monitoring.yml

# Commit the workflow
git commit -m "Add SCANOSS continuous monitoring workflow"

# Push to your repository
git push origin main
Monitor Your Scan
- Go to your GitHub repository
- Click Actions tab
- Select your SCANOSS with Dependency Track workflow
- Monitor the execution
Review Pipeline Summary
After the workflow completes, navigate to the Summary page to review results.
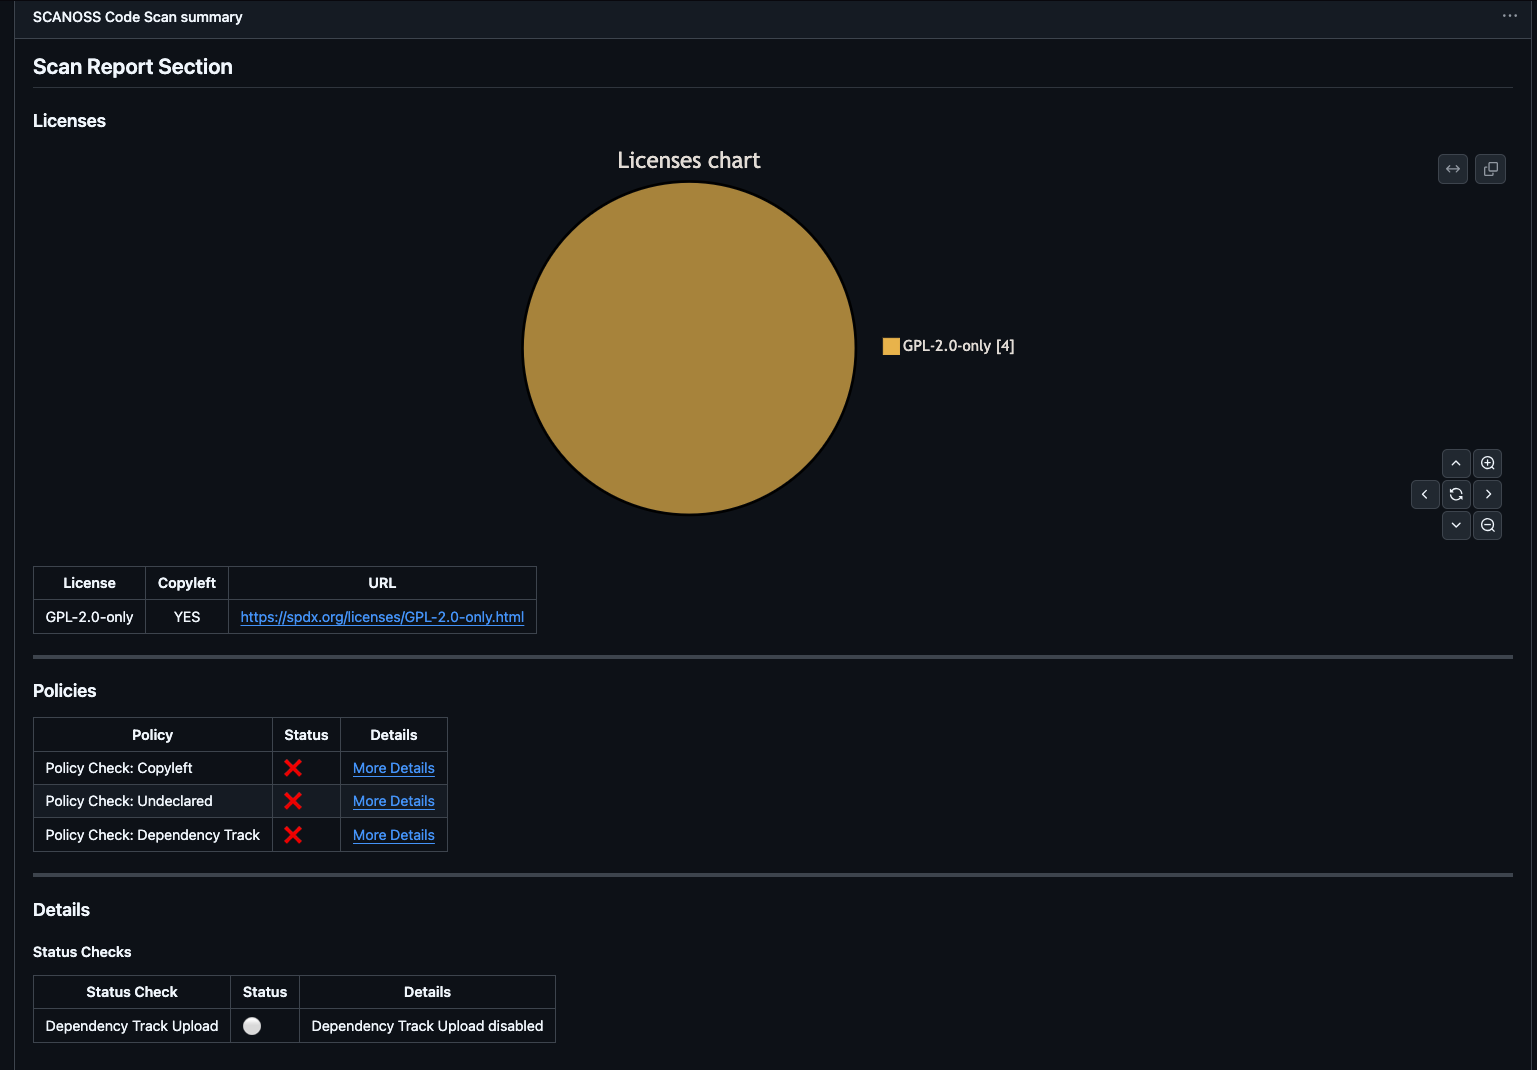 Understanding the Summary:
- Scan Report: License distribution pie chart and detailed license table
- Policies: Compliance check results (copyleft, undeclared, Dependency Track)
- Details: Upload status with direct link to Dependency Track project
- Artifacts: Downloadable reports, SBOMs, and policy results
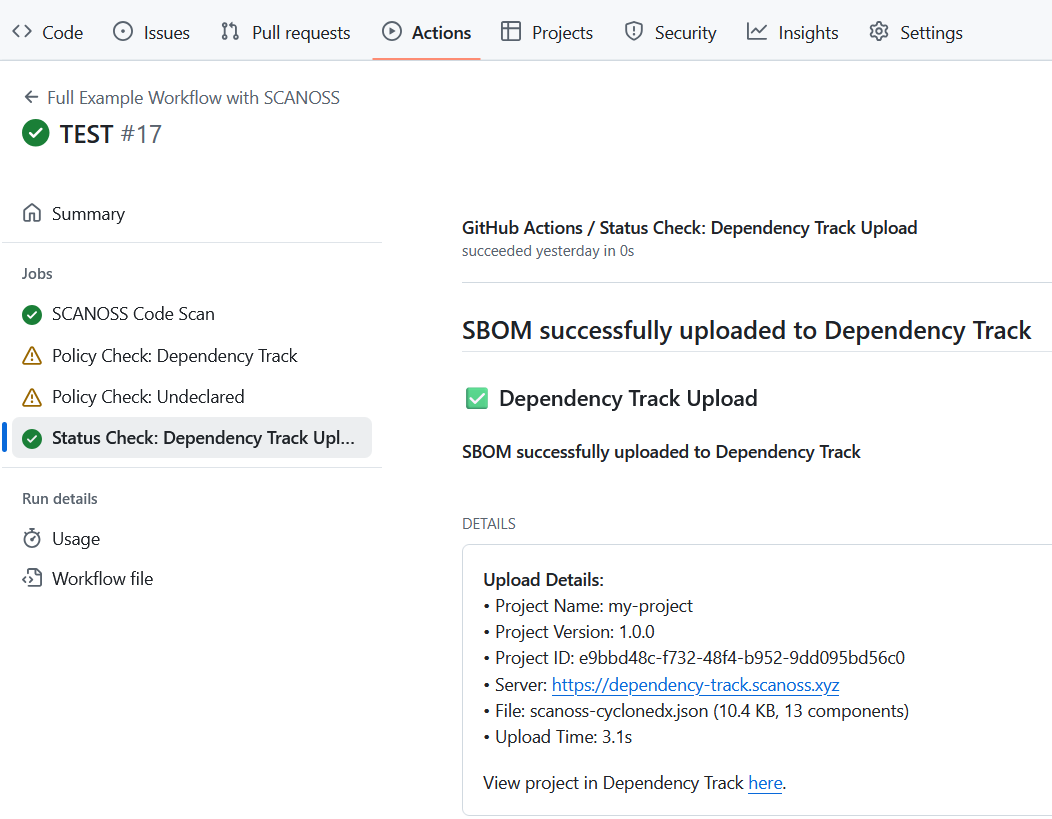
Access Dependency Track Dashboard
Once the scan uploads to Dependency Track, access the full dashboard for deeper analysis.
In the pipeline summary’s Details section, click the View Project link to open your project in Dependency Track.

Explore Dashboard Sections
The Dependency Track dashboard provides several key views for managing your open-source dependencies:
- Components: Complete inventory of detected components with their licenses, versions, and risk scores
- Dependency Graph: Visual representation of direct and transitive dependency relationships
- Audit Vulnerabilities: List of all components with known security vulnerabilities, organized by severity
Manage Vulnerabilities
Click on any vulnerability to open its details panel and assess its actual risk.
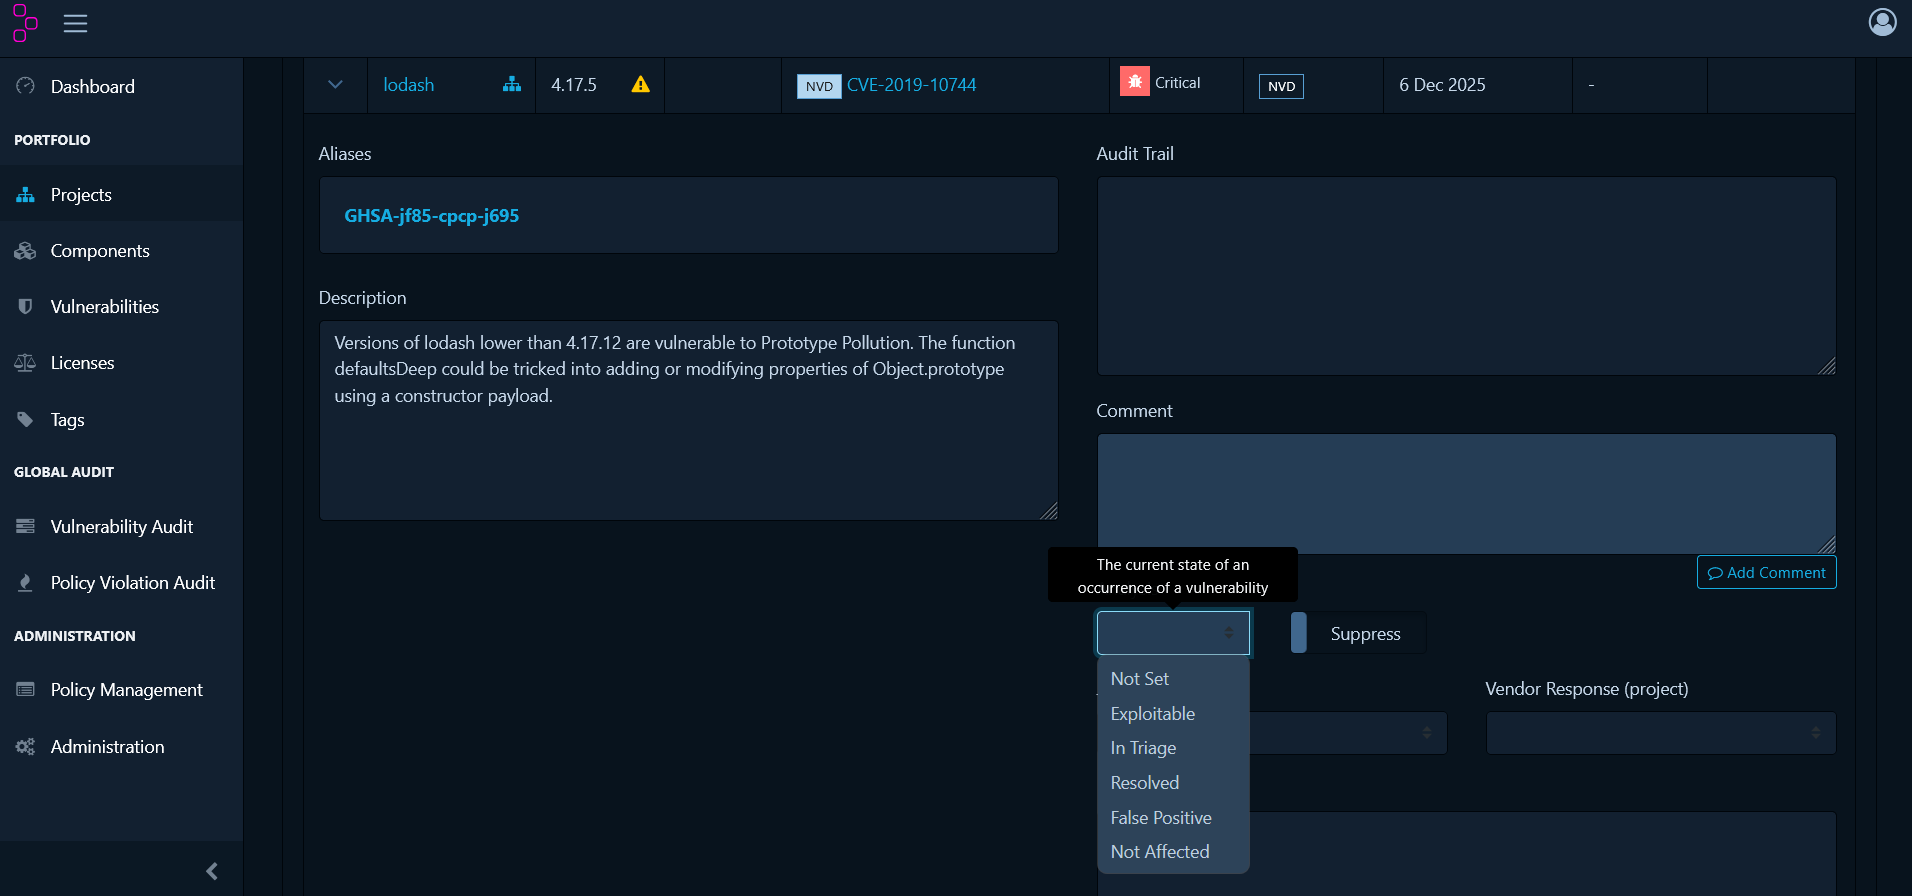 Analysis States:
- Not Set - Default state requiring review
- Exploitable - Confirmed risk to your application
- In Triage - Currently under investigation
- False Positive - Doesn’t apply to your usage
- Not Affected - Your configuration isn’t vulnerable
- Resolved - Fixed (usually by upgrading)
To Manage a Vulnerability:
- Click the vulnerability in the Audit Vulnerabilities tab
- Review the CVE details, affected versions and remediation advice
- Select an analysis state from the dropdown
- Add a comment explaining your decision
- Click Save
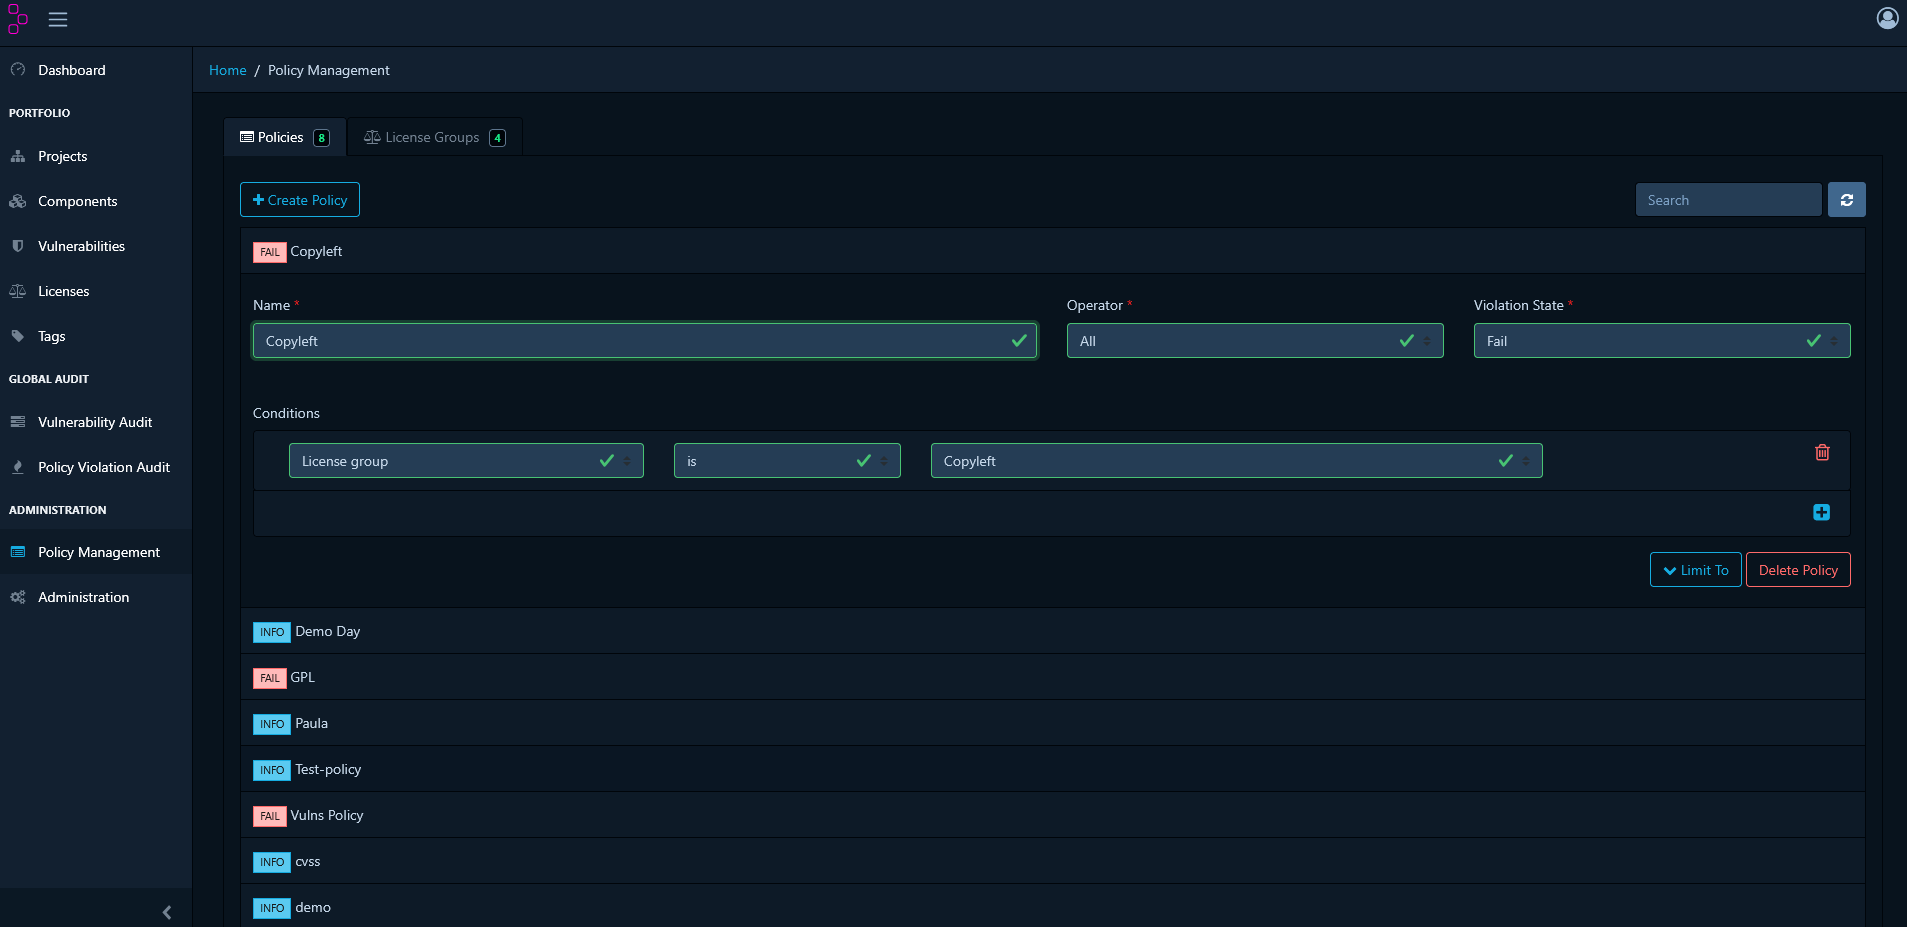
Define Organisational Policies
While vulnerability management handles security threats reactively, policy management takes a proactive approach by defining rules that automatically identify compliance issues.
Navigate to Policy Management from the main menu to create policies.
Create License Policies
Block Specific Licenses:
- Click Create Policy
- Add a Condition and select License
- Choose the specific license to block (e.g., GPL-3.0)
- Set violation state to FAIL
- Save the policy
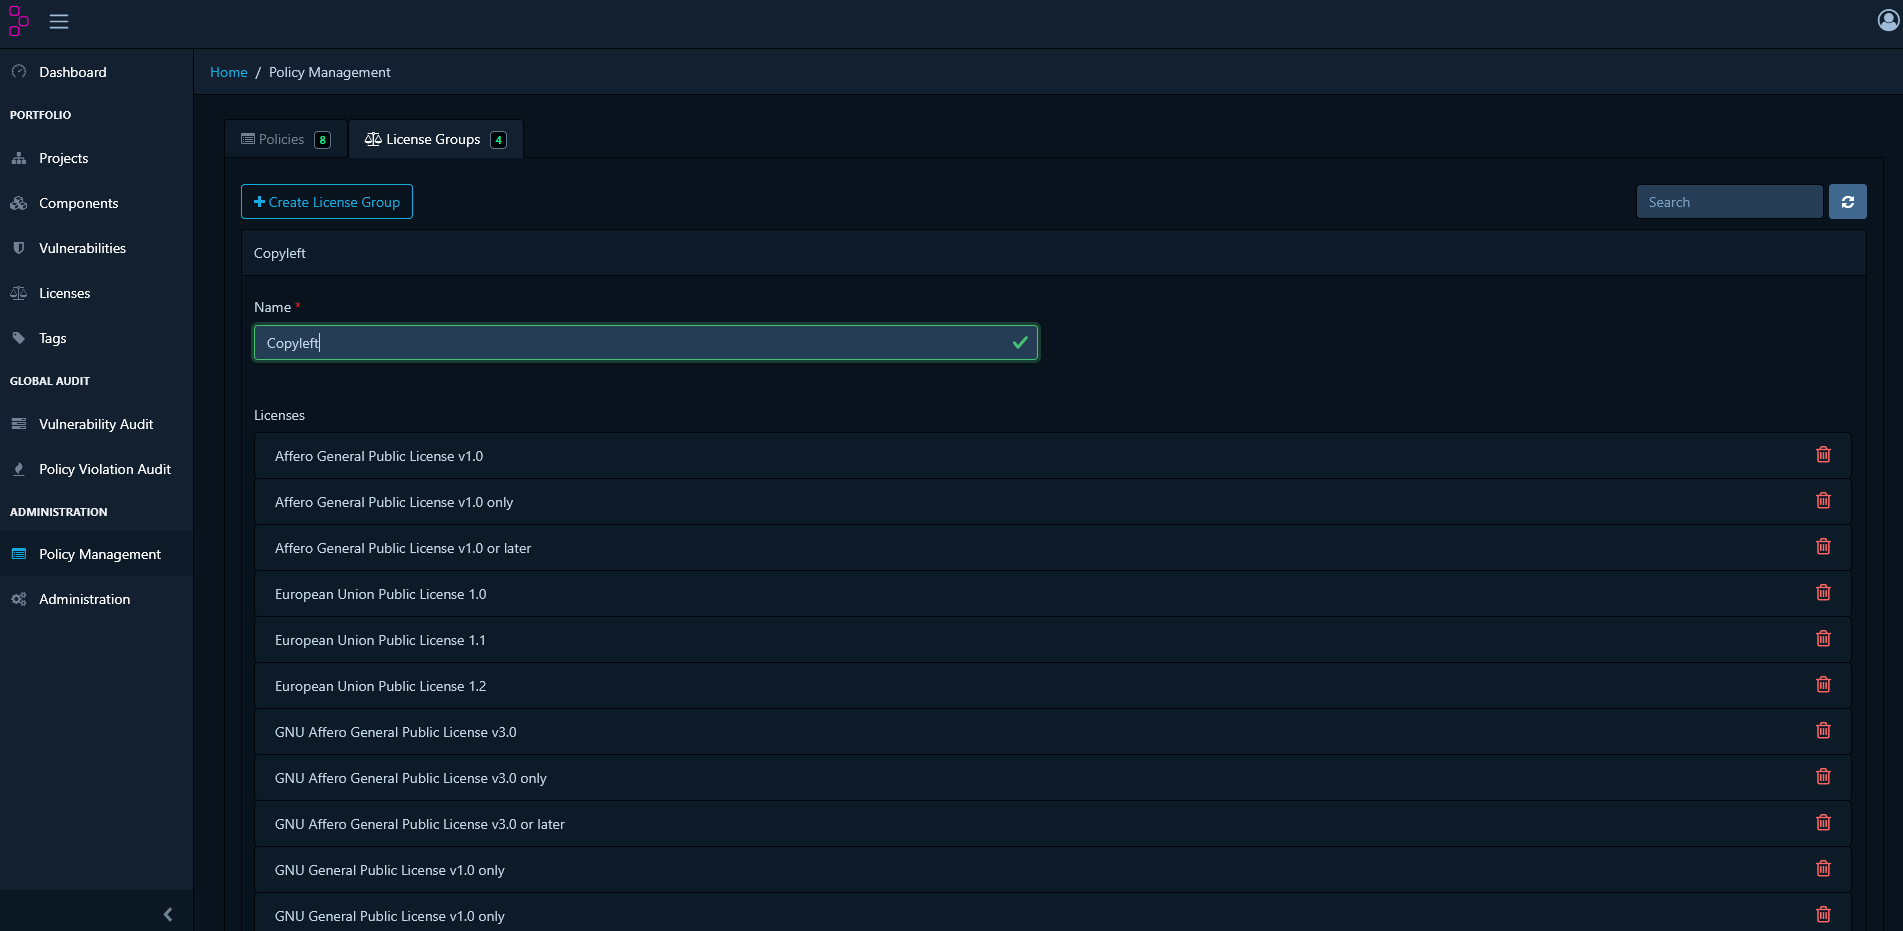
Block License Groups:
For broader control, create license groups:
- Go to License Groups tab
- Click Create License Group
- Name it (e.g., “Copyleft Licenses”)
- Add licenses: GPL-2.0, GPL-3.0, AGPL-3.0
- Save the group
 Then create a policy using the group:
- Create Policy → Add Condition
- Select License Group
- Choose your license group
- Set violation state
- Save the policy
Create Vulnerability Policies
Flag High-Severity Vulnerabilities:
- Click Create Policy
- Add a Condition and select Severity
- Select severity levels: CRITICAL, HIGH
- Set violation state to FAIL
- Save the policy
Block Specific CVEs:
- Click Create Policy
- Add a Condition and select Vulnerability ID
- Enter CVE identifier (e.g., CVE-2024-1234)
- Set violation state to FAIL
- Save the policy
Create Component Age Policies
Flag outdated components that may lack security updates:
- Click Create Policy
- Add a Condition and select Age
- Set operator to greater than
- Specify age threshold in days
- Set violation state to WARN
- Save the policy
Review Policy Violations
Navigate to your project’s Policy Violations tab to see all policy breaches:
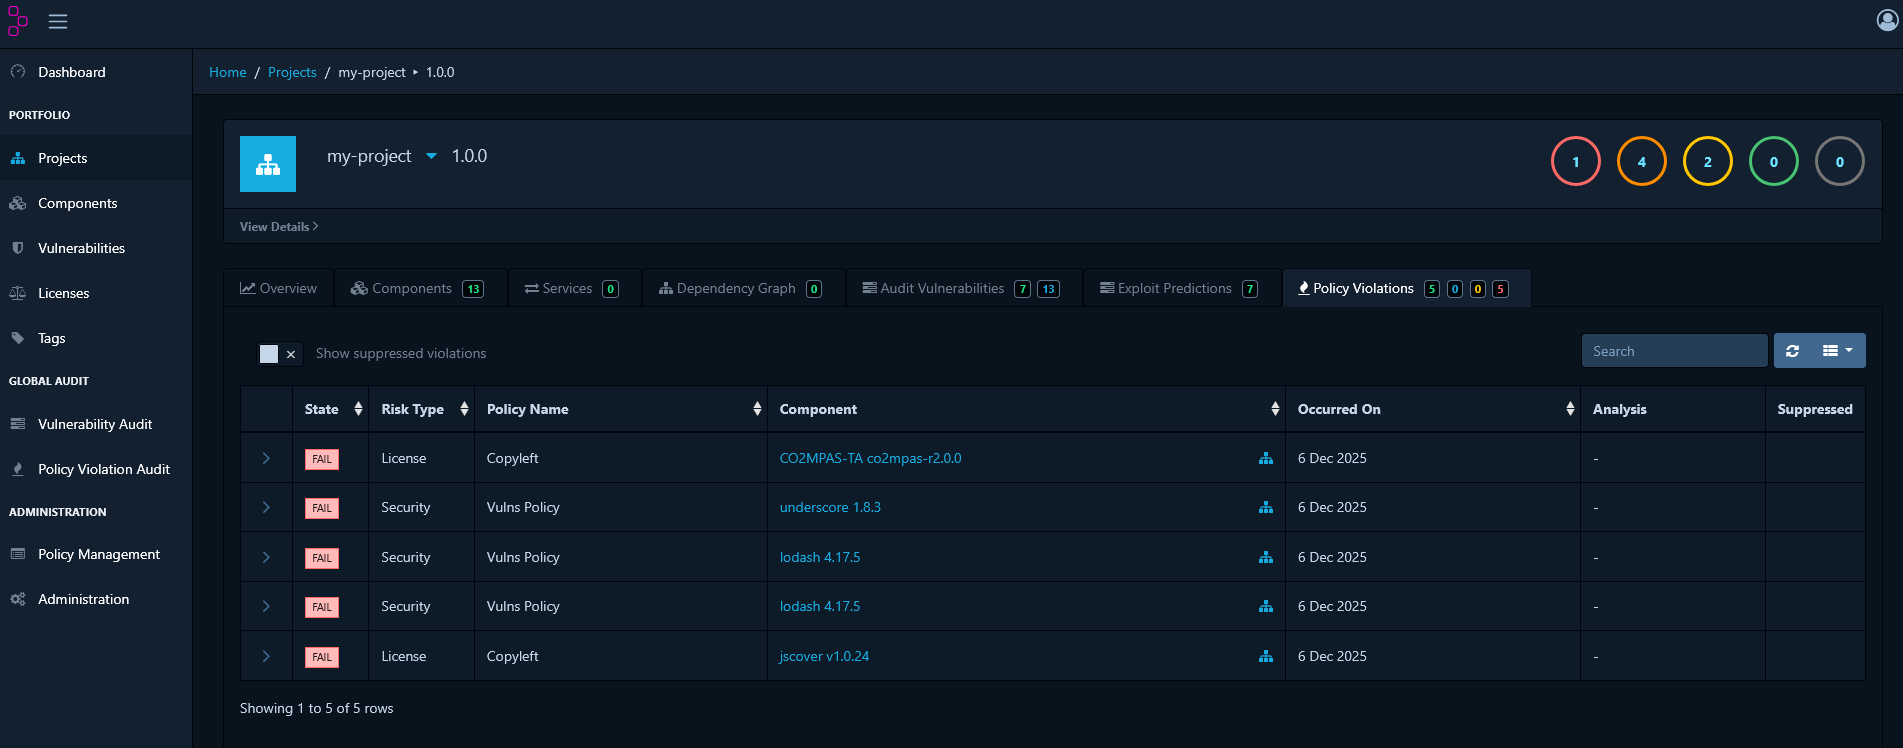 Violation States:
- INFO - Informational only, doesn’t block releases
- WARN - Requires review before release
- FAIL - Must be resolved before release
Triage Policy Violations
When a violation is technically accurate but acceptable in your context:
- Navigate to Policy Violations tab
- Select the violation to triage
- Click Analysis
- Select an analysis state:
- Not Set - No decision made yet
- Approved - Reviewed and accepted as known exception
- Rejected - Not accepted, requires remediation
- Add a comment explaining the justification
- Save your decision
Triaged violations remain visible for audit purposes but no longer block releases when marked as Approved.
ORT Integration
OSS Review Toolkit (ORT) is an enterprise-grade FOSS policy automation and orchestration toolkit.
Prerequisites
Before you begin, ensure you have:
- Java: JDK 21 or later
- Git
- SCANOSS API key
- A shell environment:
- Windows: PowerShell, Command Prompt, or Git Bash
- macOS/Linux: Terminal (Bash/Zsh)
- A text editor of your choice (VS Code, Notepad++, nano, vim, etc.)
Install ORT
For Windows:
# Clone ORT repository
git clone https://github.com/oss-review-toolkit/ort.git
cd ort

# Build ORT using Gradle
.\gradlew.bat installDist

# Add ORT to your PATH (temporarily for this session)
$env:PATH = "$PWD\cli\build\install\ort\bin;$env:PATH"

# To add permanently, use System Properties > Environment Variables
# Or add to your PowerShell profile:
# notepad $PROFILE
# Add this line to the profile:
# $env:PATH = "C:\path\to\ort\cli\build\install\ort\bin;$env:PATH"

# Verify installation
ort --help
- Variable name:
JAVA_OPTS
- Variable value:
-Xmx8g
Or set temporarily in PowerShell:
$env:JAVA_OPTS = "-Xmx8g"
# Clone ORT repository
git clone https://github.com/oss-review-toolkit/ort.git
cd ort

# Build ORT using Gradle
./gradlew installDist

# Configure Java memory (8GB recommended)
echo 'export JAVA_OPTS="-Xmx8g"' >> ~/.bashrc
source ~/.bashrc

# Add ORT to your PATH
echo "export PATH=\"$(pwd)/cli/build/install/ort/bin:\$PATH\"" >> ~/.bashrc
source ~/.bashrc

# Verify installation
ort --help
# Create config directory
New-Item -ItemType Directory -Force -Path "$env:USERPROFILE\.ort\config"

# Create configuration file using your preferred text editor
# For example, using Notepad:
notepad "$env:USERPROFILE\.ort\config\config.yml"

# Or using VS Code if installed:
# code "$env:USERPROFILE\.ort\config\config.yml"
config.yml:
ort:
  scanner:
    scanners:
      SCANOSS:
        options:
          apiUrl: "https://api.scanoss.com"
        secrets:
          apiKey: "your-scanoss-api-key-here"
your-scanoss-api-key-here with your actual SCANOSS API key.
For macOS/Linux:
# Create config directory
mkdir -p ~/.ort/config

# Create configuration file using your preferred text editor
# Options include: nano, vim, code (VS Code), or any text editor
nano ~/.ort/config/config.yml

# Or use cat to create the file directly:
cat > ~/.ort/config/config.yml << 'EOF'
ort:
  scanner:
    scanners:
      SCANOSS:
        options:
          apiUrl: "https://api.scanoss.com"
        secrets:
          apiKey: "your-scanoss-api-key-here"
EOF
your-scanoss-api-key-here with your actual SCANOSS API key.
Analyse Your Project
Navigate to your project directory and run the analyser:
# Navigate to your project
cd /path/to/your/project

# Run dependency analysis
ort analyze -i . -o ort-results
Scan with SCANOSS
Run SCANOSS scanner through ORT:
# Scan for licenses and vulnerabilities
ort scan --ort-file ort-results/analyzer-result.yml --output-dir ort-results --scanners SCANOSS
Define Policy Rules
Create custom compliance policies using ORT’s policy rules.
For Windows:
# Create policy rules file using your preferred text editor
# For example, using Notepad:
notepad "$env:USERPROFILE\.ort\config\rules.kts"

# Or using VS Code if installed:
# code "$env:USERPROFILE\.ort\config\rules.kts"
rules.kts:
/**
 * Minimal ORT Policy Rules
 */

import org.ossreviewtoolkit.model.*

ruleSet(ortResult, licenseInfoResolver) {
    // Simple rule: warn about packages without declared licenses
    packageRule("DECLARED_LICENSE_CHECK") {
        require {
            pkg.metadata.declaredLicenses.isNotEmpty()
        }

        warning(
            message = "Package ${pkg.metadata.id.toCoordinates()} has no declared license",
            howToFix = "Add license information to the package"
        )
    }
}
# Create policy rules file using your preferred text editor
# Options include: nano, vim, code (VS Code), or any text editor
nano ~/.ort/config/rules.kts

# Or use cat to create the file directly:
cat > ~/.ort/config/rules.kts << 'EOF'
/**
 * Minimal ORT Policy Rules
 */

import org.ossreviewtoolkit.model.*

ruleSet(ortResult, licenseInfoResolver) {
    // Simple rule: warn about packages without declared licenses
    packageRule("DECLARED_LICENSE_CHECK") {
        require {
            pkg.metadata.declaredLicenses.isNotEmpty()
        }

        warning(
            message = "Package ${pkg.metadata.id.toCoordinates()} has no declared license",
            howToFix = "Add license information to the package"
        )
    }
}
EOF
Run Evaluation
For macOS/Linux:
# Evaluate policies
ort evaluate \
  --ort-file ort-results/scan-result.yml \
  --output-dir ort-results \
  --rules-file ~/.ort/config/rules.kts

# Generate report with evaluation
ort report \
  --ort-file ort-results/evaluation-result.yml \
  --output-dir ort-results \
  --report-formats StaticHtml
# Evaluate policies
ort evaluate `
  --ort-file ort-results/scan-result.yml `
  --output-dir ort-results `
  --rules-file "$env:USERPROFILE\.ort\config\rules.kts"

# Generate report with evaluation
ort report `
  --ort-file ort-results/evaluation-result.yml `
  --output-dir ort-results `
  --report-formats StaticHtml
rem Evaluate policies
ort evaluate ^
  --ort-file ort-results/scan-result.yml ^
  --output-dir ort-results ^
  --rules-file "%USERPROFILE%\.ort\config\rules.kts"

rem Generate report with evaluation
ort report ^
  --ort-file ort-results/evaluation-result.yml ^
  --output-dir ort-results ^
  --report-formats StaticHtml
Generate Compliance Reports
Generate comprehensive reports in multiple formats:
# Generate HTML report
ort report \
  --ort-file ort-results/evaluation-result.yml \
  --output-dir ort-results \
  --report-formats StaticHtml

# Generate SPDX SBOM
ort report \
  --ort-file ort-results/evaluation-result.yml \
  --output-dir ort-results \
  --report-formats SpdxDocument

# Generate CycloneDX SBOM
ort report \
  --ort-file ort-results/evaluation-result.yml \
  --output-dir ort-results \
  --report-formats CycloneDx

# Generate all formats at once
ort report \
  --ort-file ort-results/evaluation-result.yml \
  --output-dir ort-results \
  --report-formats StaticHtml,SpdxDocument,CycloneDx
View Reports
Open the generated HTML report in your browser:
For Windows:
# PowerShell
Start-Process ort-results\scan-report-web-app.html

# Command Prompt
start ort-results\scan-report-web-app.html
open ort-results/scan-report-web-app.html
xdg-open ort-results/scan-report-web-app.html